


|
|
|
Heat Riser |
Post Reply 
|
Page 123> |
| Author | |
westforkboyd 
Member 
Sponsor Member Joined: 07 Sep. 2006 Location: Northern Iowa Status: Offline Points: 3514 |
 Post Options Post Options
") Thanks(0) Thanks(0)
 Quote Reply Quote Reply
 Topic: Heat Riser Topic: Heat RiserPosted: 19 Aug. 2009 at 1:47am |
|
The heat riser has been frozen/rusted in both my 2As. Two years of PB'ing and tapping to no effect. Luckily neither of them have broken from my efforts. Stopped just short of hammering the counter weight until it broke.
While up at Gary's we talked about it. Gary saw my frustration and just before the tears started to flow graciously offered one of his manifolds; cleaned, painted, and an operating heat riser! Thank you again my friend.
I had mine apart except for the rod and flapper so had two sets of parts to work with. Thought this might help someon else, show how it goes together, and works. It is assembled temporarily so the inner workings are visible as the manifold needs to be apart to see it.
Here's the manifold with rod and flapper. I chisled a line on the shaft to indicate the open position. Maybe not needed now but thought it might help in the future.
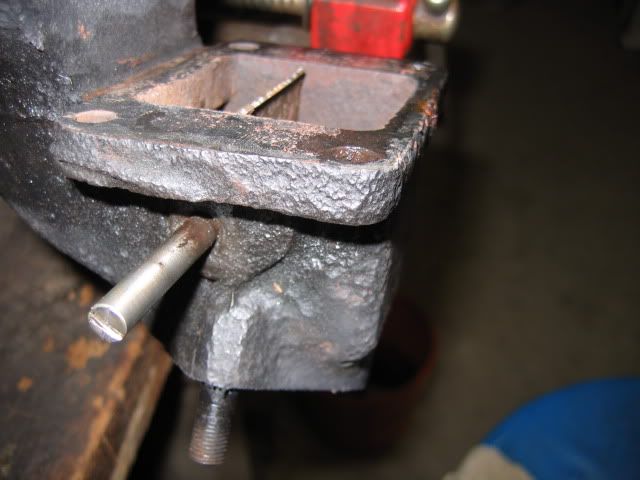 The faint scribe line is barely visible at almost right angles to the slot.
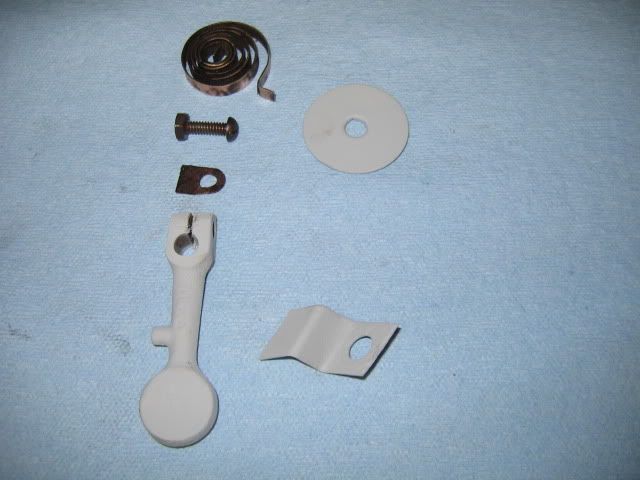
Here are all the parts for the assembly.
 Now I hope this is together correctly. If not one of the reasons this is posted is someone to help me get it right.
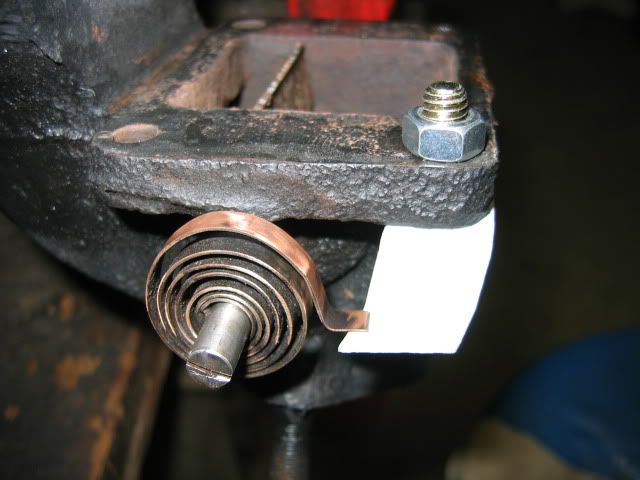
Here's the bi-metal spring and stop assembled. Note the position of the flapper....Open...Its heating the intake in this position.
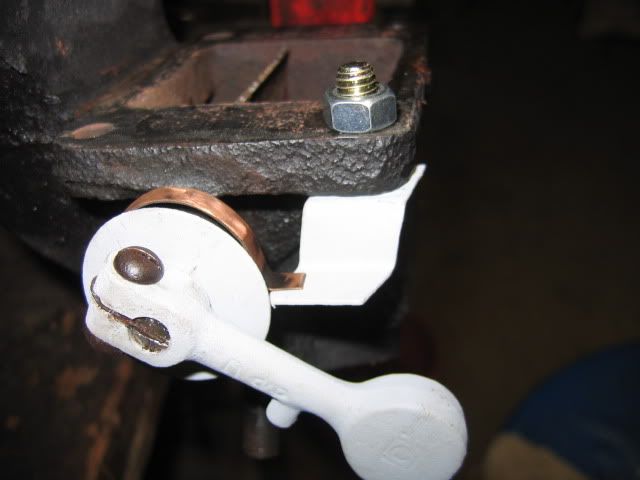
 Now the rest of the assembly: The round reflector, counterweight with the centering piece in the slot, and the screw and nut in place. With the counterweight in the "down" position the flap is open and the intake is being heated.
 As the engine warms the bi-metal spring
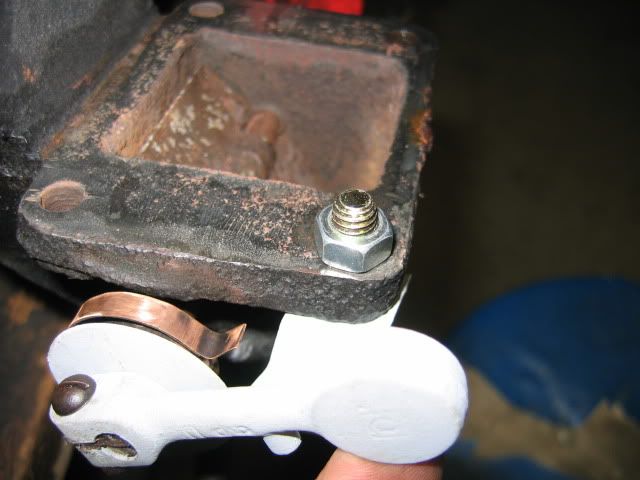 Let me know if I have this right or wrong. Hope this will help others as it's been rather confusing to me until now. By showing its operation while the manifolds are split one can see the flaps relationship to the counterweight and whats going on as it heats.
WFB Edited by westforkboyd - 10 Sep. 2009 at 5:35am |
|
|
'48 CJ-2A #184135 Lefty
'49 CJ-2A #219719 Mule '39 Ford 9N '55 Oliver Super 55 Ollybelle |
|
 |
|
|
jeepdaddybrian
Member

Joined: 15 Oct. 2007 Location: fruitland, md Status: Offline Points: 476 |
Post Options
Thanks(0)
Quote Reply
Posted: 19 Aug. 2009 at 10:56am |
|
its funny, i was just thinking about this the other day. this is exactly what i needed to know. your knowledge has been very useful!
|
|
|
|
|
softdraw
Member
Joined: 15 Mar. 2009 Location: White Oak, TX Status: Offline Points: 348 |
Post Options
Thanks(0)
Quote Reply
Posted: 19 Aug. 2009 at 12:50pm |
|
Fantastic information! Good effort and thanks much. I had no idea what it looked like in there. I'll be checking out mine today to see what position it is stuck in.
|
|
|
|
|
maesjeroen
Member
Joined: 16 May 2008 Status: Offline Points: 78 |
Post Options
Thanks(0)
Quote Reply
Posted: 21 Aug. 2009 at 9:35am |
|
The heatriser is a nice part, but when you have problems, just hang the counterweight in the top position by an iron wire, so the exhaust is free open. The heatriser is only to warm up the engine faster. Better full open then half closed. During summer i have it always in the open position.
Jeroen
|
|
|
GPW 71336 1942
http://www.surfacezero.com/g503/showgallery.php?cat=1013 |
|
|
|
|
Solar
Member
Joined: 26 Aug. 2009 Status: Offline Points: 7 |
Post Options
Thanks(0)
Quote Reply
Posted: 08 Sep. 2009 at 10:27pm |
|
I think that your description is wrong. I will get back to you soon...
|
|
|
|
|
rodfrey
Member
Joined: 25 July 2008 Location: North Newton,KS Status: Offline Points: 153 |
Post Options
Thanks(0)
Quote Reply
Posted: 09 Sep. 2009 at 8:39pm |
|
WFB,
There was a thread nearly identical to this a month or so back. I know because I posted the question. Run a search to identify other links and photos and illustrations. Chalk it up to an aging memory but I can't remember the "key words" that might facilitate the search. Second, the bimetallic spring was positioned differently from yours but consistent with springs illustrated by other owners. So, after I got my heat riser assembled (the manifold wasn't on the engine) I tested it by heating the bimetallic spring with a low flame on a propane torch. Worked great. |
|
|
Rodney Frey
48 CJ2A |
|
|
|
|
rodfrey
Member
Joined: 25 July 2008 Location: North Newton,KS Status: Offline Points: 153 |
Post Options
Thanks(0)
Quote Reply
Posted: 09 Sep. 2009 at 8:44pm |
|
WFB,
Check out this link on the G503 (military Jeep) forum. http://www.g503.com/forums/viewtopic.php?t=75996&start=0 |
|
|
Rodney Frey
48 CJ2A |
|
|
|
|
samcj2a
Member
Sponsor Member x 5 Joined: 21 Oct. 2006 Location: Arlington, VA Status: Offline Points: 8549 |
Post Options
Thanks(0)
Quote Reply
Posted: 09 Sep. 2009 at 9:06pm |
|
Allen,
___ ( ) ----------- stop You have it like this ( )_____ ----------- stop Hope you get the idea of my primitive symbolic sketch. Edit: All wrong - don't be mislead!  Edited by samcj2a - 10 Sep. 2009 at 1:27am |
|
|
|
|
samcj2a
Member
Sponsor Member x 5 Joined: 21 Oct. 2006 Location: Arlington, VA Status: Offline Points: 8549 |
Post Options
Thanks(0)
Quote Reply
Posted: 09 Sep. 2009 at 9:11pm |
|
It looks like my notion is different than was posted on the G.
 I suppose I need to be looking at one that works before I blurt out an idea.  Edited by samcj2a - 09 Sep. 2009 at 9:12pm |
|
|
|
|
samcj2a
Member
Sponsor Member x 5 Joined: 21 Oct. 2006 Location: Arlington, VA Status: Offline Points: 8549 |
Post Options
Thanks(0)
Quote Reply
Posted: 09 Sep. 2009 at 9:26pm |
|
To slightly redeem myself, here's an illustration from Sean's Parts List.
 IOW, I think you have it installed as it should be. Edited by samcj2a - 09 Sep. 2009 at 9:27pm |
|
|
|
|
westforkboyd
Member
Sponsor Member Joined: 07 Sep. 2006 Location: Northern Iowa Status: Offline Points: 3514 |
Post Options
Thanks(0)
Quote Reply
Posted: 09 Sep. 2009 at 10:26pm |
|
Sam and Rod
One of the reasons I posted this set up was because I wasn't exactly sure how it was supposed to be. I looked at a link you had posted a while back Sam. It was on the G. I also looked at Lefty's as that hasn't been tinkered with although it is frozen. I think the critical thing is the spring is to be wound clockwise (Which it is......I think
Your photo is not showing up for me Sam. It is suggested on the G to heat up the spring with a propane torch to see that it is working.
The one thing I did learn is when the counterweight is in the down position it is open to the intake manifold. My original one was frozen down and so is Lefty. So it's always heating. I liked maesjouren's? suggestion to wire it up during the summer. Then if it freezes it is going straight out the exhaust.
I think I have it right as I did some research prior to posting this thread but if not I certainly don't want to confuse the issue with bad information.
WFB
OK I do see a difference between the photo of the incomplete one and the drawing of the assembly on the G. One is a half turn different than the other. Both are wound clockwise. Mine is like the drawing. I'm not sure if that half turn would make a difference. My spacial perceptions are lacking. What do you think? Edited by westforkboyd - 09 Sep. 2009 at 10:42pm |
|
|
'48 CJ-2A #184135 Lefty
'49 CJ-2A #219719 Mule '39 Ford 9N '55 Oliver Super 55 Ollybelle |
|
|
|
|
samcj2a
Member
Sponsor Member x 5 Joined: 21 Oct. 2006 Location: Arlington, VA Status: Offline Points: 8549 |
Post Options
Thanks(0)
Quote Reply
Posted: 09 Sep. 2009 at 10:39pm |
|
Looks as though whoever is hosting Sean's site is having some issues now. I predict the illustration will show up shortly. You may need to refresh the page when you come back since now the "can't load" page displays for the site. Edit: Now it is back.
Edited by samcj2a - 09 Sep. 2009 at 10:39pm |
|
|
|
|
westforkboyd
Member
Sponsor Member Joined: 07 Sep. 2006 Location: Northern Iowa Status: Offline Points: 3514 |
Post Options
Thanks(0)
Quote Reply
Posted: 09 Sep. 2009 at 10:47pm |
|
Yeah I can see now Sam
But really can't tell from that illustration about the half turn. Think I will take a closer look at Lefty's to be sure. Work, work, work.
WFB
|
|
|
'48 CJ-2A #184135 Lefty
'49 CJ-2A #219719 Mule '39 Ford 9N '55 Oliver Super 55 Ollybelle |
|
|
|
|
dwloop
Member
Joined: 10 Feb. 2009 Location: St. louis, MO Status: Offline Points: 290 |
Post Options
Thanks(0)
Quote Reply
Posted: 09 Sep. 2009 at 10:53pm |
|
Guys, I redid mine recently with the rebuild and went through this very discovery. It works as it should I believe, I will try to get a pic tonight if it would help....
Dave
|
|
|
80 CJ7 401
76 CJ5 360 46 CJ2A #45208 All works in progress, or regress depending on your view... |
|
|
|
|
lowenuf
Member

Sponsor Member x 2 Joined: 29 Aug. 2006 Location: Ohio Status: Offline Points: 9122 |
Post Options
Thanks(0)
Quote Reply
Posted: 09 Sep. 2009 at 11:06pm |
|
i will try to explain this in layman's terms, since it baffles me until i actually install them...
here we go....
the arm in the "cold" position should be pointing to the 4 o'clock position, looking at it from the from of the front of the vehicle....
the "warm" position will be at 2 o'clock.......
when the spring is cold, it is constricted (wind inwards), as it heats up, it will
you need to orientate the spring against the stop, so that as it heats up, and unwinds, it rotates the lever counterclockwise upwards....
both #749 and #910 have the spring tip under the stop, with the arm indexed by the slot in the shaft and the tab insert that goes into the end of the shaft...
both point at 4 o'clock cold, and 2 o'clock at operating temp... Edited by lowenuf - 09 Sep. 2009 at 11:10pm |
|
|
45 #10012
45 #10033 ACM #47 45 #10163 ACM #188 57 CJ5 Dauntless V6, T-18 4-speed, D-44 rear/D-30 front, D-20 twin stick |
|
|
|
|
westforkboyd
Member
Sponsor Member Joined: 07 Sep. 2006 Location: Northern Iowa Status: Offline Points: 3514 |
Post Options
Thanks(0)
Quote Reply
Posted: 09 Sep. 2009 at 11:16pm |
|
Low
One thing I am sure about is the spring should sit on top of the stop. See page 23 of the owners manual. It clearly states the spring should be assembled above the metal stop and is shown that way in the illustration (fig. 9 Heat Control Valve). Otherwise I agree with your explanation and the orientation of the counterweight in the open and closed position.
WFB
|
|
|
'48 CJ-2A #184135 Lefty
'49 CJ-2A #219719 Mule '39 Ford 9N '55 Oliver Super 55 Ollybelle |
|
|
|
|
lowenuf
Member
Sponsor Member x 2 Joined: 29 Aug. 2006 Location: Ohio Status: Offline Points: 9122 |
Post Options
Thanks(0)
Quote Reply
Posted: 09 Sep. 2009 at 11:29pm |
|
i will see what happens when i switch the position of mine...i know on one vehicle, it is so loose it just flops around, and holds no tension, and it is a new spring..
|
|
|
45 #10012
45 #10033 ACM #47 45 #10163 ACM #188 57 CJ5 Dauntless V6, T-18 4-speed, D-44 rear/D-30 front, D-20 twin stick |
|
|
|
|
westforkboyd
Member
Sponsor Member Joined: 07 Sep. 2006 Location: Northern Iowa Status: Offline Points: 3514 |
Post Options
Thanks(0)
Quote Reply
Posted: 09 Sep. 2009 at 11:45pm |
|
Well...went out and looked at Lefty can't tell without taking the counterweight and the reflector off to see the start position. It's about the half turn starting position differerance from the drawing or the photo on the gee. I can certainly edit and put up a different photo of the starting position if we can decide what is correct. I really don't think it matters as far as operation is concerned as long as its wound clockwise. But if someone has evidence of original starting spot I'll make the changes necessary. Really don't want to take Lefty's apart right now but I do believe the answer is there.
WFB
|
|
|
'48 CJ-2A #184135 Lefty
'49 CJ-2A #219719 Mule '39 Ford 9N '55 Oliver Super 55 Ollybelle |
|
|
|
|
Post Reply
|
Page 123> |
| Tweet |
| Forum Jump | Forum Permissions You cannot post new topics in this forum You cannot reply to topics in this forum You cannot delete your posts in this forum You cannot edit your posts in this forum You cannot create polls in this forum You cannot vote in polls in this forum |


 Topic Options