


|
|
|
Wiring |
Post Reply 
|
| Author | |
gtracing 
Member 

Joined: 24 Apr. 2008 Location: iowa Status: Offline Points: 64 |
 Post Options Post Options
") Thanks(0) Thanks(0)
 Quote Reply Quote Reply
 Topic: Wiring Topic: WiringPosted: 27 May 2010 at 1:37am |
|
I recently purchased a wiring harness and boy am I confused. I am wondering if anyone has any good information on how to install the new harness. What would be the most beneficial to me would be a manual of some kind that shows step by step how to install every peice of the harness. I realize that is asking a lot, so does anyone have any tips, tricks, pictures or anything that can make this simpler.
One thing I've already noticed is I dont see anything in the harness that will connect to the brake switch on the front of the master cylinder. Is there more wiring I need thats not included in the harness I bought? I appreciate any advice I can get. Thanks |
|
|
Greg
|
|
 |
|
|
ralf
Member

Sponsor Member x 2 Joined: 06 May 2008 Location: Fayetteville WV Status: Offline Points: 4861 |
Post Options
Thanks(0)
Quote Reply
Posted: 27 May 2010 at 2:42am |
|
Why not start with pictures of what you bought and tell us where you bought it.
|
|
|
1947 CJ2A
1948 CJ2A 1953 Ford NAA Golden Jubilee Tractor 1941 J-3 Cub 1957 Farmall Cub Low Boy tractor 1942 Clarktor WW2 tug |
|
|
|
|
gtracing
Member
Joined: 24 Apr. 2008 Location: iowa Status: Offline Points: 64 |
Post Options
Thanks(0)
Quote Reply
Posted: 27 May 2010 at 2:55am |
|
Thanks for the intrest Ralf.
I bought it from Midwest Jeep Willys out of Illinois. It's the wiring harness with turn signals and horn on the fender. Atleast thats how they're always listed as I've seen. As far as pictures,,,,,, I honestly dont know if I can get them on here. I am not a computer guy. |
|
|
Greg
|
|
|
|
|
ovrlnd
Member

Joined: 18 Feb. 2008 Location: MIchigan Status: Offline Points: 1746 |
Post Options
Thanks(0)
Quote Reply
Posted: 27 May 2010 at 3:44am |
|
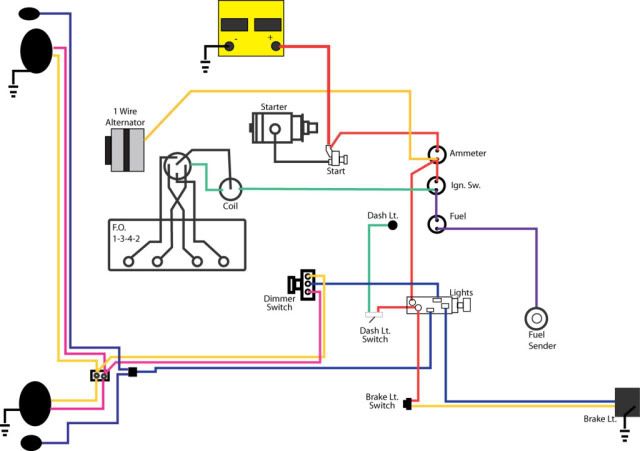
did they give you instructions? If the wire colors/tracers are the same as what walcks produces I could scan the instruction sheet. here is a basic wiring layout to give you an idea. if you search around here you will find diagrams for the High beam switch and light switch as well.
 |
|
|
|
|
gtracing
Member
Joined: 24 Apr. 2008 Location: iowa Status: Offline Points: 64 |
Post Options
Thanks(0)
Quote Reply
Posted: 27 May 2010 at 4:09am |
|
They did give me a paper that shows all the diferent parts of the harness such as the main harness and so forth, but all it says is for example,,,,,, Main Harness,,, and it shows a line with diferent lines coming of of it which are numbered. When you look at the numbers, all it says is the colors of the wires and the guage of the wire. It does not say anything about where to apply it.
I'm hoping to find something that details what each part of the harness is and where it goes. Thank-You |
|
|
Greg
|
|
|
|
|
Longhunter
Member
Joined: 13 Dec. 2006 Location: Meridian, MS Status: Offline Points: 2171 |
Post Options
Thanks(0)
Quote Reply
Posted: 27 May 2010 at 12:54pm |
|
The diagram above that Jon posted is about as good as it gets. I would say get started by using the above diagram and at least get the main harness in. The job is intimidating at first but once you start then things seem to get easier if you pay close attention to the diagram.
Dive in and ask questions if you get stuck. Also, show pics of your progress and where your problems exist.
|
|
|
Mike in Mississippi
2006 Jeep Rubicon 1946 CJ2a #49667 1946 Bantam T3-C #7909 1 UNDERSTANDING Wife "2 wrongs don't make a right but 3 rights will make a left".... Gallagher |
|
|
|
|
VINTAGE
Member
Joined: 30 May 2009 Location: Ulysses, Pa. Status: Offline Points: 123 |
Post Options
Thanks(0)
Quote Reply
Posted: 27 May 2010 at 1:16pm |
|
Well heck i came on here to find out how to wire my 48 to start... Thanks
|
|
|
|
|
sean
Moderator Group 
Sponsor Member Joined: 20 July 2005 Location: North Idaho Status: Offline Points: 7388 |
Post Options
Thanks(0)
Quote Reply
Posted: 27 May 2010 at 4:36pm |
|
Greg, check these links:
CJ-2A Wiring diagrams
Sean |
|
|
|
|
Longhunter
Member
Joined: 13 Dec. 2006 Location: Meridian, MS Status: Offline Points: 2171 |
Post Options
Thanks(0)
Quote Reply
Posted: 27 May 2010 at 4:47pm |
|
Dang Sean, that second diagram you posted is so COOL! I have never seen that one before.
I like the parts where you can turn on or off what you are working on at the time. VERY nice!!
|
|
|
Mike in Mississippi
2006 Jeep Rubicon 1946 CJ2a #49667 1946 Bantam T3-C #7909 1 UNDERSTANDING Wife "2 wrongs don't make a right but 3 rights will make a left".... Gallagher |
|
|
|
|
sean
Moderator Group
Sponsor Member Joined: 20 July 2005 Location: North Idaho Status: Offline Points: 7388 |
Post Options
Thanks(0)
Quote Reply
Posted: 27 May 2010 at 5:15pm |
|
Mike:
It's been posted a number of times, but only in the context of individual threads. It just can't accommodate all the possible owner "upgrades". I'll try & get it up in the FAQ later. |
|
|
|
|
VINTAGE
Member
Joined: 30 May 2009 Location: Ulysses, Pa. Status: Offline Points: 123 |
Post Options
Thanks(0)
Quote Reply
Posted: 27 May 2010 at 11:07pm |
|
Ok, I tried to hook up the wires like in the diagram but I get nothing. I have a 12 volt system with a solenoid and a security switch. I didn't hook up everything like the lights and etc, because I have a new Jeggs wire harness that will be installed once the body gets painted. Any Ideas on how to safly wire it to run onto a trailer. I'm moving it to Pa.
|
|
|
|
|
p3ferris
Member

Joined: 22 July 2005 Location: Norfolk Nebraska Status: Offline Points: 3812 |
Post Options
Thanks(0)
Quote Reply
Posted: 27 May 2010 at 11:53pm |
|
To get it to run, look at the diagram. From the battery do the red wiring to the ign. sw.. Then do the green wiring from the ign. Then take a heavy battery cable from the pos. to the starter side of the solinoid. after it starts take the battery cable to the starter off.
|
|
|
Ed
cj2a lefty |
|
|
|
|
jefisch
Member

Joined: 05 Dec. 2005 Location: St Louis MO Status: Offline Points: 372 |
Post Options
Thanks(0)
Quote Reply
Posted: 31 May 2010 at 7:18pm |
|
Greg,
I just posted this - it may help.
Jim
|
|
|
|
|
gtracing
Member
Joined: 24 Apr. 2008 Location: iowa Status: Offline Points: 64 |
Post Options
Thanks(0)
Quote Reply
Posted: 03 June 2010 at 2:31am |
|
WOW Sean that is a great diagram! Problem is I cant print it. I want to print it off so I can take it to the shop. I've tried to print it at work and at home with no luck. Is there any other way you can get it to me so I can print it?
Thank-You very much! |
|
|
Greg
|
|
|
|
|
sean
Moderator Group
Sponsor Member Joined: 20 July 2005 Location: North Idaho Status: Offline Points: 7388 |
Post Options
Thanks(0)
Quote Reply
Posted: 03 June 2010 at 3:50pm |
|
Greg:
Quick workaround: pick the "options" you want (coil, junction block, horn, etc.), then use your computers "screen snap"/"window snap" function to create a printable image. Sean
|
|
|
|
|
Post Reply
|
|
| Tweet |
| Forum Jump | Forum Permissions You cannot post new topics in this forum You cannot reply to topics in this forum You cannot delete your posts in this forum You cannot edit your posts in this forum You cannot create polls in this forum You cannot vote in polls in this forum |


 Topic Options
 I bought it from Midwest Jeep Willys out of Illinois...