


|
|
|
Side steps |
Post Reply 
|
| Author | |
FrankUSMC 
Member 
Joined: 11 July 2010 Status: Offline Points: 185 |
 Post Options Post Options
") Thanks(0) Thanks(0)
 Quote Reply Quote Reply
 Topic: Side steps Topic: Side stepsPosted: 25 Feb. 2013 at 1:33am |
|
I just purchased a set of side steps for my 1946 CJ2A from Walcks jeep parts.
They came with no directions. I called Walcks and asked them about where to mount them on the jeep. They said to look at the frame for the mounting holes. I looked at my frame in the area where they should be mounted and do not see any holes. I do not want to start drilling holes in the frame of this jeep, to find out they are in the wrong place. Does any one have any directions on the mounting of the side steps? or advice? Thanks. One of the few, Frank USMC RET
|
|
 |
|
|
Bill Norris
Member
Joined: 01 May 2006 Location: MI Status: Offline Points: 1839 |
Post Options
Thanks(0)
Quote Reply
Posted: 25 Feb. 2013 at 1:39am |
|
Frank,
They were not standard on 2As until 1947. Here is the tech bulletin to retrofit: An auxiliary step service kit, No. 646150, has been developed for those Jeeps not standardly equipped. The list price of the kit, which includes the required material for both right and left steps is $8.50, subject to regular parts discounts. Dealers should place their orders through their distributor. To install these steps, measure 5-1/8” to the rear from the rear face of the body bracket on the left side of the frame under the front compartment floor. Mark the frame at this point. Measure up 2-9/16” from the bottom of the frame and center punch where the marks cross. Drill a 21/64” hole at this point. Assemble the step to the brace and bolt the step to the frame through the front hole in the step brace. Using the step brackets as a template, drill the other required holes, 21/64”. Care should be used when drilling the floor at the fuel tank to avoid puncturing the tank. When installing the bolt at this point, use the stud plate inside the body as a reinforcement. When installing the outside body bolt, use the spacer to take care of the body bottom flange. The other bolts are installed in the customary manner with lockwashers and nuts. The same procedure should be followed when making the installation on the right side of the frame. The attached sketch will be of further assistance. Approximately 1-1/2 hours are required to make the installation. Bill Edited by Bill Norris - 25 Feb. 2013 at 1:44am |
|
|
|
|
bkreutz
Member
Sponsor Member Joined: 17 Oct. 2006 Location: Fruitland Idaho Status: Offline Points: 7037 |
Post Options
Thanks(0)
Quote Reply
Posted: 25 Feb. 2013 at 5:29am |
http://www.cj-3a.com/installing_original_steps.htm |
|
|
|
|
timcj2a
Member
Sponsor Member Joined: 19 July 2005 Location: Chula Vista, CA. Status: Offline Points: 801 |
Post Options
Thanks(0)
Quote Reply
Posted: 25 Feb. 2013 at 6:05am |
|
Let me see if I can attach the installation documents to this post.
 Edited by timcj2a - 25 Feb. 2013 at 6:12am |
|
|
|
|
F Bill
Member
Sponsor Member x 2 Joined: 05 Dec. 2005 Location: central Texas Status: Offline Points: 7752 |
Post Options
Thanks(0)
Quote Reply
Posted: 25 Feb. 2013 at 2:14pm |
|
That drawing is pretty good...What is the source of it? I'd like to add it to the 3A step page. Who do I need to ask permission from?
Also, when Jeep Rescue wrote up his step page he seems to say there is two possible mounting places, one ON the hat channel and one next to it...Is that the case for the 2A as well? Does it make any difference in the brackets? Or is this REPRO vs original? Wish I could find some of the NOS treads he mentions in the writeup. And just a quick note to those of you who have older links to the CJ3A site's tech pages.. We changed the CJ-3A to CJ3A in our main page when we took the page over, and all the new versions of the pages are CJ3A in the URL . Edited by F Bill - 25 Feb. 2013 at 2:18pm |
|
|
If you haven't checked out the tech FAQ section, go to:
http://www.thecj2apage.com/forums/tech-faq_forum57.html for a lot of great stuff you need to know!! |
|
|
|
|
Bill Norris
Member
Joined: 01 May 2006 Location: MI Status: Offline Points: 1839 |
Post Options
Thanks(0)
Quote Reply
Posted: 25 Feb. 2013 at 2:59pm |
|
F Bill,
The drawing and my written instructions are from the same Service Bulletin. I'll have to look it up. Tim was more successful in getting the picture to post than I was! I can't speak for the repop steps, but what Tim and I posted are factory specs for the originals.
Bill
|
|
|
|
|
F Bill
Member
Sponsor Member x 2 Joined: 05 Dec. 2005 Location: central Texas Status: Offline Points: 7752 |
Post Options
Thanks(0)
Quote Reply
Posted: 25 Feb. 2013 at 3:02pm |
|
Bill if you want to send me a scan by email I can put it up on the page. It would be pretty helpful to guys assembling steps from pieces.
Are the 2A factory steps bolted together as I suspect or spot welded to the brackets?
|
|
|
If you haven't checked out the tech FAQ section, go to:
http://www.thecj2apage.com/forums/tech-faq_forum57.html for a lot of great stuff you need to know!! |
|
|
|
|
timcj2a
Member
Sponsor Member Joined: 19 July 2005 Location: Chula Vista, CA. Status: Offline Points: 801 |
Post Options
Thanks(0)
Quote Reply
Posted: 26 Feb. 2013 at 12:17am |
|
F Bill,
PM me your email address and I'll send it to you. I already have it scanned. Tim
|
|
|
|
|
Bob W
Member 
Sponsor Member x 4 Joined: 08 Aug. 2005 Location: Monticello, NY Status: Offline Points: 1691 |
Post Options
Thanks(0)
Quote Reply
Posted: 26 Feb. 2013 at 12:51am |
|
The CJ-2A and CJ-3A original side steps are the same. CJ-3As will have all the mounting holes in place from the factory, since they came with steps. Also note that the 5-1/8" measurement is made from the transmission crossmember mounting bracket which is not present on late CJ-2As of CJ-3As.
The "NOS" steps in the CJ-3A Page article are CJ-5 steps so they don't fit the same as CJ-2A/3A steps. |
|
|
|
|
Fred Ashbrook
Member

Joined: 25 Apr. 2009 Location: Virginia Status: Offline Points: 238 |
Post Options
Thanks(0)
Quote Reply
Posted: 26 Feb. 2013 at 2:34am |
|
F Bill,
I'm pretty sure the brackets are all spot welded to the step. Only the frame-step bracket bolts on. F. |
|
|
Fred A
48 Lefty Virginia 48 Lefty |
|
|
|
|
Bob W
Member
Sponsor Member x 4 Joined: 08 Aug. 2005 Location: Monticello, NY Status: Offline Points: 1691 |
Post Options
Thanks(0)
Quote Reply
Posted: 26 Feb. 2013 at 2:41am |
Look here  http://www.cj3apage.com/Original_side_step_instructions.htm |
|
|
|
|
F Bill
Member
Sponsor Member x 2 Joined: 05 Dec. 2005 Location: central Texas Status: Offline Points: 7752 |
Post Options
Thanks(0)
Quote Reply
Posted: 26 Feb. 2013 at 3:14am |
|
OK Bob, ya got me. I guess we need to do some reorganizing to get that accessible from the step page!!
Sometimes I wonder what I got into when we took over the page. I looked for that over there before too.. RRRGH! Dazed and confused... |
|
|
If you haven't checked out the tech FAQ section, go to:
http://www.thecj2apage.com/forums/tech-faq_forum57.html for a lot of great stuff you need to know!! |
|
|
|
|
F Bill
Member
Sponsor Member x 2 Joined: 05 Dec. 2005 Location: central Texas Status: Offline Points: 7752 |
Post Options
Thanks(0)
Quote Reply
Posted: 01 Mar. 2013 at 2:49pm |
|
Just for grins, here is the newest Side Step available from jeep in the 70's.
Look familiar?? 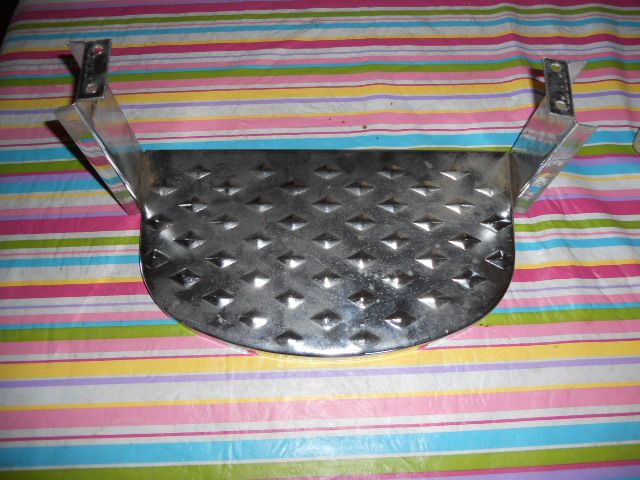 And yes, it is a genuine Jeep made part, chrome from the factory. On a side note I did a little experiment trying to produce the diamond shapes in the step. I got close but no cigar after a couple of hours making a punch . I think If I started with a larger piece of square stock it would work pretty well.
|
|
|
If you haven't checked out the tech FAQ section, go to:
http://www.thecj2apage.com/forums/tech-faq_forum57.html for a lot of great stuff you need to know!! |
|
|
|
|
rocnroll
Member
Sponsor Member Joined: 20 July 2005 Location: Tuscumbia, AL Status: Online Points: 13585 |
Post Options
Thanks(0)
Quote Reply
Posted: 01 Mar. 2013 at 7:43pm |
|
Bill, I'm not following what you are saying....are you saying these are available or that that was the last factory offering back in the 70s? |
|
|
'47 CJ2A PU
'48 CJ2A Lefty "Common sense is not that common" |
|
|
|
|
F Bill
Member
Sponsor Member x 2 Joined: 05 Dec. 2005 Location: central Texas Status: Offline Points: 7752 |
Post Options
Thanks(0)
Quote Reply
Posted: 01 Mar. 2013 at 8:39pm |
 Last factory version of the step that started in 45 or 46. Same tread panel. It was sold to fit the CJ5. Also had a chrome bracket that went to the frame, I have that as well. I forget which side but I think it is a left. Last factory version of the step that started in 45 or 46. Same tread panel. It was sold to fit the CJ5. Also had a chrome bracket that went to the frame, I have that as well. I forget which side but I think it is a left. I only know of ONE available right now. Bidding starts at .....lets see, for a one of a kind how's $100 sound. I bought it to use as a pattern in case I happen to figure out how to succesfully make the diamond tread. I have worked on it but the punch and female die are going to be tricky. I can make small copies of the tread in 22 gage right now. I had to round the punch more than I thought, it was actually cutting through the metal when I pressed over a hard rubber mat. That experiment convinced me I need a female die with at least the outline of the diamond cut in it to make the bottom edges crisp. I am disappointed you can't read my mind, Roc. Sometimes I make things so dang clear..
 |
|
|
If you haven't checked out the tech FAQ section, go to:
http://www.thecj2apage.com/forums/tech-faq_forum57.html for a lot of great stuff you need to know!! |
|
|
|
|
rocnroll
Member
Sponsor Member Joined: 20 July 2005 Location: Tuscumbia, AL Status: Online Points: 13585 |
Post Options
Thanks(0)
Quote Reply
Posted: 01 Mar. 2013 at 9:23pm |
|
I was pretty sure what you meant just wanted to be clear on it.
|
|
|
'47 CJ2A PU
'48 CJ2A Lefty "Common sense is not that common" |
|
|
|
|
Bill Norris
Member
Joined: 01 May 2006 Location: MI Status: Offline Points: 1839 |
Post Options
Thanks(0)
Quote Reply
Posted: 02 Mar. 2013 at 2:42pm |
|
Fred,
You are correct, only the middle bracket is bolted on, the sides are welded.
Bill
|
|
|
|
|
Fred Ashbrook
Member
Joined: 25 Apr. 2009 Location: Virginia Status: Offline Points: 238 |
Post Options
Thanks(0)
Quote Reply
Posted: 02 Mar. 2013 at 4:00pm |
|
Thanks Bill!
Fred |
|
|
Fred A
48 Lefty Virginia 48 Lefty |
|
|
|
|
Post Reply
|
|
| Tweet |
| Forum Jump | Forum Permissions You cannot post new topics in this forum You cannot reply to topics in this forum You cannot delete your posts in this forum You cannot edit your posts in this forum You cannot create polls in this forum You cannot vote in polls in this forum |


 Topic Options
 FrankUSMC wrote: