


|
|
|
Buck's turbo diesel swap |
Post Reply 
|
Page <1 2122232425 30> |
| Author | |
Mike S 
Member 
Joined: 20 May 2006 Location: West Coast Status: Offline Points: 2318 |
 Post Options Post Options
") Thanks(0) Thanks(0)
 Quote Reply Quote Reply
 Posted: 20 Apr. 2015 at 10:35pm Posted: 20 Apr. 2015 at 10:35pm |
|
Looks like you will be needing a double cardan (CV) joint in the rear at least.
|
|
|
'47 CJ2A -- #114542
Warn FF D41 rear Lock-Right locker 11" drum brakes Dual master cylinder T90C Transmission 16 X 6 Jeep truck wheels Cooper STT Pro tires |
|
 |
|
|
Daniel_Buck
Member
Joined: 01 Apr. 2012 Location: Gilroy Status: Offline Points: 1200 |
Post Options
Thanks(0)
Quote Reply
Posted: 20 Apr. 2015 at 11:06pm |
|
I've already got a Double CV shaft for the rear. And with the angle that I've already rotated the axle, once the driveshaft is the correct length (3" shorter) I don't think there will be any issues. The top of the double CV joint is about 3/4" from the tub floor, haha! But I think it's going to work. Worst case, I guess I rotate the axle some more.
|
|
|
2a #40500
|
|
|
|
|
Mike S
Member
Joined: 20 May 2006 Location: West Coast Status: Offline Points: 2318 |
Post Options
Thanks(0)
Quote Reply
Posted: 21 Apr. 2015 at 4:10am |
|
Good on ya' Daniel. I think the Kubota and the T18 / T98 will be a good combination.
|
|
|
'47 CJ2A -- #114542
Warn FF D41 rear Lock-Right locker 11" drum brakes Dual master cylinder T90C Transmission 16 X 6 Jeep truck wheels Cooper STT Pro tires |
|
|
|
|
Daniel_Buck
Member
Joined: 01 Apr. 2012 Location: Gilroy Status: Offline Points: 1200 |
Post Options
Thanks(0)
Quote Reply
Posted: 24 Apr. 2015 at 5:44pm |
|
Got the clutch linkage done, and the brake light switch bolted on.
Yes, the bolt has been replaced with a proper cotter pin, it was just there to hold things together. 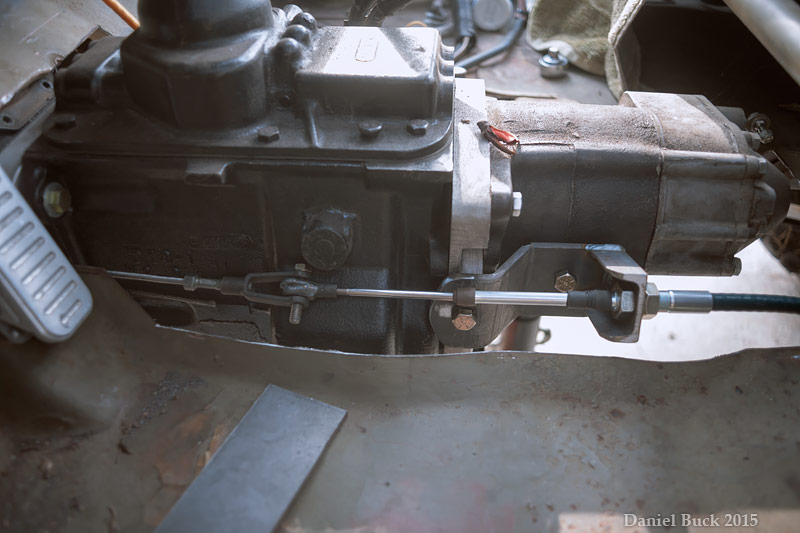  |
|
|
2a #40500
|
|
|
|
|
Lemield
Member

Joined: 18 Jan. 2008 Location: Arvada Colorado Status: Offline Points: 501 |
Post Options
Thanks(0)
Quote Reply
Posted: 24 Apr. 2015 at 7:23pm |
|
Looking good. :)
|
|
|
Larry
1949 CJ2A "Little Stinky Green" Kubota Diesel Powered 1970 Chevy C20 454 "Big Red" 1971 Chevy K20 6.2 Diesel "Pumpkin Wagon" 2001 Mercedes CLK320 2003 Cadillac Seville |
|
|
|
|
Daniel_Buck
Member
Joined: 01 Apr. 2012 Location: Gilroy Status: Offline Points: 1200 |
Post Options
Thanks(0)
Quote Reply
Posted: 25 Apr. 2015 at 2:56am |
|
Made new frame mounts for the motor mounts. And put in the hydraulic isolators.
They squish down at least 1/4" when the weight of the motor is on them, I bet they will definitely provide some additional vibration reduction over the rubber isolators I was using before. I made the 'buckets' for the isolators a bit wide on purpose, with the intention to eventually have them also serve as the mounts for the skid plate. The 20 ton press bent the 1/4" 6" wide flat bar no problem. :D I raised the motor just a tad bit more, still plenty of clearance on the steering. I've still got room to play, to move the motor around a little bit to get it perfectly parallel to the frame, and to move it forwards or backwards a bit if needed.  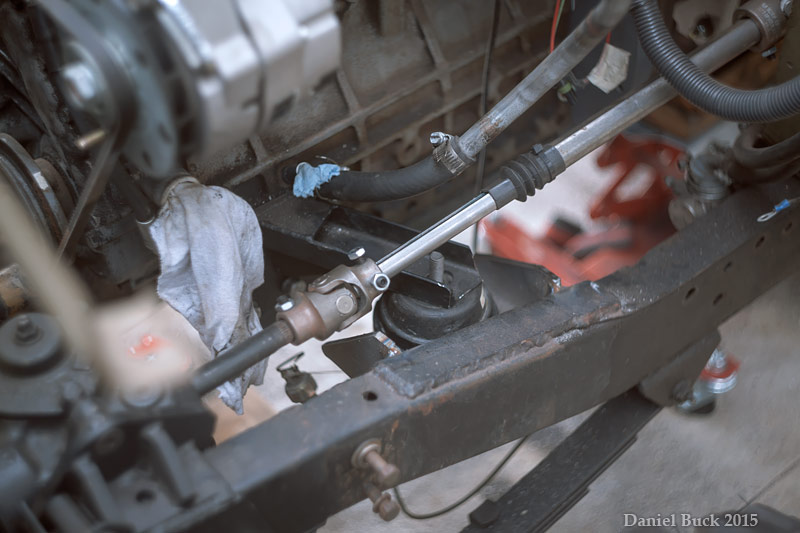  |
|
|
2a #40500
|
|
|
|
|
Daniel_Buck
Member
Joined: 01 Apr. 2012 Location: Gilroy Status: Offline Points: 1200 |
Post Options
Thanks(0)
Quote Reply
Posted: 25 Apr. 2015 at 11:29pm |
|
Almost had the crossmember finished, when it started raining, lol! I just need to make an angled bracket on the crossmember that lines up with the mount hole on the transfer case.
It sits 2" lower than the frame, and is the lowest part of the jeep between the axles now :) (it's even with lowest part of the transfer case)    |
|
|
2a #40500
|
|
|
|
|
Mike S
Member
Joined: 20 May 2006 Location: West Coast Status: Offline Points: 2318 |
Post Options
Thanks(0)
Quote Reply
Posted: 26 Apr. 2015 at 3:07am |
|
lookin' good, daniel.
|
|
|
'47 CJ2A -- #114542
Warn FF D41 rear Lock-Right locker 11" drum brakes Dual master cylinder T90C Transmission 16 X 6 Jeep truck wheels Cooper STT Pro tires |
|
|
|
|
Daniel_Buck
Member
Joined: 01 Apr. 2012 Location: Gilroy Status: Offline Points: 1200 |
Post Options
Thanks(0)
Quote Reply
Posted: 26 Apr. 2015 at 5:07am |
|
the sun came out, and dried up the driveway and the willys, so I got back at it! I'm pleased with the crossmember. I actually have the transfer case bolted to the crossmember as well, but that was after I took the photos, and I'm waiting on some thick rubber isolators to complete that.
If my measurements are correct, I'm about 3" higher up than the factory crossmember. Crossmember has paint on it, drying in the garage tonight.    |
|
|
2a #40500
|
|
|
|
|
Daniel_Buck
Member
Joined: 01 Apr. 2012 Location: Gilroy Status: Offline Points: 1200 |
Post Options
Thanks(0)
Quote Reply
Posted: 27 Apr. 2015 at 4:17am |
|
Here's a shot of my transfer case mount. It's a 1/2" bolt with thick rubber on either side of the transfer case, similar to the factory setup. I think this will work??
and some shots of the clutch cable, trans mount and frame mount.    |
|
|
2a #40500
|
|
|
|
|
Daniel_Buck
Member
Joined: 01 Apr. 2012 Location: Gilroy Status: Offline Points: 1200 |
Post Options
Thanks(0)
Quote Reply
Posted: 07 May 2015 at 7:21pm |
|
Got the turbo down tube welded up for the willys, clearance is very nice. I sprayed it with BBQ paint, 3 coats. in 2-3 days I'll do another few coats. We'll see how it holds up once the heat gets applied while driving. Says it can take 1200 degrees. I try to limit my turbo EGT to 1000 peak, so it *should* be ok. We'll see. :-)
no photos after I sprayed it, I'll take some more photos later when I bolt it up. 2.5" exhaust on a 2.2L diesel! :D    |
|
|
2a #40500
|
|
|
|
|
pjensen641
Member
Joined: 21 June 2014 Location: United States Status: Offline Points: 690 |
Post Options
Thanks(0)
Quote Reply
Posted: 07 May 2015 at 9:09pm |
|
Demonstrating some pretty impressive home fab jobs there!
 Where are you getting your exhaust components? Flanges, flex pipe, mandrel bends etc. Do you have a press-brake set up? Or maybe you are cutting apart some square tube? I see what looks like some nice crisp bends in some of the brackets and such. Do you have a plasma torch or are you using a cut-off wheel to make the cuts in the exhaust pipe? I'm always interested to hear some of the tricks for doing this sort of fab work at home. I know I have found several ways of doing things that would normally be done on a several thousand dollar machine at a fab shop.
|
|
|
|
|
Daniel_Buck
Member
Joined: 01 Apr. 2012 Location: Gilroy Status: Offline Points: 1200 |
Post Options
Thanks(0)
Quote Reply
Posted: 08 May 2015 at 2:51am |
|
I get the mandrel bends from www.mandrel-bends.com, I also get the flanges and copper gaskets from them too.
The oval shaped flange at the top of the exhaust, I drew up in CAD and had it CNC plasma cut from a local shop. I scanned the back of the turbo on my flatbed scanner, and traced and measured everything, turned out perfect :D Making the transition from oval to round wasn't very clean, but I think it will work. I do have a press brake that I use to make brackets and stuff, if it's thin, I'll just cheap out and put it in the vice and bend it with pliers and a hammer, haha! For cutting, I use a mounted portable bandsaw when ever I can. Otherwise, I use a cutoff wheel on an angle grinder, sometimes a sawzall, and sometimes a diegrinder with cutoff disk. Diegrinder is a bit dicey, so I only use it for cutting when I really can't use anything else. I'm learning this all as I go, taking it slow, trying to keep the mistakes to a minimum :-D Here's the bandsaw that I use, I run a miter gauge in the slots to cut angles and straights. The mounting stand is from SWAG Offroad. I use this almost every time I'm in the garage. Either cutting out pieces of flat bar, or tubing, or shortening bolts, or whatever. It gets alot of use! I want a larger horizontal bandsaw though, it would be easier for working with longer pieces of tubing.  Edited by Daniel_Buck - 08 May 2015 at 2:53am |
|
|
2a #40500
|
|
|
|
|
Daniel_Buck
Member
Joined: 01 Apr. 2012 Location: Gilroy Status: Offline Points: 1200 |
Post Options
Thanks(0)
Quote Reply
Posted: 11 May 2015 at 2:33am |
|
Got the battery in, and the exhaust done to the rear axle (not quite finished).
Started it up for the heck of it, even though I don't have the driveshafts back yet, and I still haven't figured out the upper radiator hose. Sounds good, I like it :D Lots of things rattling, since the fenders aren't fully bolted on yet. Edited by Daniel_Buck - 11 May 2015 at 2:37am |
|
|
2a #40500
|
|
|
|
|
Daniel_Buck
Member
Joined: 01 Apr. 2012 Location: Gilroy Status: Offline Points: 1200 |
Post Options
Thanks(0)
Quote Reply
Posted: 13 May 2015 at 1:50am |
|
I picked up the driveshafts today, and bolted them up, perfect fit :)
I rigged up an upper coolant hose, I'm hot happy with it, so I'm going to keep an eye on it, I'll probably take the radiator out and have a radiator shop relocate the upper hose inlet so that I can more comfortably get a hose on there, it's just to close to the thermostat on the engine right now since the engine went up 3 inches at least. I filled it up with distilled water, and let it idle until it was full temperature. No leaks! I need to get the electrical back before I drive around the block, maybe I'll get it tonight, need to put the fenders back on as well.
|
|
|
2a #40500
|
|
|
|
|
pjensen641
Member
Joined: 21 June 2014 Location: United States Status: Offline Points: 690 |
Post Options
Thanks(0)
Quote Reply
Posted: 13 May 2015 at 2:40am |
|
Did you happen to dial indicate your bell housing to inspect alignment with the engine? I finally started my engine this weekend and everything looked great so I started the install of the plate and such. When I dial indicated the bell housing, it was 20 thousands off (bell housing too high on the engine)!
Don't know if it was the right thing to do, but I enlarged the dowel bolt holes so that I could drop the bell housing. Then I ended up just cutting up a beer can to shim the extra clearance in the holes to keep the bolts tight in the right direction. Not sure if the adapter plate was off, or if it was my bell housing. It sucks that there are no dowel pins so that you can use offset dowels! Edited to add: I wonder if this might be why you had a cracked clutch disc? It looks like you are nearing completion on your install, so its not too easy to check now, but if you have more trouble...this could be it.
Edited by pjensen641 - 15 May 2015 at 4:41pm |
|
|
|
|
Daniel_Buck
Member
Joined: 01 Apr. 2012 Location: Gilroy Status: Offline Points: 1200 |
Post Options
Thanks(0)
Quote Reply
Posted: 17 May 2015 at 10:59pm |
|
No, I didn't dial indicate the bell housing.
I finally drove it today! Overdrive not engaged, and starting out in 2nd gear, 1st is stoopid slow :D Drives good. Steering feels WAY better, doesn't feel un-safe in the least. Working on the overdrive shifter now. And I need to re-do the front brake lines, and some other small stuff, and then tackle the floor. I want to try an exhaust brake too. |
|
|
2a #40500
|
|
|
|
|
Lemield
Member
Joined: 18 Jan. 2008 Location: Arvada Colorado Status: Offline Points: 501 |
Post Options
Thanks(0)
Quote Reply
Posted: 18 May 2015 at 10:46pm |
|
Looking mighty California-ish with the flip flops Daniel!
The turbo sounds AWESOME. Looking good. |
|
|
Larry
1949 CJ2A "Little Stinky Green" Kubota Diesel Powered 1970 Chevy C20 454 "Big Red" 1971 Chevy K20 6.2 Diesel "Pumpkin Wagon" 2001 Mercedes CLK320 2003 Cadillac Seville |
|
|
|
|
Post Reply
|
Page <1 2122232425 30> |
| Tweet |
| Forum Jump | Forum Permissions You cannot post new topics in this forum You cannot reply to topics in this forum You cannot delete your posts in this forum You cannot edit your posts in this forum You cannot create polls in this forum You cannot vote in polls in this forum |


 Topic Options