


|
|
|
Clean old fuel tank or purchase new? |
Post Reply 
|
| Author | |
DrPop 
Member 

Joined: 12 June 2014 Location: Ventura, CA Status: Offline Points: 202 |
 Post Options Post Options
") Thanks(0) Thanks(0)
 Quote Reply Quote Reply
 Topic: Clean old fuel tank or purchase new? Topic: Clean old fuel tank or purchase new?Posted: 25 July 2014 at 3:32pm |
|
Just looking for some opinions on this one. My grandpa had put in a new under seat fuel tank about 10 years ago, but then it obviously just sat there for years in his yard with about 2 gals of fuel (or less) in it. I noticed there was crud in there, so I drained it, unbolted it, and tried to clean it out best I could using a garden hose, shaking it, and then acetone at the end to get any last bits of water out.
Bolted it back in, hooked it up and filled it. Seemed to work for about a day of random off and on starts of the Jeep to check things, but now it's plugged up again with some kind of sediment or something. I have a clear fuel filter up past the electric fuel pump, so I can see when it's blocked. The question at this point: is there an easy or simple way to clean every last bit of crud out of the tank? Or should I just give up on this one and buy a new tank? I'd hate to have this happen on the trail, so if I can't get every last piece of sediment or crud out, then I guess I'm looking at a new tank, right?
|
|
 |
|
|
pjensen641
Member
Joined: 21 June 2014 Location: United States Status: Offline Points: 690 |
Post Options
Thanks(0)
Quote Reply
Posted: 25 July 2014 at 3:54pm |
|
I've never done this, so a bit more research is probably necessary.
I've heard of folks putting pea gravel inside the tank with a solvent and then shaking the tank all around. This essentially scrubs or sands all the crud off the inside of the tank walls so that you can get it all washed out at once. However, I am not sure how the filler neck is designed on the tank. Somehow you have to get all the media back out and if the filler neck has an internal rim down in the tank that could be difficult. Also, I'm not sure how this would work with an internal baffle. I've mostly heard of this method for motorcycle tanks.
|
|
|
|
|
48willys
Member

Joined: 22 June 2007 Location: sw/ virginia Status: Offline Points: 1341 |
Post Options
Thanks(0)
Quote Reply
Posted: 25 July 2014 at 4:33pm |
|
I'v used BB's or just some old nuts and bolts.Since these tanks have baffles I would use something metal that can be pulled out with a magnet if it gets stuck. I think you'll be ok with just a good cleaning as long as its in good condition.
|
|
|
1946 cj2a #28680
1948 chevy 3800 thriftmaster 1946-50's cj2a-3a farm jeep 1993 yj, aka the yj7 |
|
|
|
|
DrPop
Member
Joined: 12 June 2014 Location: Ventura, CA Status: Offline Points: 202 |
Post Options
Thanks(0)
Quote Reply
Posted: 25 July 2014 at 4:42pm |
|
Thanks guys, sounds like I should give it one more shot then. I'll siphon out the fuel tonight after work and try the BB trick and shake it some more.
 Any idea on the best solvent to put in there with the BBs? Or should I just use some fresh gas? I wonder if there's a way I could shoot a bunch of brake cleaner or carb cleaner or something like that in there? I'll see if I can come up with anything on a search for what people have used for solvents in the past.
|
|
|
|
|
scoutpilot
Member

Joined: 30 Dec. 2008 Location: Asheboro, NC Status: Offline Points: 4373 |
Post Options
Thanks(0)
Quote Reply
Posted: 25 July 2014 at 4:44pm |
|
Search your local area for a radiator shop that will boil it out. Compare their cost/time to the alternatives.
|
|
|
|
|
48willys
Member
Joined: 22 June 2007 Location: sw/ virginia Status: Offline Points: 1341 |
Post Options
Thanks(0)
Quote Reply
Posted: 25 July 2014 at 6:29pm |
|
Scoutpilot is right on boiling it out. If it’s gummy inside, then boiling it out is really the best way as you would need some strong solvent to get it out. But if you want to give it another shot yourself, I would probably just use soap and water because the metal might make a spark with the BB's. Then I’ve used rubbing alcohol to rinse it and get the water out followed by a good amount of time in the sun to make sure all the water is gone. Another thought is if you know someone with a steam cleaner you might get them to clean it cheap.
|
|
|
1946 cj2a #28680
1948 chevy 3800 thriftmaster 1946-50's cj2a-3a farm jeep 1993 yj, aka the yj7 |
|
|
|
|
p3ferris
Member

Joined: 22 July 2005 Location: Norfolk Nebraska Status: Offline Points: 3812 |
Post Options
Thanks(0)
Quote Reply
Posted: 25 July 2014 at 7:01pm |
|
Clean it out the best you can as you did, then get a tank coating kit. you just have to put it in slosh it around then empty. Then you put the sealer in and shake it vigoursly to coat the entire inside and dump the excess out. You will have a good tank for years. It seals any loose dirt/rust and does not ever let it move. About 20 minutes time.
|
|
|
Ed
cj2a lefty |
|
|
|
|
PhillipM
Member

Joined: 28 May 2012 Location: Jackson, MS Status: Offline Points: 560 |
Post Options
Thanks(0)
Quote Reply
Posted: 25 July 2014 at 11:52pm |
|
Buy a plastic tank and never worry again.
|
|
|
"90% of all carburetor problems are electrical"
|
|
|
|
|
LesBerg
Member

Joined: 09 Apr. 2014 Location: Athol, ID Status: Offline Points: 1554 |
Post Options
Thanks(0)
Quote Reply
Posted: 26 July 2014 at 5:27am |
|
hit Napa for a POR15 fuel tank kit. It'll clean all that out to bare metal and reseal it.
I did this with the fuel tanks on our 29' motorhome and it worked like a champ. The kit easily did the 50 gallon tank and some of the chemicals are reusable. I picked up two of everything as it also has a 35 gallon aux tank that needed it as well. I think I paid $35 for the cleaner, the rust remover, and the sealer. Much cheaper than a new tank and very easy to do. This is a picture of the auxiliary tank. There was so much rust I had to cut the top off to clean it out. 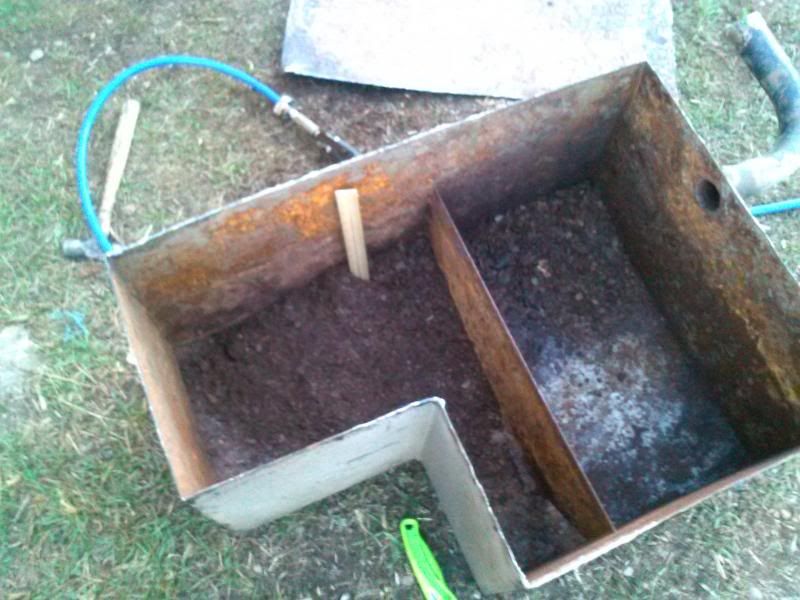 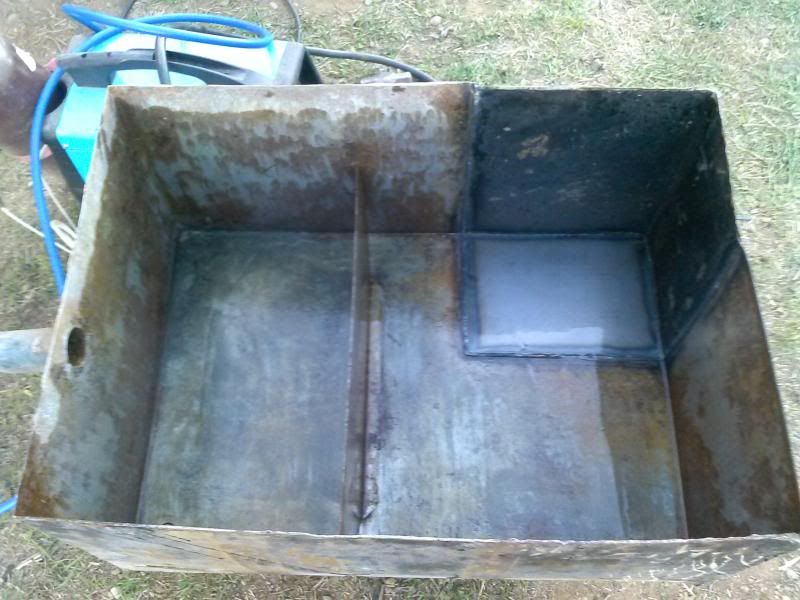 I welded the top on before I sealed it, of course. Still, I was very impressed with how well it works.
Edited by LesBerg - 26 July 2014 at 5:34am |
|
|
1948 CJ2A 157713 24" Stretch "Old Ironsides"
1st Armored Div 6th Infantry Reg 3rd Infantry Bn Headquarters Company #161 rubigo in quo speramus - "In Rust we Trust" |
|
|
|
|
DrPop
Member
Joined: 12 June 2014 Location: Ventura, CA Status: Offline Points: 202 |
Post Options
Thanks(0)
Quote Reply
Posted: 26 July 2014 at 6:59am |
|
Thank you all very much for the suggestions! I will definitely do that tomorrow, siphon out the fuel and take it out to clean it again and this time do that sealer kit. I will let you know how it goes.

|
|
|
|
|
bkreutz
Member
Sponsor Member Joined: 17 Oct. 2006 Location: Fruitland Idaho Status: Offline Points: 7037 |
Post Options
Thanks(0)
Quote Reply
Posted: 26 July 2014 at 2:51pm |
Be careful with the sealer kit, the pickup tube in a stock 2A tank is somewhat unusual as it has a 'hook" in the tube. It's possible to plug the hole in the tube with the sealer. I recommend pushing something through the tube after coating the inside of the tank (like a piece of wire) to make sure the sealer doesn't "seal" the end of the pickup tube.  |
|
|
|
|
DrPop
Member
Joined: 12 June 2014 Location: Ventura, CA Status: Offline Points: 202 |
Post Options
Thanks(0)
Quote Reply
Posted: 26 July 2014 at 4:02pm |
|
Hi bkreutz, thank you for that tip! Glad I checked in one more time this morning, I'm about to walk out to the garage and yank the tank to start the cleaning process again.
|
|
|
|
|
LesBerg
Member
Joined: 09 Apr. 2014 Location: Athol, ID Status: Offline Points: 1554 |
Post Options
Thanks(0)
Quote Reply
Posted: 26 July 2014 at 6:07pm |
|
remember to pull it out before the sealer cures, though, or it will be cemented in place.
I would also recommend swabbing it out (the pickup tube) with whatever cleaner they recommend cleaning up the sealer with. I noticed days later that some sealer had gotten into the gear on my favorite 4" crescent wrench and I still haven't found a way to free it up. Edited by LesBerg - 26 July 2014 at 6:09pm |
|
|
1948 CJ2A 157713 24" Stretch "Old Ironsides"
1st Armored Div 6th Infantry Reg 3rd Infantry Bn Headquarters Company #161 rubigo in quo speramus - "In Rust we Trust" |
|
|
|
|
DrPop
Member
Joined: 12 June 2014 Location: Ventura, CA Status: Offline Points: 202 |
Post Options
Thanks(0)
Quote Reply
Posted: 27 July 2014 at 8:59am |
|
Well, shoot. NAPA didn't have the POR15 sealer, they didn't even know what it was until I explained it to them. Then they somehow looked it up in the computer but said I would have to order it from a Speed shop or Summit Racing or some place like that. Maybe it's one of California's restrictions on something? Wouldn't be the first time if it is...
Cleaned it out much more thoroughly this time. Lots and lots of foamy soap to get out the little specs and even tried the boiling water trick multiple times. She's back together and running off the front tank again, so hopefully this does it. If not, I'll see about ordering the sealer and do 'er again. Now tackling the wiring - it's going but not real pretty yet.
 |
|
|
|
|
52 M38
Member

Joined: 26 Nov. 2012 Location: New England Status: Offline Points: 1286 |
Post Options
Thanks(0)
Quote Reply
Posted: 27 July 2014 at 5:34pm |
X2. The tank I had was not original as far a I could tell so I went with the $150 plastic indestructible version. |
|
|
|
|
DrPop
Member
Joined: 12 June 2014 Location: Ventura, CA Status: Offline Points: 202 |
Post Options
Thanks(0)
Quote Reply
Posted: 28 July 2014 at 6:18am |
|
I will seriously think about that as an option if this latest cleaning doesn't end up working long term.
|
|
|
|
|
Bob3b
Member

Joined: 08 Mar. 2010 Location: Akron, Ohio Status: Offline Points: 3097 |
Post Options
Thanks(1)
Quote Reply
Posted: 28 July 2014 at 1:39pm |
|
Eastwood has a nice clean and seal kit I used on mine. It's time consuming, but works great. I put some gravel, nuts, bolts in mine and strapped it to one of those portable cement mixers for a few hours. It really cleaned it out.
|
|
|
1946 CJ2A #23881
1953 CJ3b, nice! 1949 Jeepster 1947 Empire Model 90 1985 CJ10A Spen "S" Utility trailer Kubota l3400 |
|
|
|
|
Post Reply
|
|
| Tweet |
| Forum Jump | Forum Permissions You cannot post new topics in this forum You cannot reply to topics in this forum You cannot delete your posts in this forum You cannot edit your posts in this forum You cannot create polls in this forum You cannot vote in polls in this forum |


 Topic Options
 DrPop wrote: