


|
|
|
1947 Craigslist Barn Find |
Post Reply 
|
Page <1 5678> |
| Author | |||
PapaC 
Member 

Joined: 11 Sep. 2013 Location: Ms Status: Offline Points: 205 |
 Post Options Post Options
") Thanks(0) Thanks(0)
 Quote Reply Quote Reply
 Posted: 29 June 2016 at 4:20am Posted: 29 June 2016 at 4:20am |
||
|
With heavy willys panels a little bit of heat or cooling at the right time can be a tremendous help with straightening those stiff panels is my experience.
I often use a worn out flap disc that really won't cut anymore for a cheap shrinking or smoothing disc and or a propane torch for spot preheating and air for cooling as needed. Was able to straighten this extreme example without the use of filler except a very light coat at the last minute before paint Before  A home made tool to help me get to some of the inside highs  The other side but a example of how the heat from the worn out and slick flap wheel along with hammer and dolly work helped me smooth things out  After (no filler here yet) just bare metal and primer to help see exactly where I was at  I hope I'm not stepping on your thread too much that's not my intention. Honestly I just wanted to pass along a few things I've learned the hard way. Things that I WISH I had known on my restoration from the beginning. Charles |
|||
 |
|||
|
SE Kansas 46 CJ-2A
Member

Sponsor Member x 3 Joined: 22 Jan. 2016 Location: S.E. Kansas Status: Offline Points: 3190 |
Post Options
Thanks(0)
Quote Reply
Posted: 29 June 2016 at 4:50pm |
||
|
Welds are lookin' good...keep up the good work.

|
|||
|
46 CJ-2A #64462 "Ol' Red" (bought April 1969)(second owner)(12 V, 11" brakes, M-38 frame, MD Juan tub)
U.S. Coast Guard Chief Petty Officer(ret.) U.S. Army Vietnam veteran and damned proud of it. |
|||
|
|||
|
Becca
Member

Joined: 19 Oct. 2014 Location: Indiana Status: Offline Points: 140 |
Post Options
Thanks(0)
Quote Reply
Posted: 30 June 2016 at 2:29am |
||
|
Your not stepping on my toes, I need to know this stuff. I knew about the heat shrinking but not the flapper disk, and I will be reviewing this thread on that tool you showed PapaC. My grill is bent and dented pretty good where you showed in your pics. Thank you Kansas for the compliment on the welds. I'll be sure to tell my boss on the welding side you said so. He picks at my welds for being a little sloppy looking sometimes, and I just thank him for all the Snap-On metal I got thanks to him.
|
|||
|
1947 Willys CJ-2A
|
|||
|
|||
|
PapaC
Member
Joined: 11 Sep. 2013 Location: Ms Status: Offline Points: 205 |
Post Options
Thanks(0)
Quote Reply
Posted: 30 June 2016 at 4:07am |
||
|
I agree with Kansas. Those welds look exceptionally good to me.
That tool I made for the grill, I'm through with it. Even if I ever needed something like that again I spent a whole maybe 15 minutes throwing it together. To go with it you'd also need a flat piece of heavy steel OR that really heavy piece of copper shown in one of those pictures as a back up plate. A regular dolly won't do there and I've got tons of pieces of 1/4" thick copper exactly like that. Those holes in it are even useful sometimes for shrinking the little high spots. Originally electrical buss bars that I stripped the wiring and boxes out of a old dairy building. A while back I borrowed a tool from this site to put the welt on my grill. That tool is still in circulation for members of this site and I Suggest you 'borrow' it yourself after you get your grill fixed and painted. Per this thread. ... http://www.thecj2apage.com/forums/topic37548_post355654.html#355654 To help continue to pay things forward and if you're interested pm me your address and I'll send you both the tool and the heavy copper plate for absolutely free and to keep forever. I'll even pay shipping and it would be a honor to help someone else who tries hard. Believe me when I say that's a real rarity these days. Charles Tate (happily married and OMG 18 grandkids..... tons of their friends who visit here...and 3 great grandchildren....all who call me PapaC except for the real real little ones.......thus my name on these forums  ) )EDIT. look up shrinking disc's on utube. I do NOT believe they will do as good as they say on our Willys metal which is thicker than a average car and lots harder to shrink and smooth. Edit: (worked with a homemade one for a while). Results somewhat ok but much less than spectacular. Willys metal is exceptionally hard to shrink even with torch heat and water and fast cooling. But heating it up with torch.....or worn flap wheel which tends to focus more heat on the highs where you need it the most...and then helping it along with hammer and dolly work and edit: 'compressed' air cooling can work wonders. A real shrinking hammer or shrinking dolly while much more expensive than what comes in a regular set will help keep the metal from streaching farther out of shape. Even the pick side of a regular hammer properly used with a back up plate with a hole in it such as the copper plate I mentioned works really good as opposed to off dolly work for tiny spots when the metal is properly heated, worked, and then compressed air cooled on flatter areas. Edited by PapaC - 30 June 2016 at 8:13pm |
|||
|
|||
|
Becca
Member
Joined: 19 Oct. 2014 Location: Indiana Status: Offline Points: 140 |
Post Options
Thanks(0)
Quote Reply
Posted: 31 July 2016 at 4:30pm |
||
|
Well, its been a while since I been on here. Had to buy a new ipod because the old one finally bit the dust. But I had started fixing the driver side floor in the meantime with some angle iron I had bought and part of the 18 gague sheet I bought and Papa Smurf has used to make up the floor sides and the angled part of the floor. Didn't get to use that tool yet or go to an ac place, but I am thinking about using diamond plating as accenting, and I might be getting some rusty stuff for free sometime.
  Edited by Becca - 31 July 2016 at 4:38pm |
|||
|
1947 Willys CJ-2A
|
|||
|
|||
|
Flatfender Ben
Member

Joined: 13 July 2014 Location: Nyssa OR Status: Offline Points: 2657 |
Post Options
Thanks(0)
Quote Reply
Posted: 31 July 2016 at 4:36pm |
||
|
Wow it's coming along.
Keep it up and you'll soon have a complete tub 
|
|||
|
|||
|
LesBerg
Member

Joined: 09 Apr. 2014 Location: Athol, ID Status: Offline Points: 1554 |
Post Options
Thanks(0)
Quote Reply
Posted: 01 Aug. 2016 at 7:31am |
||
Beretta did a far nicer job than I. Here's what I fabbed out of 1x1 and 1x1.5 for my 2A with a 24" stretch: 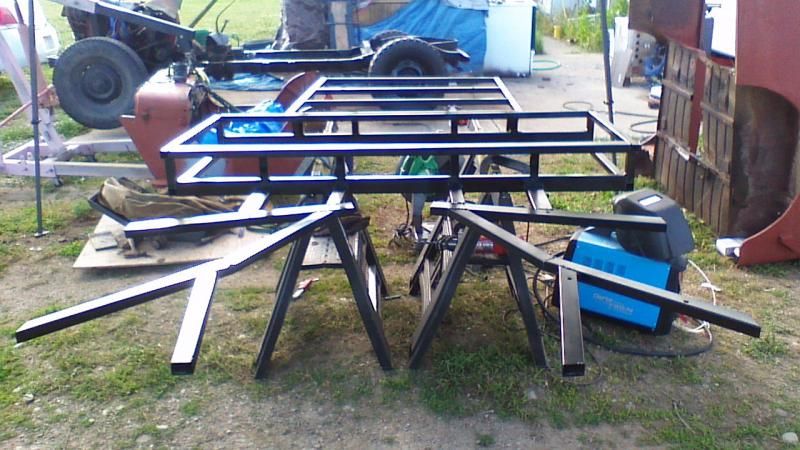 What's with the modified vise grip? I'm a big fan of metal working and have a ton of work to do on my hood. I should have an oxy acetylene torch working in the not too distant future, and I'm hoping to get my hood flat enough that it doesn't make people seasick looking at it...
Edited by LesBerg - 01 Aug. 2016 at 7:36am |
|||
|
1948 CJ2A 157713 24" Stretch "Old Ironsides"
1st Armored Div 6th Infantry Reg 3rd Infantry Bn Headquarters Company #161 rubigo in quo speramus - "In Rust we Trust" |
|||
|
|||
|
Becca
Member
Joined: 19 Oct. 2014 Location: Indiana Status: Offline Points: 140 |
Post Options
Thanks(0)
Quote Reply
Posted: 13 Sep. 2016 at 10:57pm |
||
|
The little clamps used in the pics are actually for welding sheet metal together with a gap for better penetration on your welds. You can find them at Harber Freight in the welding section. Each package has about 8 in each I think. I have a little bit more done on the jeep now, but pics are a problem. Gotta figure out a way to get a link set up to get to them because they are too big for the website. Working on the steps that are on the side of the jeep and have decided to change it's name from Steve to Patches because they are everywhere now.
|
|||
|
1947 Willys CJ-2A
|
|||
|
|||
|
GB-
Member
Joined: 10 Apr. 2016 Location: usa Status: Offline Points: 30 |
Post Options
Thanks(0)
Quote Reply
Posted: 14 Sep. 2016 at 5:28pm |
||
|
THERE ARE GIRLS HERE???!!!
WOW! My wife says this is face book for old farts. Shows what she knows.
|
|||
|
|||
|
Becca
Member
Joined: 19 Oct. 2014 Location: Indiana Status: Offline Points: 140 |
Post Options
Thanks(0)
Quote Reply
Posted: 14 Sep. 2016 at 10:58pm |
||
|
Well, old farts know their stuff better than I do.
 |
|||
|
1947 Willys CJ-2A
|
|||
|
|||
|
48willys
Member

Joined: 22 June 2007 Location: sw/ virginia Status: Offline Points: 1340 |
Post Options
Thanks(0)
Quote Reply
Posted: 15 Sep. 2016 at 4:51pm |
||
|
|||
|
1946 cj2a #28680
1948 chevy 3800 thriftmaster 1946-50's cj2a-3a farm jeep 1993 yj, aka the yj7 |
|||
|
|||
|
smfulle
Member

Sponsor Member Joined: 16 Sep. 2010 Location: Ogden, Utah Status: Offline Points: 6141 |
Post Options
Thanks(0)
Quote Reply
Posted: 15 Sep. 2016 at 5:07pm |
||
That works, or you could just upload your full size photos to a photo hosting site like Photobucket.com and then just copy and paste the link from photobucket into your post. No resizing or editing required.
|
|||
|
|||
|
Becca
Member
Joined: 19 Oct. 2014 Location: Indiana Status: Offline Points: 140 |
Post Options
Thanks(0)
Quote Reply
Posted: 21 Sep. 2016 at 1:20am |
||
I think that is what I'm gonna try. I think Facebook works on this website. Anyways, I might be able to go and put the front floorboard in this weekend. Got both sides patched well enough in the front that I can lay a sheet of 18 gague down and tack it in to see how it looks, then finish welding around that to seal it good. Afterwards I need to start on the transmission hump and get it to where I can just bolt it on and off in case I need to work on it later. Got a empty tank of 134a refrigerent to quarter up. Before you ask, it is not flammable, the tank cannot be refilled, and has had all proper procedures done to make sure there is no refrigerent left in the tank. (The valve has been left open for over a year, definetly empty.) Should make for an interesting project.
|
|||
|
1947 Willys CJ-2A
|
|||
|
|||
|
Becca
Member
Joined: 19 Oct. 2014 Location: Indiana Status: Offline Points: 140 |
Post Options
Thanks(0)
Quote Reply
Posted: 23 Sep. 2016 at 12:40am |
||
|
Does anybody know the demensions of the fuel tank? How tall it is, width, and length would be good.
|
|||
|
1947 Willys CJ-2A
|
|||
|
|||
|
SE Kansas 46 CJ-2A
Member
Sponsor Member x 3 Joined: 22 Jan. 2016 Location: S.E. Kansas Status: Offline Points: 3190 |
Post Options
Thanks(0)
Quote Reply
Posted: 23 Sep. 2016 at 4:50pm |
||
|
For a CJ-2A, CJ-3A, or early CJ-3B:
Height= 6 1/4" Length= 18 3/4" Width= 24 1/2" at the widest point. If you are thinking of fabricating a fuel tank that could be an onerous task. A new tank can be had for about $175 that is a very good replacement for the original. |
|||
|
46 CJ-2A #64462 "Ol' Red" (bought April 1969)(second owner)(12 V, 11" brakes, M-38 frame, MD Juan tub)
U.S. Coast Guard Chief Petty Officer(ret.) U.S. Army Vietnam veteran and damned proud of it. |
|||
|
|||
|
Becca
Member
Joined: 19 Oct. 2014 Location: Indiana Status: Offline Points: 140 |
Post Options
Thanks(0)
Quote Reply
Posted: 25 Sep. 2016 at 4:24pm |
||
|
oh no! I'm way too lazy for that. I just needed the measurements to help figure out the deninsions of the floor and hump because I didn't write all those down like I thought I did.
|
|||
|
1947 Willys CJ-2A
|
|||
|
|||
|
Becca
Member
Joined: 19 Oct. 2014 Location: Indiana Status: Offline Points: 140 |
Post Options
Thanks(0)
Quote Reply
Posted: 26 Sep. 2016 at 10:41pm |
||
|
I figured it out!
  
|
|||
|
1947 Willys CJ-2A
|
|||
|
|||
|
Becca
Member
Joined: 19 Oct. 2014 Location: Indiana Status: Offline Points: 140 |
Post Options
Thanks(0)
Quote Reply
Posted: 09 Oct. 2016 at 1:05am |
||
|
Got more done today. Built the rear sub-frame for the floor of the tub yesterday at work with some donated metal from one of the students. A 5 1/2"x49" piece of diamond plate! not quite long enough but two plates of 4"x5 1/2" plates should fix that.
   Also had to replace a small strip of wheel well on the passenger side because it was badly pitted. |
|||
|
1947 Willys CJ-2A
|
|||
|
|||
|
Post Reply
|
Page <1 5678> |
| Tweet |
| Forum Jump | Forum Permissions You cannot post new topics in this forum You cannot reply to topics in this forum You cannot delete your posts in this forum You cannot edit your posts in this forum You cannot create polls in this forum You cannot vote in polls in this forum |


 Topic Options
 berettajeep wrote:
