


|
|
|
Setting the metering rod in a Carter WO carb. |
Post Reply 
|
Page 12> |
| Author | |
Carlsjeep 
Member 

Joined: 15 Jan. 2011 Location: Taylorsville Ky Status: Offline Points: 2642 |
 Post Options Post Options
") Thanks(0) Thanks(0)
 Quote Reply Quote Reply
 Topic: Setting the metering rod in a Carter WO carb. Topic: Setting the metering rod in a Carter WO carb.Posted: 23 Dec. 2011 at 1:20am |
|
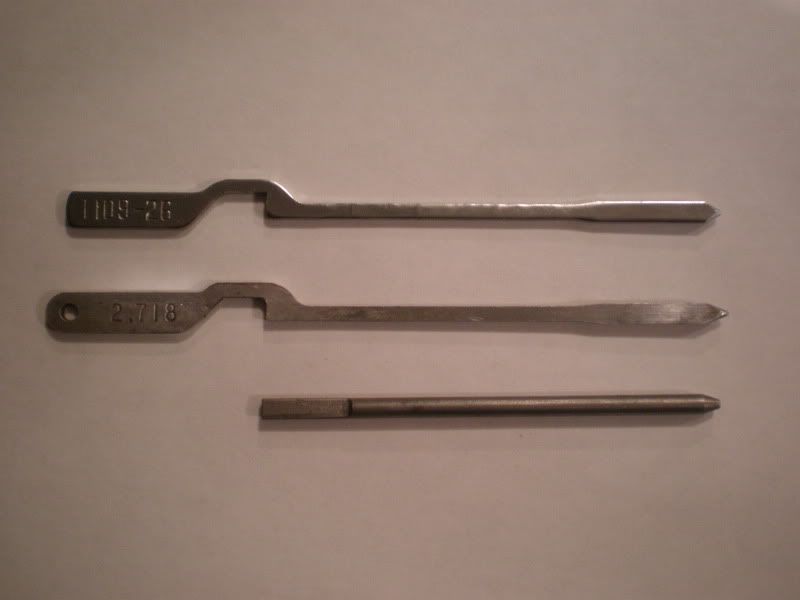
Comparing the metering rod setting tools In an effort to find the easiest or best way to set the metering rod I did a comparison of the Carter tool, the Snap-On tool and the Home made tool. I have three metering rods and jets to use to compare with a borrowed Carter tool and a Snap-On tool and my own Home made tool. The jet has a tapered opening of 116 deg with a hole of .070” +.000 -.0002” as measured in the three jets I have. The metering rods vary in length from the start of the tapered area to the spot the pin rests on. The OAL length of the rod from the spot the pin rests on to the tip also varies as shown below in the drawing. I also used one of the cleaner jets to measure the OAL of the bottom on the jet to the shoulder of the tool for a reference and they are as follows: Carter tool, shoulder to bottom of jet = 2.947”. Snap-On tool, shoulder to bottom of jet = 2.946”. Home made tool, shoulder to bottom of jet = 2.945”.
Below is a photo of the Carter, Snap-On and Home made tool. The tip angles and lengths of the tools vary as follow. The Carter tool has a tip angle of 58 deg with an OAL from the shoulder to tip of 2.782”. The length of the shoulder to contact area in jet is 2.720” and may be 2.718” as it’s hard to read a line scratched in dykem clearly on the surface of an extremely rough finish. The Snap-On tool has a tip angle of 42 deg with an OAL of 2.804” from shoulder to tip. The length of the shoulder to contact area of the jet is 2.718” and was clear to read because the tip was very smooth. The Home made tool I made has a tip angle of 36 deg with an OAL of 2.761”. The length of the top end to the contact area of the jet is 2.719” The tip on my tool is as smooth as the Snap-On tool.
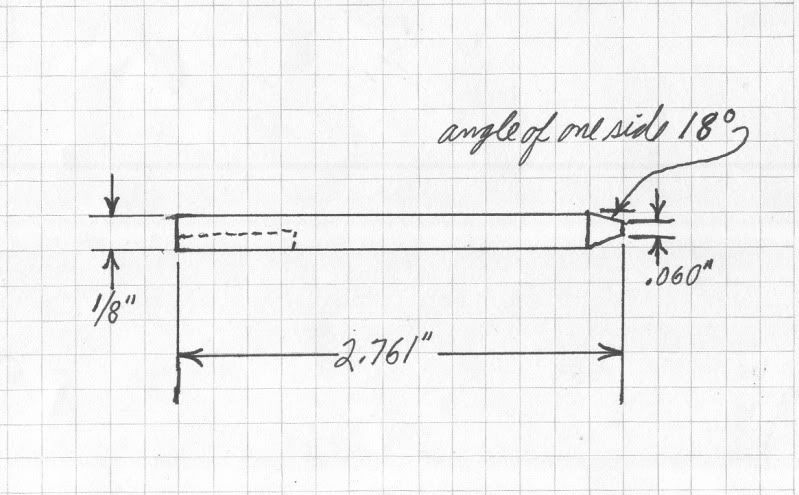
I measured them several times to be sure I was as correct as possible. I used dial calipers along with a 10 power glass and a jig to hold the rods as I made the measurements. I also used a Peak brand 10 power comparator to do the small measurements. I was as careful as I could but some readings could be off a thousandth or two. Here is a drawing of the Home made tool from the internet that I made to save you from looking it up. I paid close attention to getting is exact as possible and it must have worked as will be shown in the following tests of all three tools. You will note a dotted line on the drawing that indicates where I gound away half of the diameter for about ½” down the shaft to clear the backing washer on the pin where the metering rod sits. Since the Carter and Snap-On tools are flat stamped metal and the rod is 1/8” diameter there will be some interference so don’t force it or you will get a false reading.
Now for comparing them on the carb on my Jeep. When I checked my current setting it had .005” free travel of the rod with the throttle screw backed off all the way to close the throttle plate. That means with a dial indicator on the top of the rod I could move the rod up .005” while holding the throttle closed. When I put the Carter tool in place of the metering rod I had to loosen the nut and reset the pin and tighten the nut. When I checked the free travel using the metering rod I now have .040” free travel using the dial indicator as noted above. Then I removed the metering rod and installed the Snap-On tool and the setting was the same as with the Carter tool. As I moved the tool I could just feel it touching the bottom of the pin. Then I removed the Snap-On tool and installed the Home made tool and the result was the same. Moving the Home made tool under the pin I could just fell the tool as it rubbed the bottom of the pin. All three tools gave the same setting of the metering rod pin. I wasn’t expecting that they would be that close but they are. |
|
 |
|
|
silverbullet72tnt
Member

Joined: 20 Oct. 2010 Location: Littleton NH Status: Offline Points: 544 |
Post Options
Thanks(0)
Quote Reply
Posted: 23 Dec. 2011 at 1:26am |
|
Hmmm. Three slightly different ways to get the same result. Good research.
Have you tried the "setting the needle with no tool" where it is at rest "bottomed" out in the jet with the pin slightly resting on the bottom of the loop setting for a comparison? Would be interested in seeing how close it would be that way. Any interest in making some more tools?
|
|
|
Insert some clever signature here...
|
|
|
|
|
Carlsjeep
Member
Joined: 15 Jan. 2011 Location: Taylorsville Ky Status: Offline Points: 2642 |
Post Options
Thanks(0)
Quote Reply
Posted: 23 Dec. 2011 at 1:39am |
|
To make it easy for someone to find an article on setting the metering rod I decided to open a new thread. Many of the measurements that I questioned turned out to be ok but to settle my mind on it I conducted this comparison. One thing I found was what ever method I set my metering rod by originally was not right. I have the feeling that the odd things happening on a cold start was from the high speed circuit opening to soon. I have to agree with Sean that the tools do a good job and that the home made tool HAS to be 2.761" long. Also, if you make one be as exact as you can so it will do the job right. If you don't get the length, angle on the tip and the diameter of the tip very close it won't give a good setting.
I only drove my Jeep for a short run and one cold start but the cold start seemed to be less troublesome. Only a week or so of starting and driving will tell for sure. One thing that bothers me is that now the metering rod will be raised .040" less and I have to wonder how that will affect wide open throttle climbing a hill. When I measured the metering rods they do have a .001" reduced area at the lower end as Sean shows in his drawing. I am going to make a high altitude metering rod to the dimensions in Seans drawing by modifying one of my used rods or a new one to experiment with in Utah next summer.
|
|
|
|
|
silverbullet72tnt
Member
Joined: 20 Oct. 2010 Location: Littleton NH Status: Offline Points: 544 |
Post Options
Thanks(0)
Quote Reply
Posted: 23 Dec. 2011 at 1:42am |
|
Any interest in making a few more? I can fab, but not anything that small and precise. Good work either way... interesting stuff
|
|
|
Insert some clever signature here...
|
|
|
|
|
Carlsjeep
Member
Joined: 15 Jan. 2011 Location: Taylorsville Ky Status: Offline Points: 2642 |
Post Options
Thanks(0)
Quote Reply
Posted: 23 Dec. 2011 at 1:43am |
|
Yes Silverbullet, that was just about the way my carb was set when I started this testing. My metering rod only had .005" free travel and you can barely feel that moving the rod with tweezers.
It proves to my mind you don't have to buy the expensive hard to find Carter or Snap-On tool to set the metering rod. A home made tool will do just fine.
|
|
|
|
|
Carlsjeep
Member
Joined: 15 Jan. 2011 Location: Taylorsville Ky Status: Offline Points: 2642 |
Post Options
Thanks(0)
Quote Reply
Posted: 23 Dec. 2011 at 1:47am |
|
That is something I am thinking about doing. I need to make a few to do a time study to see what to charge so it's reasonable for anyone to own. Cutting the length is not to hard and setting the tip angle is easy but getting the tip diameter is troublesome with a manual lathe. Doing them in a CNC lathe would be a piece of cake.
A friend may be getting one soon so I may approach him with this project. I may also look into having him modify standard metering rods to the high altitude metering rod.
|
|
|
|
|
silverbullet72tnt
Member
Joined: 20 Oct. 2010 Location: Littleton NH Status: Offline Points: 544 |
Post Options
Thanks(0)
Quote Reply
Posted: 23 Dec. 2011 at 1:52am |
|
awesome. I have 3 jeeps running these carbs, but they all run "good enough" that I can't see spending $$$$$ for a hard to find tool. But anyone who lists a rod style one is out of stock...
Will be interesting to see the setting difference on the hi altitude tool
|
|
|
Insert some clever signature here...
|
|
|
|
|
lowenuf
Member

Sponsor Member x 2 Joined: 29 Aug. 2006 Location: Ohio Status: Offline Points: 9122 |
Post Options
Thanks(0)
Quote Reply
Posted: 23 Dec. 2011 at 2:11am |
|
Carl, nice work !!!!!!!!
|
|
|
45 #10012
45 #10033 ACM #47 45 #10163 ACM #188 57 CJ5 Dauntless V6, T-18 4-speed, D-44 rear/D-30 front, D-20 twin stick |
|
|
|
|
misterberry
Member

Joined: 27 Jan. 2006 Location: Edmonton Canada Status: Offline Points: 683 |
Post Options
Thanks(0)
Quote Reply
Posted: 23 Dec. 2011 at 2:27am |
|
I really enjoyed reading broke down and of all of this technical journey you have been on. I have ruminated over trying to find an original Carter piece, but a few years ago I broke down and had the g503 sent. Not that I needed it, I have 2 of Jim Wallace's rebuilds - one to use right now and have been for the past 10 years...but another "fresh"...just in case :-)
I figured better to have all the tools at hand...
|
|
|
James Berry
'48 2A ser.187593 "Jeep Jeep" It's a "Lefty".... Moved north from California- Now waving the Canadian flag - A Canuck back home in Edmonton |
|
|
|
|
Carlsjeep
Member
Joined: 15 Jan. 2011 Location: Taylorsville Ky Status: Offline Points: 2642 |
Post Options
Thanks(0)
Quote Reply
Posted: 23 Dec. 2011 at 2:58am |
|
Thank you lowenuf, I will be mailing your tools back tomorrow and I sure appreciate the loan of them. I tried to do the best at measuring as I could because I know the info will out there for everyone to see. I think a lot of people that overhaul their carbs just put the new metering rod and jet in and expect it to be the right setting. However, my finding the rods are not the same length and while I didn't measure the depth of the taper in my jets I suspect they vary a few thousandths as well.
Knowing what I found a careful person with a dial indicator and magnetic base could set the metering rod without a tool by setting the free travel of the rod to the .040" I found mine to have after using the correct tools. Clamping the carb to a flat metal bench and using the mag base indicator next to it would do a good job IF YOUR CAREFUL and use a very flat work bench or drill press table. EDIT: today, 12/23/11 I measured how much the metering rod is lifted out of the jet at full throttle and it's about 3/8" and that is just about the point the metering rod gets reduced to .047" for the open throttle power part Sean mentioned.
Edited by Carlsjeep - 23 Dec. 2011 at 3:19pm |
|
|
|
|
Carlsjeep
Member
Joined: 15 Jan. 2011 Location: Taylorsville Ky Status: Offline Points: 2642 |
Post Options
Thanks(0)
Quote Reply
Posted: 27 Dec. 2011 at 2:10am |
|
In the photo below I have the dial indicator set up on the exh. man. and against the head in a spot where it is solid and doesn't move. You have to back the throttle screw off 6 full turns to be sure the throttle plate is closed. The plunger is set on the metering rod with the plunger as straight in line with the metering rod as I can get it. Then I set the dial on "0" to start to set the rod. Then you loosen the pin nut just so it will slip, push the pin down gently on the metering rod loop bottom and then with tweezers lift the rod until the dial indicator shows .040" and lock the pin nut. Check the travel by moving the metering rod up and down between the jet and the pin and it should still be .040". If not reset it until it is. It is important that the plunger tip touch only the metering rod and not the washer on the pin. 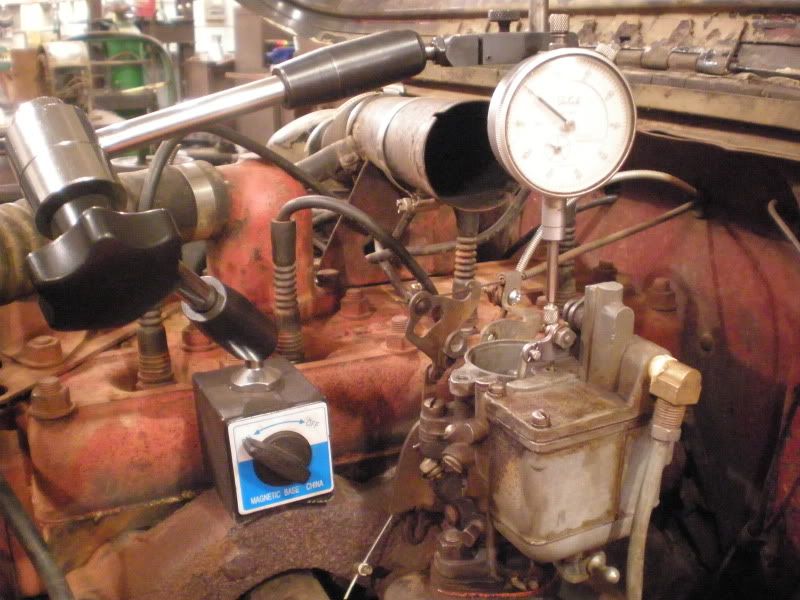 Setting the metering rod on the bench is a little easier but you still use the same method as above while the carb is clamped to a drill press table. See photo below. The tip I used in the dial indicator has a flat face but didn't screw all the way in the plunger but it is bottomed out in the threads. You can use the rounded tip that comes with the dial indicator but you have to be very careful to get it centered on the metering rod and not touching the pin washer to get a good reading. Most people would find it easier using the Carter tool or a home made tool. 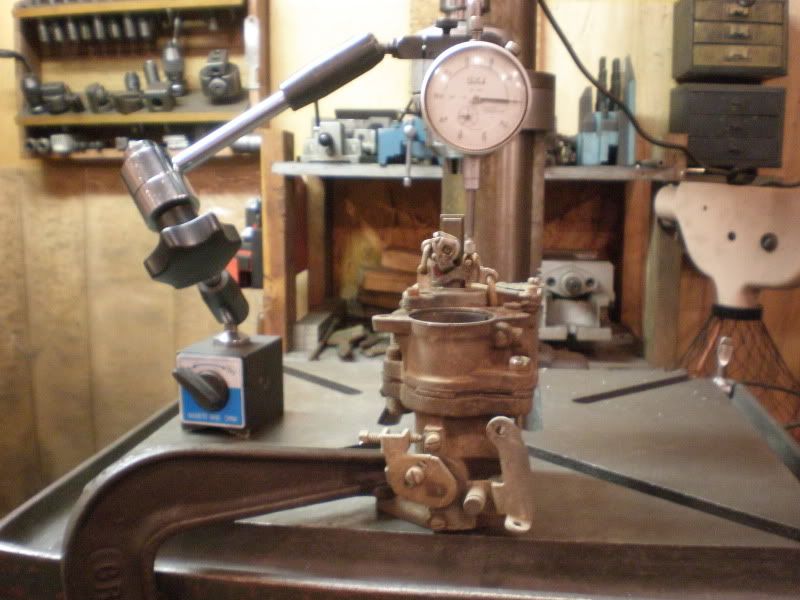 |
|
|
|
|
JIMO
Member
Joined: 18 Feb. 2010 Location: North Jersey Status: Offline Points: 266 |
Post Options
Thanks(0)
Quote Reply
Posted: 08 May 2012 at 2:40am |
Question: When you set the indicator to zero, is the metering rod bottomed in the jet, do you actually want to set zero on the indicator before loosening the pin nut or after? I am trying to picture what the .040" is actually measuring....I am a little fuzzy on the big picture and some clarification would be appreciated. I want to verify my metering rod adjustment as I think it may be a bit lean by looking at the spark plugs...the porcelain is totally white after 1200 miles of driving, to me they should be a tan color....am I right? Another symptom is the engine likes to run a little warmer than I would like at about 195 to 200 deg with a 160 T-stat in her. Do you think I am in the right area by looking into the metering rod? Some input would be appreciated. Thanks, Jim |
|
|
1946 CJ-2A
1996 F-150 2000 XJ MITY KAT CRAWLER "I love it when a plan comes together" |
|
|
|
|
Carlsjeep
Member
Joined: 15 Jan. 2011 Location: Taylorsville Ky Status: Offline Points: 2642 |
Post Options
Thanks(0)
Quote Reply
Posted: 08 May 2012 at 3:24am |
|
You have to get the indicator plunger directly over the center of the loop and parallel to the metering rod. The distance your measuring is the gap between the bottom of the pin and the loop. When you raise the metering rod the indicator should move as close to .040" as you can get it. I will guess that if your .002" +/- it would be ok.
Setting the metering rod with a dial indicator is tricky and you have to have steady hands and a gentle touch and since the metering rod can move around you have to be careful. It's easier to use this method to see what the metering rod is set at than to adjust it. If your metering rod turns out to be set correctly then you may be using to hot of a heat range plug and your timing may be a little to advanced.
Edited by Carlsjeep - 08 May 2012 at 3:26am |
|
|
Life is only as good as you make it.
|
|
|
|
|
JeepRoger
Member
Joined: 26 Oct. 2009 Location: Atascadero, CA Status: Offline Points: 1165 |
Post Options
Thanks(0)
Quote Reply
Posted: 08 May 2012 at 4:54am |
|
Carl... Lots of good work and info here, thanks. Couple of things:
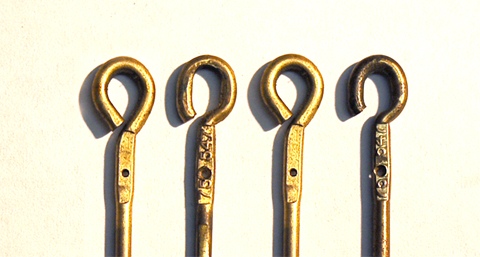
1) Regarding your first drawing, you will find differences in the distances from the metering rod's shoulder to the BOTTOM portion of the eye of the rod (what you show as 2.694", 2.706", and 2.704" because that is not a critical distance. The pin does does not rest on that portion of the rod's eye as you stated, but instead lifts the metering rod at the upper inside portion of the eye. (Several of the needles I have here have slightly different shaped eyes and they are all different lengths at the bottom of the eye - but the are all about 2.920" +/- .003" from the shoulder to the inside top of the eye). The tolerance might have been better when they were new, but I'm measuring used metering rods that show signs of wear. 2) After trying to get so many of these WOs to behave by trying to set them with a tool, I find it much easier to do as SilverBullet suggests; to get just a hair of clearance between the lifting pin and the upper inside portion of the rod's eye with the throttle set to the idle position (i.e. NOT all the way closed). In this way, the main jet is closed by the metering rod and begins to open at the very instant the throttle is opened. 3) The tool may be helpful for setting a new rod, but if you look carefully at the inside of the eye, these rods do wear where the pin lifts them, and the tool can't compensate for this wear (so the tool doesn't work if you want to use and reset your original rod). 4) To test that the main jet is closed, look into the carb with the engine running - you should see no gas dripping from the venturi until the throttle is just cracked a hair. 5) It seems to me that what Carter intended with this tool was to set the lift pin to a known distance with the throttle fully closed so that the pin would just be a hair from lifting the metering rod when the throttle screw was tightened to the idle position. Well, why not just set it that way to begin with? Possibly they thought that was easier than trying to find a way to measure that tiny space (which Carl did with the dial indicator). 6) Whenever I do a WO, I usually start by setting the pin with the tool just to get the pin in the approximate correct place. but I always end up moving the pin once the engine is running to get it just right. Jimo - to your question about the .040˝, that's what my #5 above suggests. It's .040˝ when the throttle plate is closed, but that gap goes to almost zero when the throttle plate is set to the idle position. Of course, not every throttle plate on every engine ends up at the exact same point (because of a bunch of other issues) and this is all the more reason, in my opinion, that it is best to set the pin to an almost zero clearance position by hand. ...R
|
|
|
Roger in California
'46 CJ2A 38503 '47 CJ2A 142084 '46 T3C Bantam trailer |
|
|
|
|
Carlsjeep
Member
Joined: 15 Jan. 2011 Location: Taylorsville Ky Status: Offline Points: 2642 |
Post Options
Thanks(0)
Quote Reply
Posted: 08 May 2012 at 1:43pm |
|
Yes, I would guess all the rods vary a little in length. It's also important that the metering rod is resting on the jet at idle to close off the main jet. You also want the metering rod to lift off the jet just after the throttle plate starts to move.
1-That's true but each rod I have has a flat spot at the top and bottom on the inside of the loop which indicates they are formed around a post of determined size. If the length from the inside top of the loop to the shoulder is a certain length and the loop hole is a determined length then there should be some tolerance relationship between every metering rod. I suspect an original Carter rod would have reasonable tolerances for those dimensions. I suspect the loop is formed and then the rod loop is mounted on a post and the far end is machined to the correct length.
The critical length is from the inside top of the loop to the shoulder and perhaps I should have measured them there, but alas, I didn't.
Setting the metering rod with the tool gives what the factory sets them to and because the opening of the throttle plate may vary from engine to engine to get the correct idle it may not be the perfect setting. Also, the variation in length of the rods will cause a change in the real setting and I suspect the Carter rods had closer tolerances. I agree that it's best to check the metering rod to be sure the pin is not holding it off the jet after the engine has been run and the idle set. Especially if your using an after market metering rod. If the pin has to be lowered you may have to go back and reset the idle and the idle bleed. The metering rod, throttle plate screw and idle bleed screw have to be right for the engine to run right. Of course the accelerator pump is in the picture as well. It doesn't have to be perfect, it just has to be right. Edited by Carlsjeep - 08 May 2012 at 1:44pm |
|
|
Life is only as good as you make it.
|
|
|
|
|
JeepRoger
Member
Joined: 26 Oct. 2009 Location: Atascadero, CA Status: Offline Points: 1165 |
Post Options
Thanks(0)
Quote Reply
Posted: 08 May 2012 at 2:59pm |
|
Carl... thx... I went through some rods I have and at a glance (I didn't measure them) most of them fall into these four shapes, and they are obviously different. So while I don't think there was a huge range of difference in the WO metering rods, the shape and height of the eyes were different on some. And, of course, there were a lot of after-market rods. Just judging from this photo it appears that the distance from the inside top of the rod to the spring hole was the same. ...R
 |
|
|
Roger in California
'46 CJ2A 38503 '47 CJ2A 142084 '46 T3C Bantam trailer |
|
|
|
|
Carlsjeep
Member
Joined: 15 Jan. 2011 Location: Taylorsville Ky Status: Offline Points: 2642 |
Post Options
Thanks(0)
Quote Reply
Posted: 08 May 2012 at 3:34pm |
|
Yes, it looks like two are after market and two are Carter. The after market rods are probably only measured from the top inside of the loop to the shoulder of the taper when they make them. That's probably the same critical measurement Carter used but they used better manufacturing methods than the after market people do.
I don't have any after market rods, just new and used Carter rods to measure. I doubt the spring hole is a critical dimension, it just holds the metering rod down in the jet.
|
|
|
Life is only as good as you make it.
|
|
|
|
|
JIMO
Member
Joined: 18 Feb. 2010 Location: North Jersey Status: Offline Points: 266 |
Post Options
Thanks(0)
Quote Reply
Posted: 08 May 2012 at 6:49pm |
|
Thanks for the replies and great research! So Carlsjeep, is this accurate....the .040" metering rod set-up (with throttle plate closed) upon start-up provides enough "slop" to be able to set the idle stop where one wants it, without the metering rod lifting out of the jet????
Without the dial indicator is this a good overall summary from this thread as I tend to miss things? (I apologize if my input seems hijacking, it is an attempt to streamline your thoughts for my understanding and maybe someone else coming across this). Jeeprodger: "3) The tool may be helpful for setting a new rod, but if you look carefully at the inside of the eye, these rods do wear where the pin lifts them, and the tool can't compensate for this wear (so the tool doesn't work if you want to use and reset your original rod)." JIMO: Myself, I wonder about machining differences on the rod or even on the main jet...you know, with today's "quality" aftermarket parts, could affect distance/length? Silverbullet: "Have you tried the "setting the needle with no tool" where it is at rest "bottomed" out in the jet with the pin slightly resting on the bottom of the loop setting for a comparison?" JIMO: Would this be a good starting point for someone with no tool? Jeeprodger: "2) After trying to get so many of these WOs to behave by trying to set them with a tool, I find it much easier to do as SilverBullet suggests; to get just a hair of clearance between the lifting pin and the upper inside portion of the rod's eye with the throttle set to the idle position (i.e. NOT all the way closed). In this way, the main jet is closed by the metering rod and begins to open at the very instant the throttle is opened." JIMO: Would this be a good finishing point? Things to keep in mind: Carlsjeep: "It's also important that the metering rod is resting on the jet at idle to close off the main jet. You also want the metering rod to lift off the jet just after the throttle plate starts to move." Carlsjeep: "I agree that it's best to check the metering rod to be sure the pin is not holding it off the jet after the engine has been run and the idle set. Especially if your using an after market metering rod. If the pin has to be lowered you may have to go back and reset the idle and the idle bleed. The metering rod, throttle plate screw and idle bleed screw have to be right for the engine to run right. Of course the accelerator pump is in the picture as well." JIMO: Float level is everything as well, yes?? Jeeprodger: "4) To test that the main jet is closed, look into the carb with the engine running - you should see no gas dripping from the venturi until the throttle is just cracked a hair." Thoughts? Jim |
|
|
1946 CJ-2A
1996 F-150 2000 XJ MITY KAT CRAWLER "I love it when a plan comes together" |
|
|
|
|
Post Reply
|
Page 12> |
| Tweet |
| Forum Jump | Forum Permissions You cannot post new topics in this forum You cannot reply to topics in this forum You cannot delete your posts in this forum You cannot edit your posts in this forum You cannot create polls in this forum You cannot vote in polls in this forum |


 Topic Options
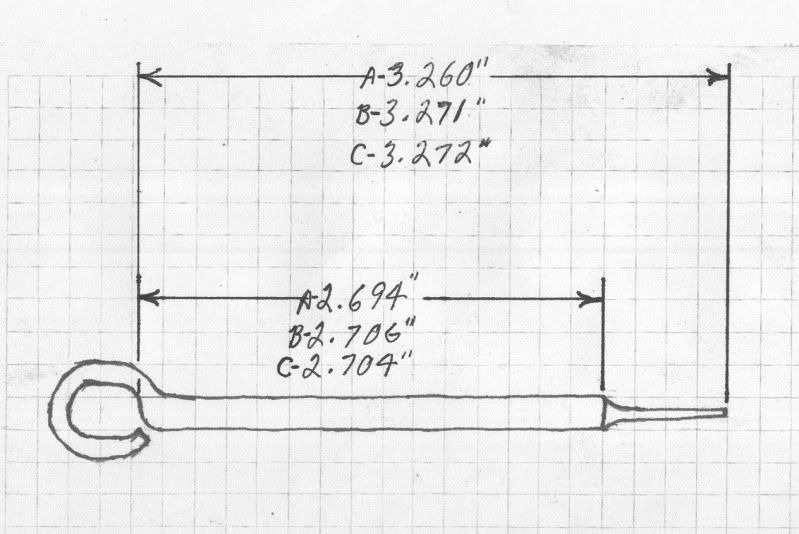
 Carlsjeep wrote: