46 CJ2A #69750
Printed From: The CJ2A Page
Category: CJ-2A Discussion Area
Forum Name: Your Jeep Project
Forum Description: Show everyone progress on your jeep!
URL: https://www.thecj2apage.com/forums/forum_posts.asp?TID=36996
Printed Date: 16 Apr. 2024 at 12:10pm
Software Version: Web Wiz Forums 12.06 - http://www.webwizforums.com
Topic: 46 CJ2A #69750
Posted By: mbullism
Subject: 46 CJ2A #69750
Date Posted: 11 Feb. 2016 at 4:05pm
Well, it's feeling like it's time  The bulk of my ownership to date has been acquisition, documentation, maintenance checks and fluid changes... things are creeping along of a sort, and I figured I'd start to document the process. (Backstory---> http://www.thecj2apage.com/forums/looking-forward69750_topic36542.html" rel="nofollow - here ) My starting point: . http://s1304.photobucket.com/user/mbullism/media/CJ2A%2069750/5400D4F0-6A01-49DC-B9B7-574F9560E1C1_zpsip7pmh3u.jpg.html" rel="nofollow"> 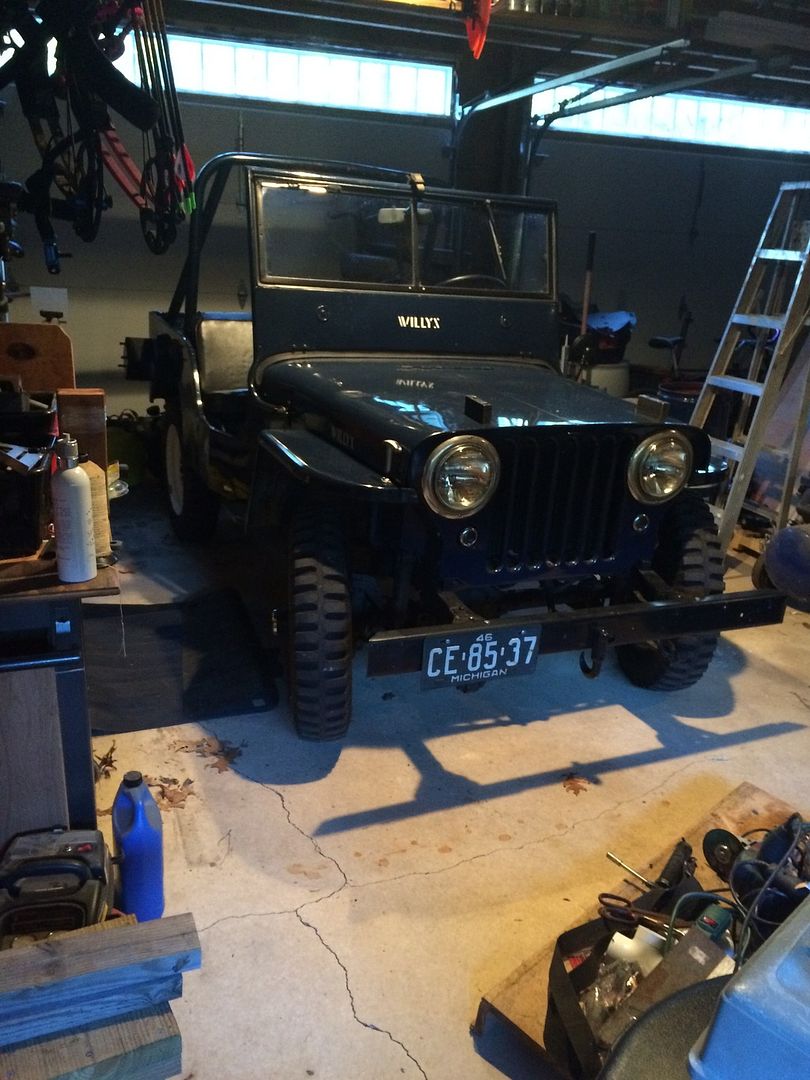 . 1946 2A #69750, built right about halloween of 46. Mostly stock, some previous body work that'll work for now, the original engine apparently long gone and a Kaiser supersonic block and head in it's place. Near as I can tell, all the 2A style bolt-ons were swapped onto the bare block. It's been swapped to 12v when the wiring harness was replaced, but all the 6v stuff (bulbs too!) came with it should I decide to revert. Already a driver, needs a little TLC. Springs all four corners are hurting . http://s1304.photobucket.com/user/mbullism/media/CJ2A%2069750/Michigan/042_zpsgvhl8ghr.jpg.html" rel="nofollow">  . Note the reverse arch in this front spring (and I have to get after that fender brace as well) . http://s1304.photobucket.com/user/mbullism/media/CJ2A%2069750/Michigan/049_zpsh4ytzx06.jpg.html" rel="nofollow">  . found some springs, lol.. . http://s1304.photobucket.com/user/mbullism/media/CJ2A%2069750/parts%20chassis/6D1E0CF1-A6BE-433F-B18C-27795A18CFD7_zpsfjuxe0zs.jpg.html" rel="nofollow"> 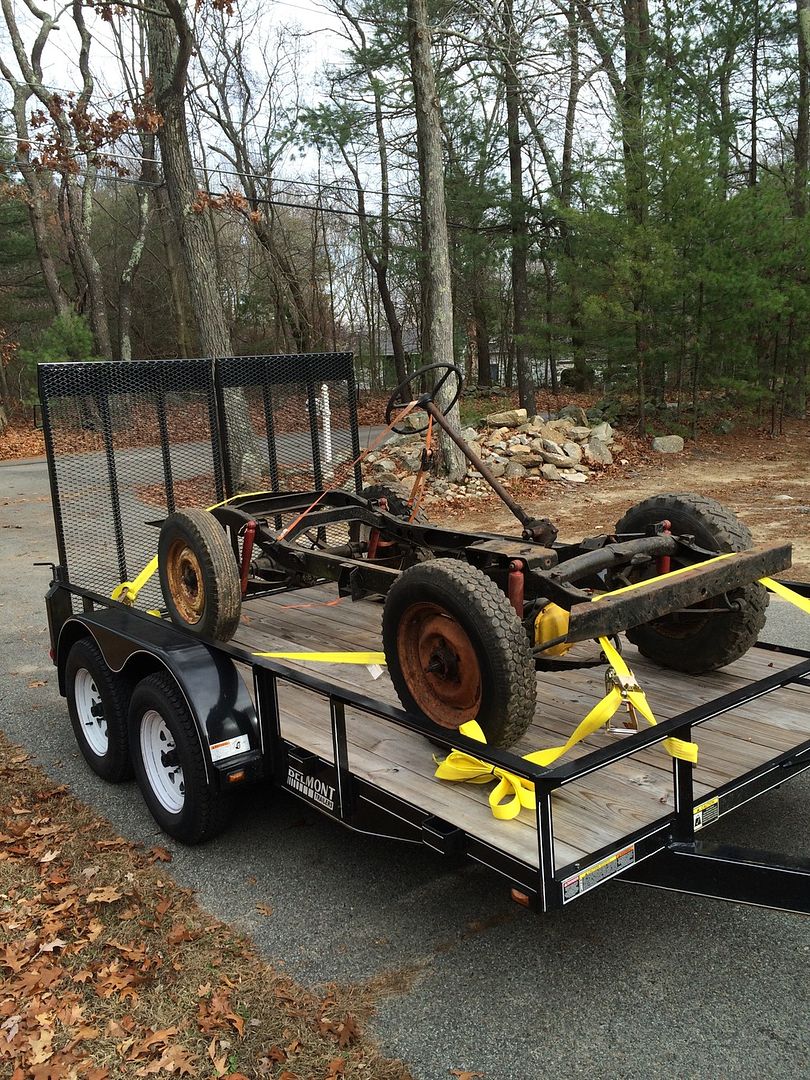 . Transmission felt good on my test drive, but has the decel second gear pop out.. so I sourced this: (just happens to have an assembly date a week after I believe the jeep was numbered) . http://s1304.photobucket.com/user/mbullism/media/CJ2A%2069750/T90%20rebuild/D2DC5E0B-C631-4DA1-8458-8FD9075CDC08_zpsb0ahieop.jpg.html" rel="nofollow"> 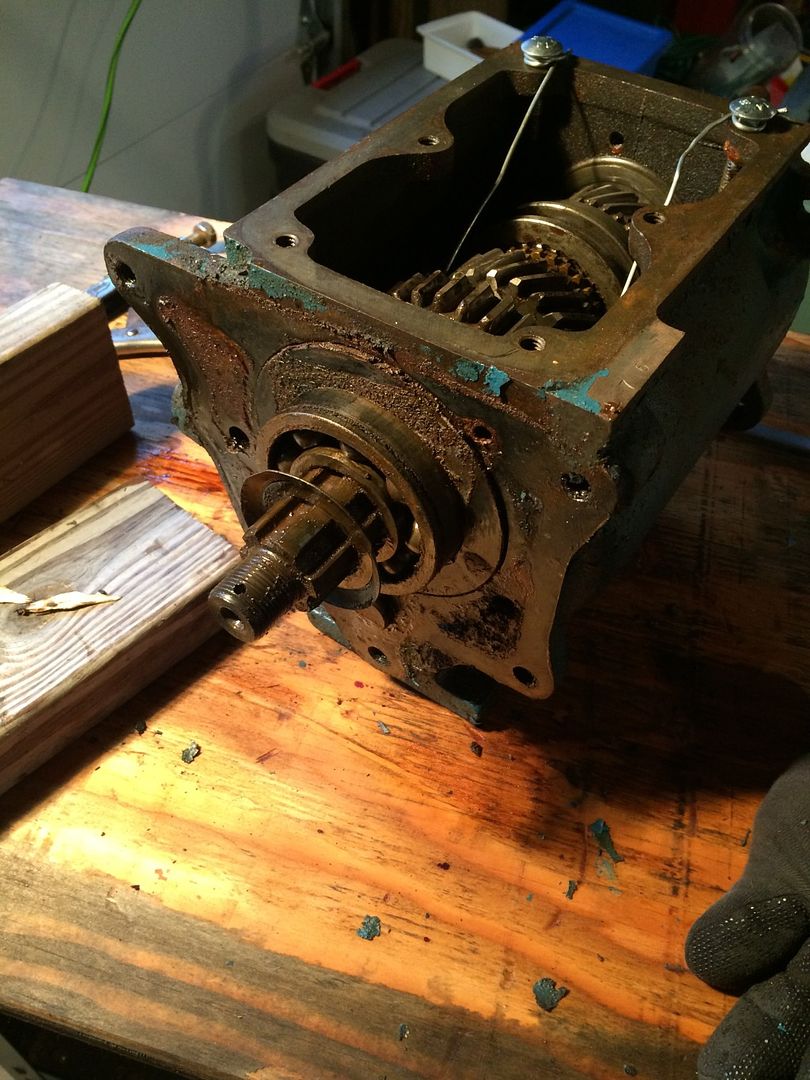 . and we're well on the way back... the current plan is a "quick" swap, and to rebuild the original if the dates on that look original... . http://s1304.photobucket.com/user/mbullism/media/CJ2A%2069750/T90%20rebuild/9329ad8f-0fb0-42c4-a9e9-199dfc074f44_zpsehywsx8z.jpg.html" rel="nofollow"> 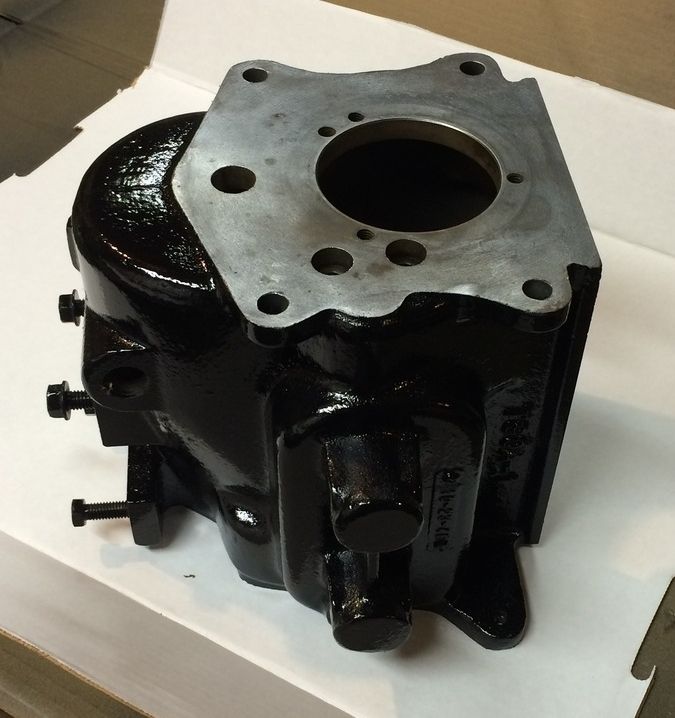 . It's supposed to be frigidly cold this weekend, sounds like a good time to stuff all the new guts back in this case, in a nice warm basement  . The rolling frame has been dismantled, the frame moved on, and the "new" springs set for a good disassembly/cleaning/reassembly/paint/swap. . The rolling frame has been dismantled, the frame moved on, and the "new" springs set for a good disassembly/cleaning/reassembly/paint/swap.Not so much a project, yet, but wanted a place to document over time... it goes by so fast  ------------- Those who do not learn from history are doomed to repeat it... Welcome to 1930's Germany |
Replies:
Posted By: mbullism
Date Posted: 12 Feb. 2016 at 4:51pm
|
So as I've been going along, I'm trying to clean/paint and re-gasket things. Wire brushing treads, chasing threads with taps, paint stripper, degrease, primer and paint of the few places I've been to date gives me a new found respect for folks that go frame off over years... seriously. . http://s1304.photobucket.com/user/mbullism/media/CJ2A%2069750/oil%20pan%2001-21-16/326B0222-BAFE-4BDB-AF4F-9582C07C28A4_zpsxejrxqgn.jpg.html" rel="nofollow"> 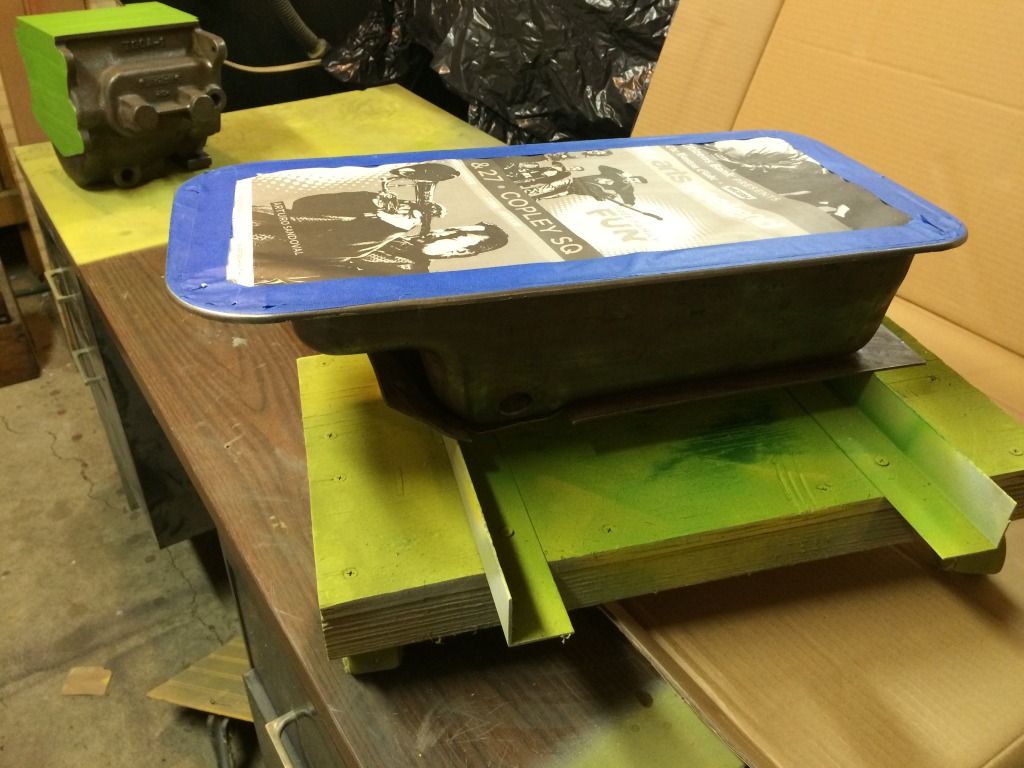 . http://s1304.photobucket.com/user/mbullism/media/CJ2A%2069750/oil%20pan%2001-21-16/E0C07D18-A9A3-41E6-85F0-D5A6E8DBF740_zpsqrgtivo5.jpg.html" rel="nofollow">  . http://s1304.photobucket.com/user/mbullism/media/CJ2A%2069750/oil%20pan%2001-21-16/82D4BFA2-B26D-48F8-8908-8EC9E3CD2669_zps43js3ata.jpg.html" rel="nofollow"> 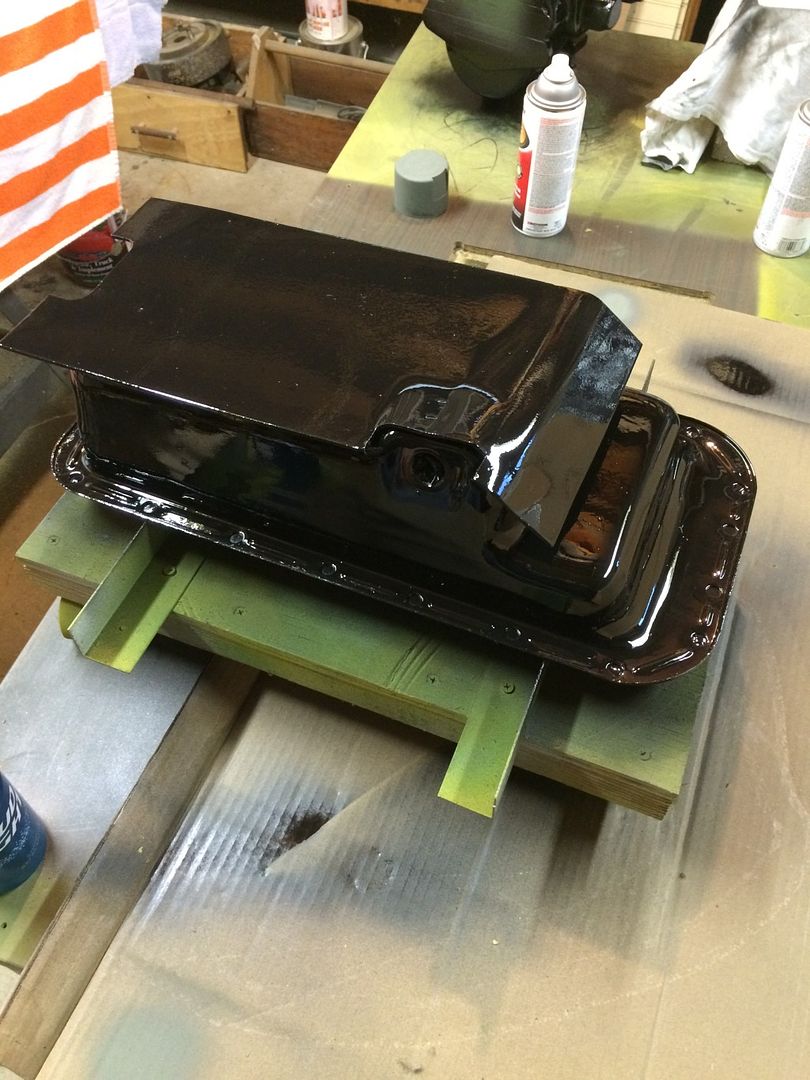 . Part of reversing 70 years is looking in places ya normally wouldn't go  . http://s1304.photobucket.com/user/mbullism/media/CJ2A%2069750/FBBB0287-E045-44B5-BCBF-0545F17D5CBC_zpspz3xwrlf.jpg.html" rel="nofollow"> 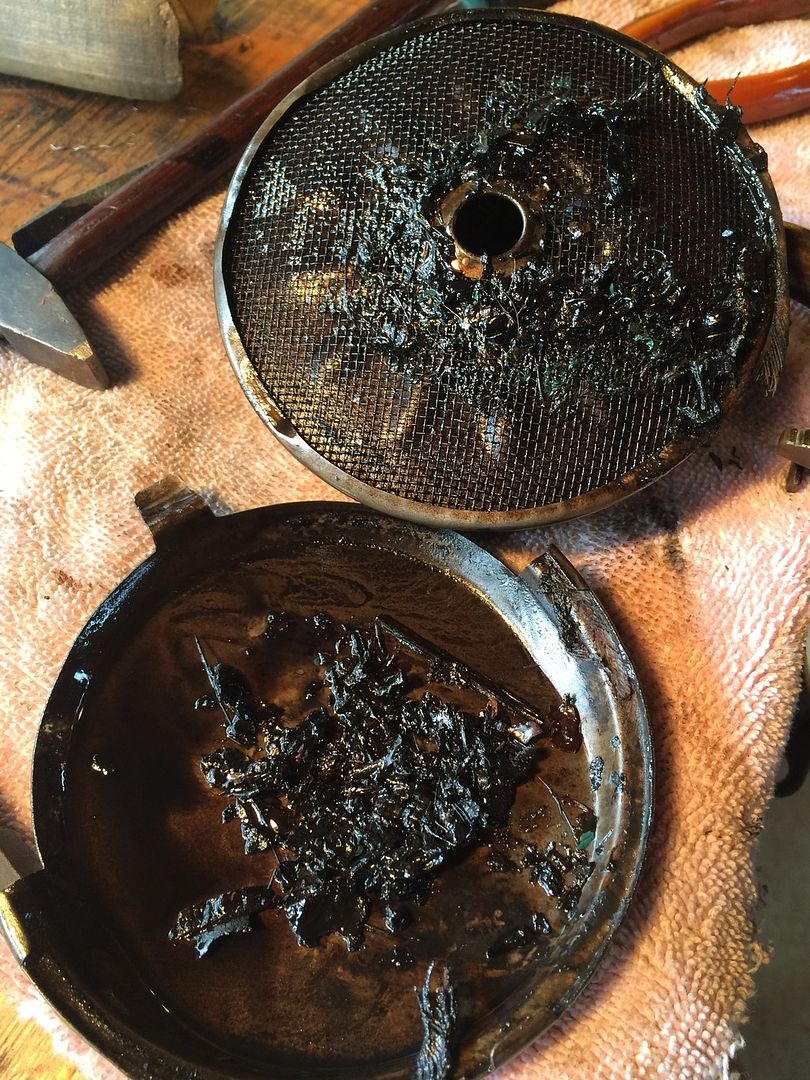 ------------- Those who do not learn from history are doomed to repeat it... Welcome to 1930's Germany |
Posted By: SE Kansas 46 CJ-2A
Date Posted: 13 Feb. 2016 at 1:54am
|
I'm going to be following this with interest. My 2A is #64462 and had to have been built just a little before yours. (A month maybe?). The condition of your 2A body puts mine to shame. While I don't have a lot of rust, there are dings and folds and bondo everywhere. Unfortunately, I can never restore mine to original because it has an M-38 frame under it. I put it in the garage 20 years ago and walked around it all that time figuring I would get around to working on a few critical problems (steering, brakes, electrical...) one of these days. Just started in January to get Ol' Red back on the road. I have the body off the frame and have rebuilt the steering box and am currently going through the brakes. The plate on my dash was brass by the way... ...and following your old history on the link you gave I notice you have three fine looking helpers to help you! Good luck with your restoration. I'll be looking over your shoulder...if you don't mind that is! ------------- 46 CJ-2A #64462 "Ol' Red" (bought April 1969)(second owner)(12 V, 11" brakes, M-38 frame, MD Juan tub) U.S. Coast Guard Chief Petty Officer(ret.) U.S. Army Vietnam veteran and damned proud of it. |
Posted By: mbullism
Date Posted: 13 Feb. 2016 at 3:12am
|
Don't mind at all, SEK... Your brass tag, is it all brass showing as mine appears, or is it painted black with just the raised letters the brass showing through? I have a feeling mine may have been cleaned aggressively in the past, removing any paint. My frame horns have been "reinforced", the tag long gone, so I'm not even sure the frame in mine is original (keeping in mind I know the engine isnt). The passenger side rocker has been re-skun, the rear panels replaced and the hat channels and floors pieced back together.... this list goes on, lol, and I don't care I used the logic in this thread to estimate build date: http://www.thecj2apage.com/forums/when-was-my-cj2a-made_topic16466.html" rel="nofollow - http://www.thecj2apage.com/forums/when-was-my-cj2a-made_top serviic16466.html so starting at #63585 at service bulletin 795 effective 10/7/46 and figuring 175/day, #64462 looks to be around 10/12/46 or so, so that's only a couple weeks apart ;) ------------- Those who do not learn from history are doomed to repeat it... Welcome to 1930's Germany |
Posted By: SE Kansas 46 CJ-2A
Date Posted: 13 Feb. 2016 at 6:16pm
|
Well, I had the build date on #64462 at around 1st of October so it couldn't be too far off. I'll split the difference and celebrate Ol' Red's birthday on the 5th of October 1946. The all brass dashplate was originally brass lettering showing through a black background. Sounds like you have your work cut out for you with body repairs and frame repairs. My M-38 frame is in very good shape with only some surface rust in a few places. I am getting ready to clean it up and repaint it in the vicinity of the master cylinder where brake fluid has leaked on it. I will install a new master cylinder and clutch linkage parts before I put the tub back on. The frame won't be original, but most people wouldn't know the difference anyway and I doubt I could come up with an original frame anyway. Oh well, it's not like I'm entering it in a Concours contest; Ol' Red is for driving...  ------------- 46 CJ-2A #64462 "Ol' Red" (bought April 1969)(second owner)(12 V, 11" brakes, M-38 frame, MD Juan tub) U.S. Coast Guard Chief Petty Officer(ret.) U.S. Army Vietnam veteran and damned proud of it. |
Posted By: mbullism
Date Posted: 19 Feb. 2016 at 3:30am
|
So the NOS cluster gear I found didn't have index slots for the thrust washer... . http://s1304.photobucket.com/user/mbullism/media/CJ2A%2069750/T90%20rebuild/3B82D6CA-F60B-49FC-956B-4A238BA8481F_zpscctoev9u.jpg.html" rel="nofollow">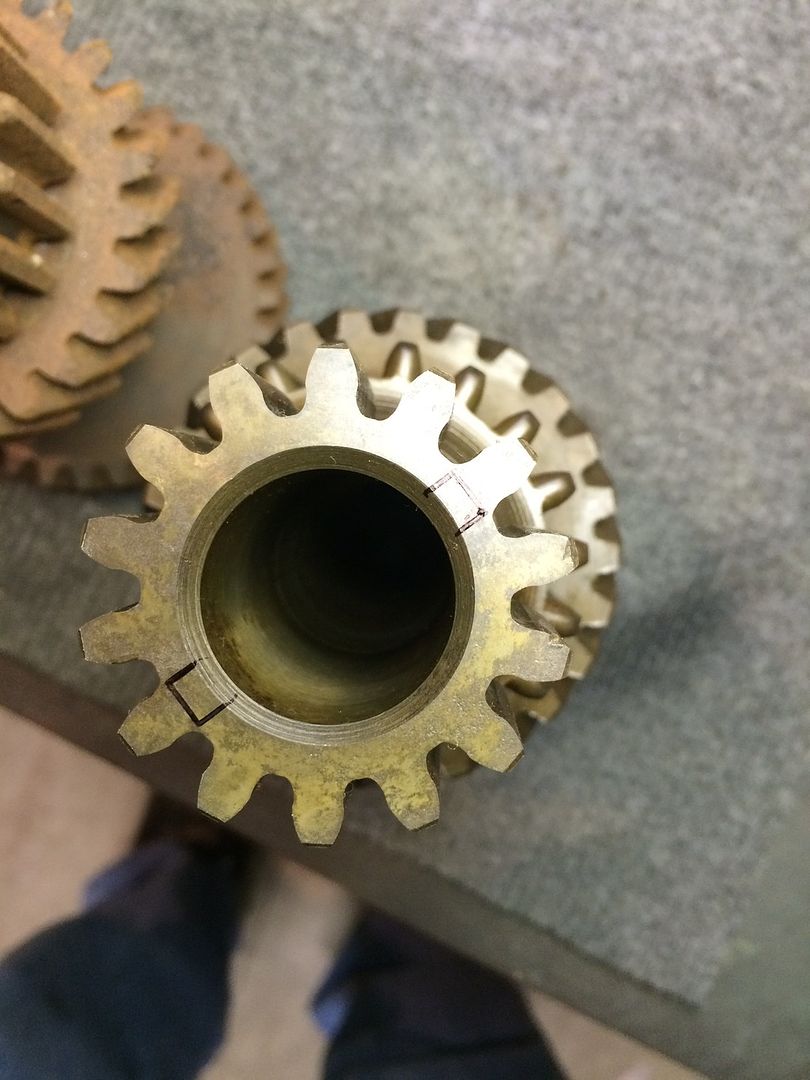
. fortunately they shipped separately and all I had to do was install them . http://s1304.photobucket.com/user/mbullism/media/CJ2A%2069750/T90%20rebuild/F03EF7BB-E3A3-4B06-8FB9-2A610E71741E_zpsbpzvxmeh.jpg.html" rel="nofollow"> 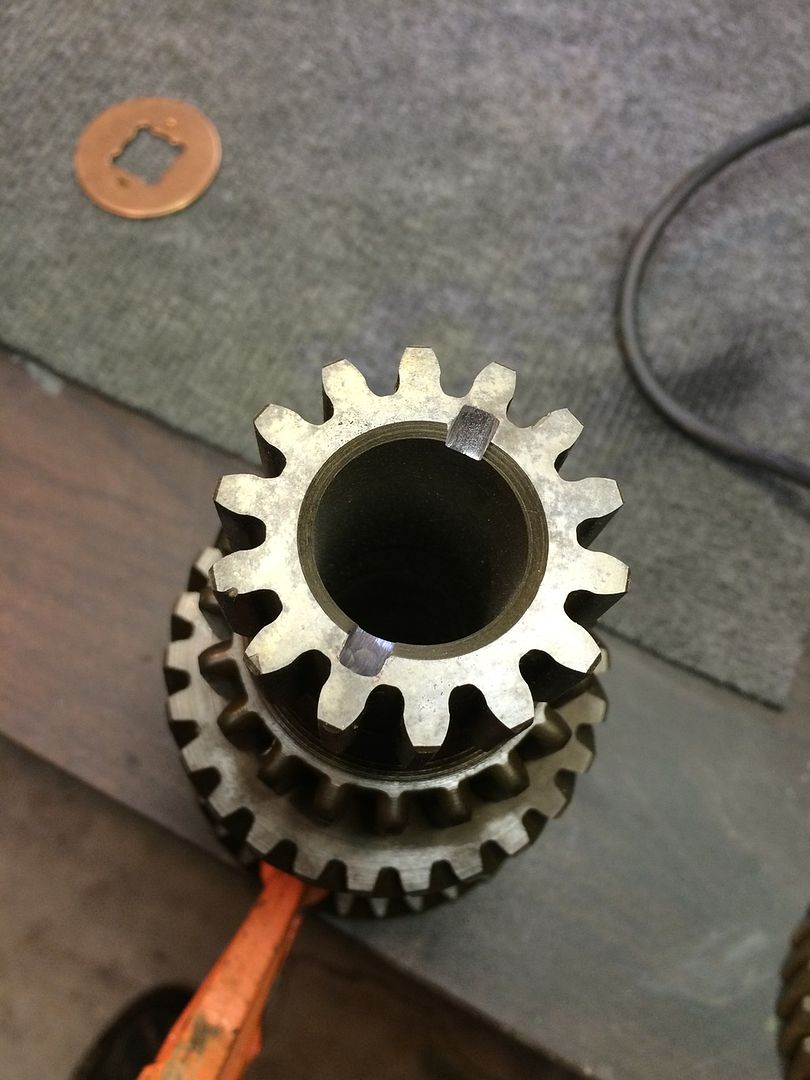 . http://s1304.photobucket.com/user/mbullism/media/CJ2A%2069750/T90%20rebuild/804474C4-C841-45FE-8577-B608B3DD307F_zpsds1rw7o3.jpg.html" rel="nofollow"> 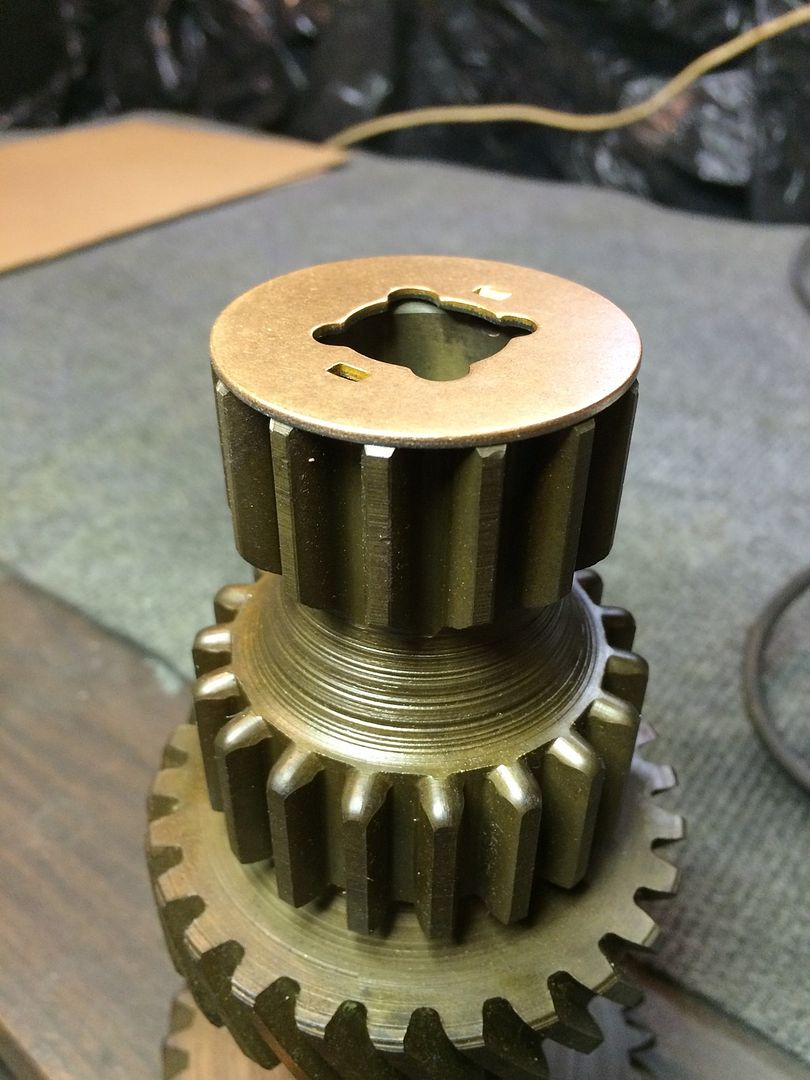 . all loaded up . http://s1304.photobucket.com/user/mbullism/media/CJ2A%2069750/T90%20rebuild/1008D69B-1A30-4773-85C8-2771EA056F66_zpsse5rxsh4.jpg.html" rel="nofollow"> 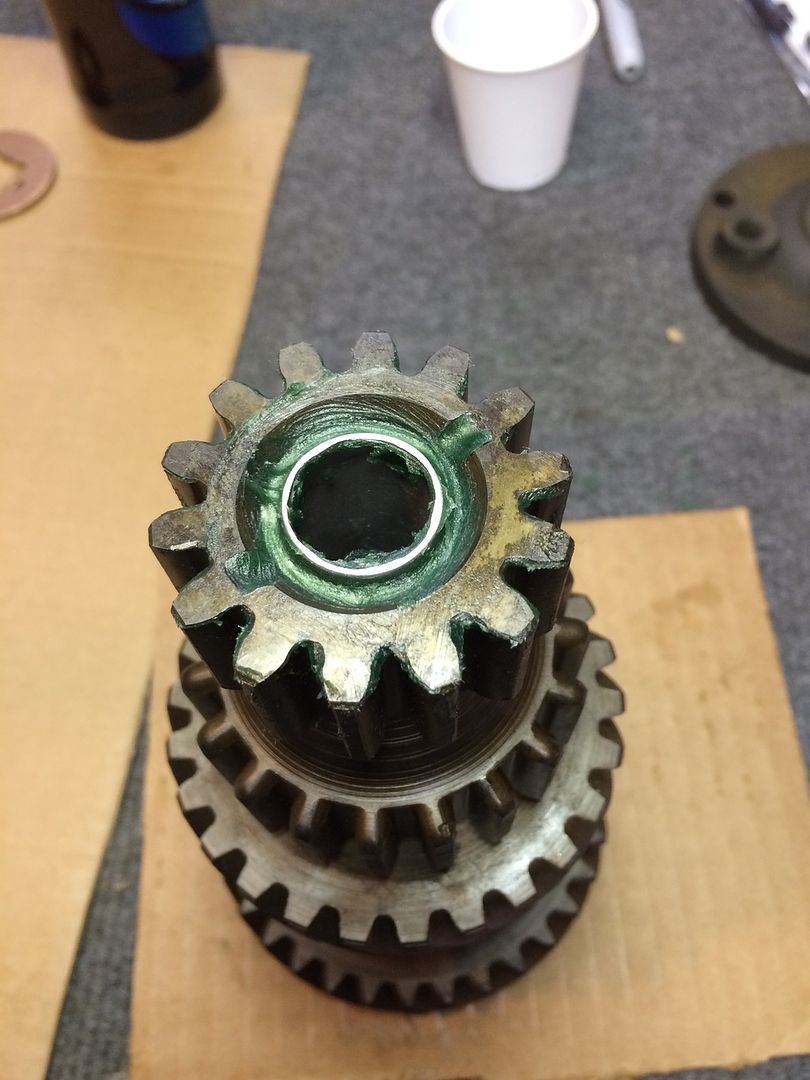 ------------- Those who do not learn from history are doomed to repeat it... Welcome to 1930's Germany |
Posted By: mbullism
Date Posted: 21 Feb. 2016 at 12:26am
|
So today was warm enough to spend time in the garage, continuing on with fluids and gaskets... I continue to be happy with what I find... . http://s1304.photobucket.com/user/mbullism/media/CJ2A%2069750/FC3645BC-51F8-41AD-91F9-431243B51617_zpsh2tdt41e.jpg.html" rel="nofollow">  . Disassembly of my donor springs... . http://s1304.photobucket.com/user/mbullism/media/CJ2A%2069750/0F52C184-505A-493C-813F-14184B7D2C91_zpsvijauwue.jpg.html" rel="nofollow">  . http://s1304.photobucket.com/user/mbullism/media/CJ2A%2069750/C4F47215-09D8-4D02-992C-A08F76DBBBD8_zpsqr2ynzgr.jpg.html" rel="nofollow"> 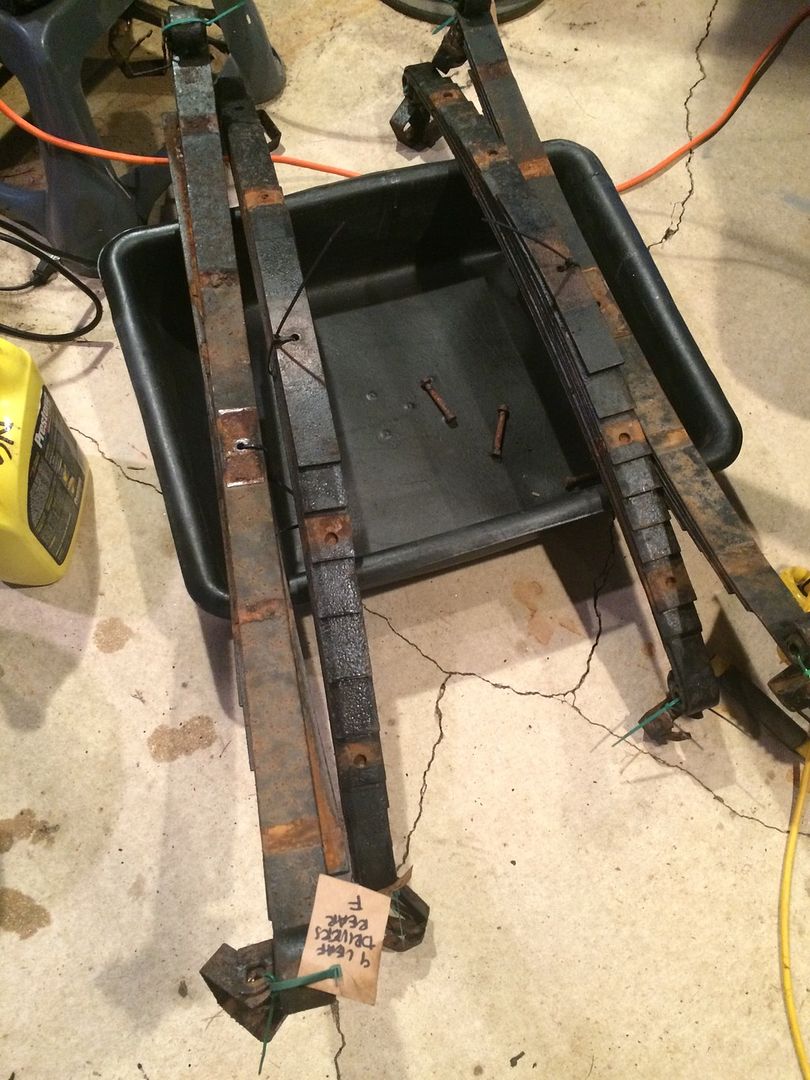 . cleaning and reassembly starts tomorrow- ------------- Those who do not learn from history are doomed to repeat it... Welcome to 1930's Germany |
Posted By: SE Kansas 46 CJ-2A
Date Posted: 21 Feb. 2016 at 1:29am
I like that cluster gear mod...where there is a will there is a way... ------------- 46 CJ-2A #64462 "Ol' Red" (bought April 1969)(second owner)(12 V, 11" brakes, M-38 frame, MD Juan tub) U.S. Coast Guard Chief Petty Officer(ret.) U.S. Army Vietnam veteran and damned proud of it. |
Posted By: Speedy
Date Posted: 21 Feb. 2016 at 3:48am
|
that oil slinger, on the T90 transmission that gets sandwiched behind the transfer case drive gear…… I never seen this on any of mine :S oh oooooo. ------------- - Mike 47 CJ2A - Warn OD, Ramsey PT1-J/Koenig 100,Arctic top,Dana 44 30 spline full float with disc's,Dana 30 with discs, 2.5 lift, Saginaw power steering, dual master cylinder |
Posted By: mbullism
Date Posted: 23 Feb. 2016 at 9:35pm
|
So over the weekend I cleaned up two springs leaf by leaf... suckage work, lol. http://s1304.photobucket.com/user/mbullism/media/CJ2A%2069750/6892C32A-2E9A-4238-82C4-EC547B9614D1_zps0800kgqy.jpg.html" rel="nofollow"> 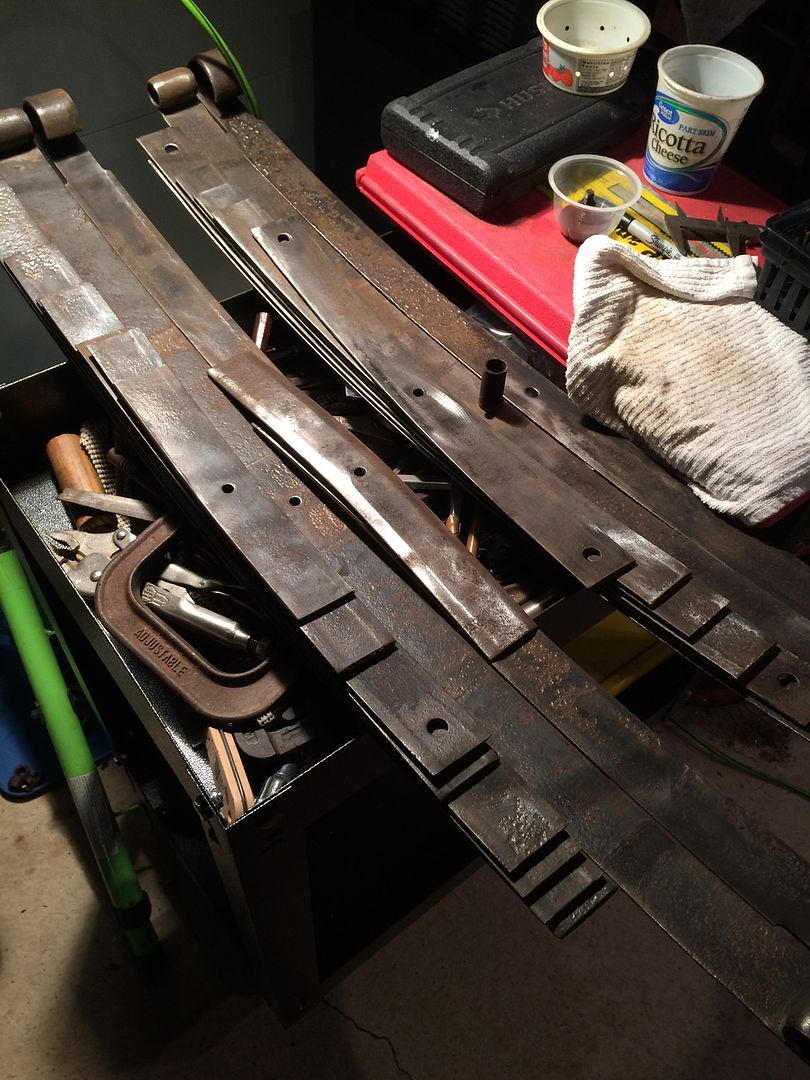 . . also picked up some new sheet metal for the back . http://s1304.photobucket.com/user/mbullism/media/CJ2A%2069750/d287d8a1-8c59-4e2e-89c7-3b1a692d0d7e_zpsf9ifgusg.jpg.html" rel="nofollow">  ------------- Those who do not learn from history are doomed to repeat it... Welcome to 1930's Germany |
Posted By: mbullism
Date Posted: 15 Mar. 2016 at 7:07pm
|
Continued progress, though very little to see... the most important development is the first engine start since I drove off the trailer and into the garage last fall, early October. Chased down some bad grounds, worked around a now dead battery and months old gasoline. You can't tell in the photo but it's happily idling away http://s1304.photobucket.com/user/mbullism/media/CJ2A%2069750/A5C275A6-C429-43D7-BDC4-486DB1DDA22E_zpsfsmcpc0z.jpg.html" rel="nofollow"> 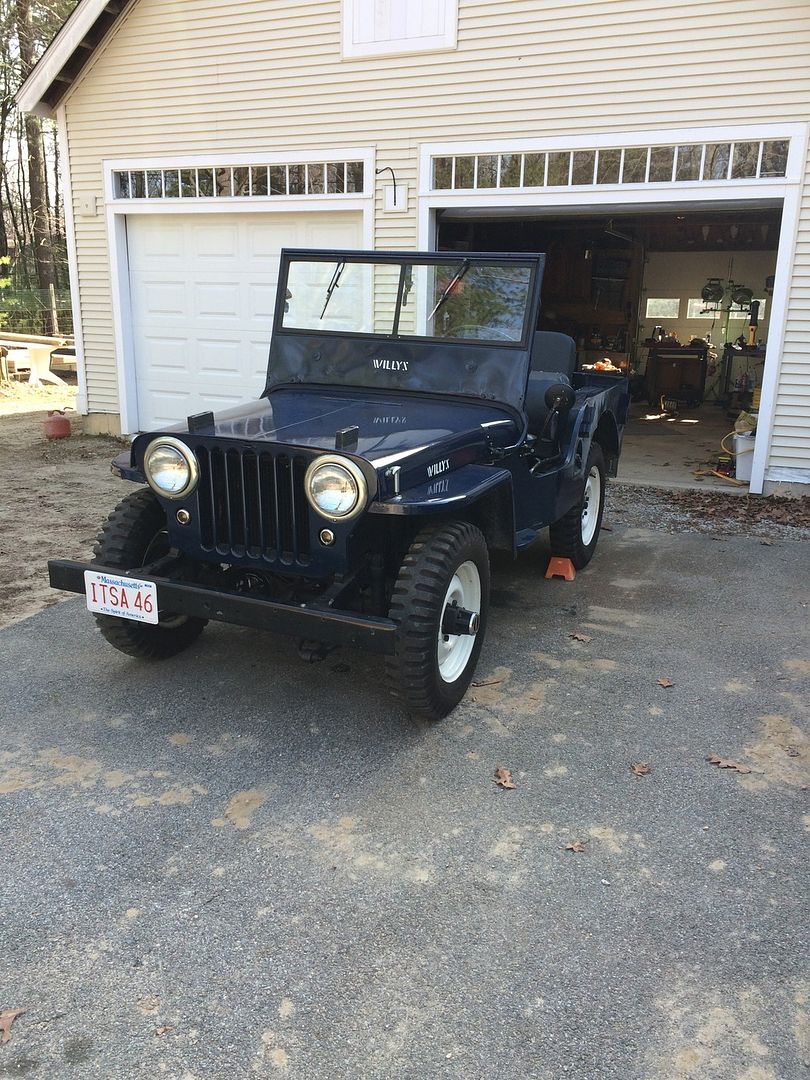 Let it come up to temp, watching oil pressure like a hawk, lol... then a couple of spins around the ponderosa. Well as much of a spin as one can have on two acres . It was getting late on Sunday afternoon, temps in the low 60's... grabbed the wife and headed out. First flight was a solid 13-15miles, loops never getting more than a couple miles from home... went better than a first trip had a right to. Identified a few new rattles to address... Grin still on my face as I type this here Tuesday.Springs and tranny swap still on the horizon, going to focus on the wiper motor and parking brake first and get past the state inspection. Engine is running well, but plans are to continue on through checking valve adjustments, timing, dwell, etc, etc...
------------- Those who do not learn from history are doomed to repeat it... Welcome to 1930's Germany |
Posted By: Flatfender Ben
Date Posted: 16 Mar. 2016 at 12:53am
|
Sweet plates. Glad the test drives went so well Great job thanks for sharing 
|
Posted By: mbullism
Date Posted: 13 Apr. 2016 at 7:52pm
|
been a little remiss with the camera as of late... I've resurrected the vacuum wiper and it works bomb. The parking brake turned into more of a thing than I had planned, but we're working now, and quite well actually. One little adjustment to take a little slack out of one tie rod at the bell crank and saturday I think I'll finally go after that inspection sticker- cuz sunday I'm gonna put a tank full of gas through this thing if I have to stay in RI and CT to do it ------------- Those who do not learn from history are doomed to repeat it... Welcome to 1930's Germany |
Posted By: mbullism
Date Posted: 16 Apr. 2016 at 4:20pm
|
Scored the Kings permission this morning . http://s1304.photobucket.com/user/mbullism/media/CJ2A%2069750/CFB8D525-B8F2-49DC-9DD1-ED39B3E48535_zpscl4ylsxv.jpg.html" rel="nofollow">  ------------- Those who do not learn from history are doomed to repeat it... Welcome to 1930's Germany |
Posted By: markcl52
Date Posted: 27 Apr. 2016 at 1:08pm
| I need to get my parking brake working and then I'm hoping to get an inspection sticker too. Was there anything they gave you a hard time on? There are several things for me that could go either way depending on how much of a stickler the inspector is. |
Posted By: bkwudz
Date Posted: 27 Apr. 2016 at 2:19pm
where in mass are you? With these willys in mass, a lot depends on the inspection station you go to. I had been going to one for years, the owners son always did the inspection and never had any issues. last year I pull in and while im inside paying, I see the owner out there looking over the willys. I go out and he says if im here for an inspection, he will have to fail it. When I ask why, he rattles off a half dozen reasons, of which only one applied, maybe. Like seat belt, license plate light etc. I try to explain this to him, but he just said no, walked away. And he knows I come there every year, have been a custom for years. didn't care. At least he told me BEFORE he failed it. I asked around and found the hot rod friendly shop in town. Its a full shop that specialize in custom exhausts. Took it to them, they stickered it no questions asked. They spent more time checking it out than they did doing the inspection. find any place in your town that does custom car hotrod stuff. IF they don't do inspections ask them who you should go to. They will know! ------------- Paul F http://eastcoastwillys.proboards.com/forum" rel="nofollow - East Coast Willys Association https://www.facebook.com/groups/MPIFFC/" rel="nofollow - MASSACHUSETTS PATROL IFFC |
 markcl52 wrote:
Posted By: mbullism
Date Posted: 27 Apr. 2016 at 5:58pm
I basically picked a mom and pop type mechanic shop that's been around for years (versus a big chain type) .... When I pulled up there were three guys out front, one asked if I needed a sticker (yes, lol), the other said they would have to take it for a test drive ... I felt I was in good hands, so I asked if they were gonna have any issues with factory equipment, cuz it aint got none. They all laughed, and it devolved into 20 minutes of talking Willys, mine and a couple others they'd worked on...or towed, lol. I'm glad i got the wiper, the horn, the headlights, the parking brake, etc., etc. etc. all in tip top shape... in the end he jacked the front and checked the king pins. That was basically it.They never did get their test drive I honestly thought they might give me grief about the NDTs, factory or not. Would have meant schlepping home to throw my white spoke wranglers on, but I'm guessing they knew I was just gonna switch 'em back- ------------- Those who do not learn from history are doomed to repeat it... Welcome to 1930's Germany |
Posted By: mbullism
Date Posted: 27 Apr. 2016 at 6:06pm
|
Ok, so this is a first for me, lol. While bleeding the brakes I took note that the cotter pins were missing, top and bottom, on the drivers side rear shock absorber... but the washers are both there. Upon closer inspection, it appears the shock bushings were too wide to get the pins in... the OBVIOUS fix to all but the most uneducated was to hold the washer on by mushrooming the end of the mount with a ball peen hammer. Bubba is nothing if not surprising. Stupid Bubba. ------------- Those who do not learn from history are doomed to repeat it... Welcome to 1930's Germany |
Posted By: markcl52
Date Posted: 27 Apr. 2016 at 6:13pm
| I am in Eastern Mass, I keep the CJ2a in Waltham. I need to find the right place. I have the brakes, lights, wiper and horn in good shape, but the parking break slips (covered in oil), the tires are old, and there is slop in the steering. If i have to fix everything, I'd rather hold off on paying registration and insurance because it will take me a while to find the time. |
Posted By: mbullism
Date Posted: 27 Apr. 2016 at 6:25pm
The flip side is that once you register it you only have 7 days to get inspected... only took me about 6 weeks, lol. It would (should) be a minor ta-do, but in MA having no sticker or an expired sticker is somehow a moving violation, and is surchargeable... What a racket  ------------- Those who do not learn from history are doomed to repeat it... Welcome to 1930's Germany |
Posted By: mbullism
Date Posted: 28 Apr. 2016 at 11:20pm
|
Put some more time in today cleaning up my donor springs... this job continues to not be for the faint of heart, lol, especially given I'm not exactly sure of the outcome. The extent of my testing of the used springs is basically my putting my 220# on the rolling frame I bought and noting the spring set compared to the natural set of the springs currently installed. Previously dismantled, and power wire brushed . http://s1304.photobucket.com/user/mbullism/media/CJ2A%2069750/376ecc9c-87e7-4f5e-bfac-49bbf24ce8f9_zpstaj57czg.jpg.html" rel="nofollow"> 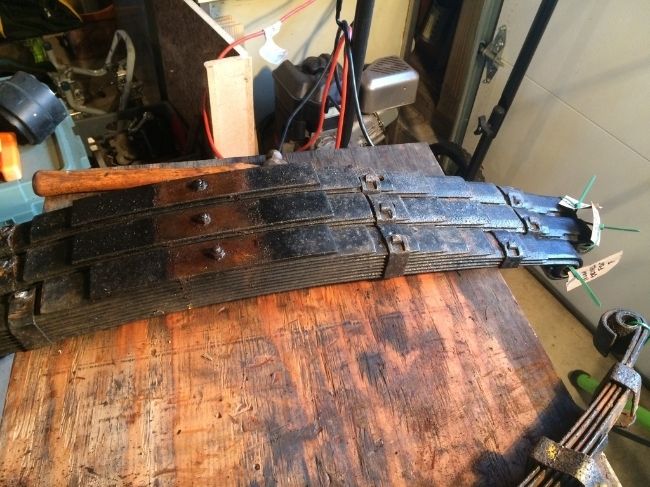 . http://s1304.photobucket.com/user/mbullism/media/CJ2A%2069750/61597617-2470-4aa9-a339-13861241acc7_zpsjyrbzi5f.jpg.html" rel="nofollow">  . Each leaf was gone over with paint/rust stripping pad in my angle grinder. I'm not gonna lie, I have some concerns about the pitting found on a few leaves, but we're gonna run with it for now. My thinking is i could've just swapped springs and they likely would've worked just fine, cleaning things up couldn't hurt too bad, lol. The edges were all dressed to remove stress risers, first with a grinding disk, then a medium flapper wheel . http://s1304.photobucket.com/user/mbullism/media/CJ2A%2069750/3497d323-0a7e-4d85-bf4b-b0354bd2f03a_zpszhqu3dwt.jpg.html" rel="nofollow">  . http://s1304.photobucket.com/user/mbullism/media/CJ2A%2069750/e7fe0955-03f8-4090-ab54-b1251648708d_zpsiufi94ei.jpg.html" rel="nofollow"> 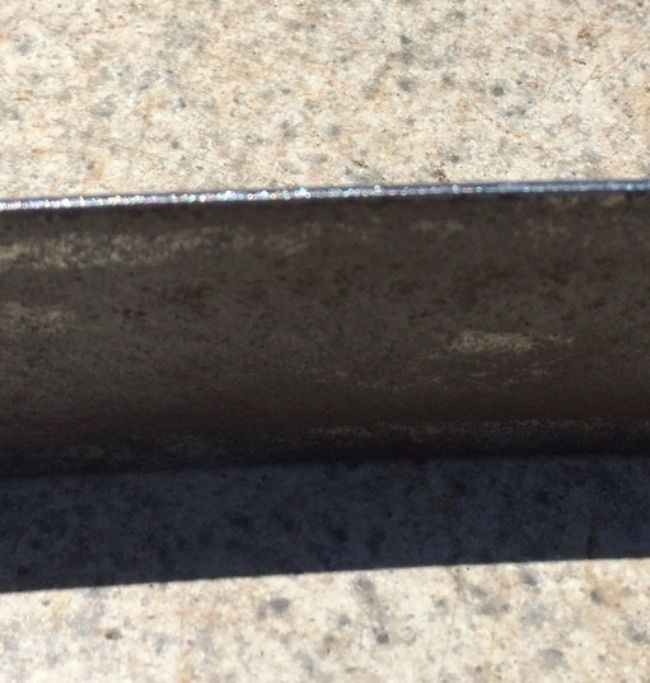 . Several leaves had ridges set in them from the ends of the leaf below... these catch points were eased, trying not to remove more material than necessary . http://s1304.photobucket.com/user/mbullism/media/CJ2A%2069750/a4039bba-ce86-4c84-80f4-03d3cb6e0f58_zpsg4jpayh9.jpg.html" rel="nofollow">  . http://s1304.photobucket.com/user/mbullism/media/CJ2A%2069750/7214500d-afb6-41ff-8f29-381674c898ab_zpsaqbr4sgv.jpg.html" rel="nofollow">  . loosely assembled... . http://s1304.photobucket.com/user/mbullism/media/CJ2A%2069750/d8342c5c-37a3-4fe4-ad2b-c9bdd2cd64b5_zpsuueofwgy.jpg.html" rel="nofollow"> 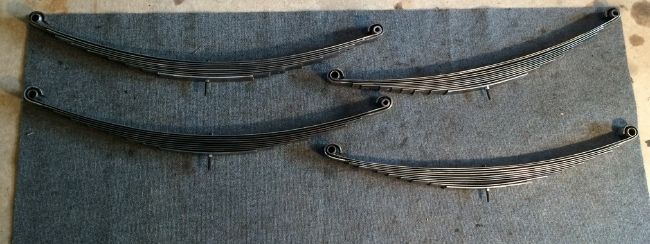 . Tomorrow the old bushings come out, each leaf gets wiped down, then re-assembly with new rebound straps. The current plan is re-assembly with graphite lube, then self etching priming of the springs as a whole unit, and paint, then pressing in new bushings. My 2A currently has 9 leaf rears, 8 leaf fronts... the "new" springs will be 9 leaf rears and 10 leaf fronts, I'm hoping the mitigation of the wear and tear and pitting as well as the overall cleaning will leave me no worse off than I started (the existing springs are beat) with a better overall stance. Time will tell  ------------- Those who do not learn from history are doomed to repeat it... Welcome to 1930's Germany |
Posted By: mbullism
Date Posted: 29 Apr. 2016 at 8:10pm
|
out with the old... . http://s1304.photobucket.com/user/mbullism/media/CJ2A%2069750/B39F935A-70A4-4B1A-B8D0-F2F322F535C1_zpsjt1zbjo3.jpg.html" rel="nofollow"> 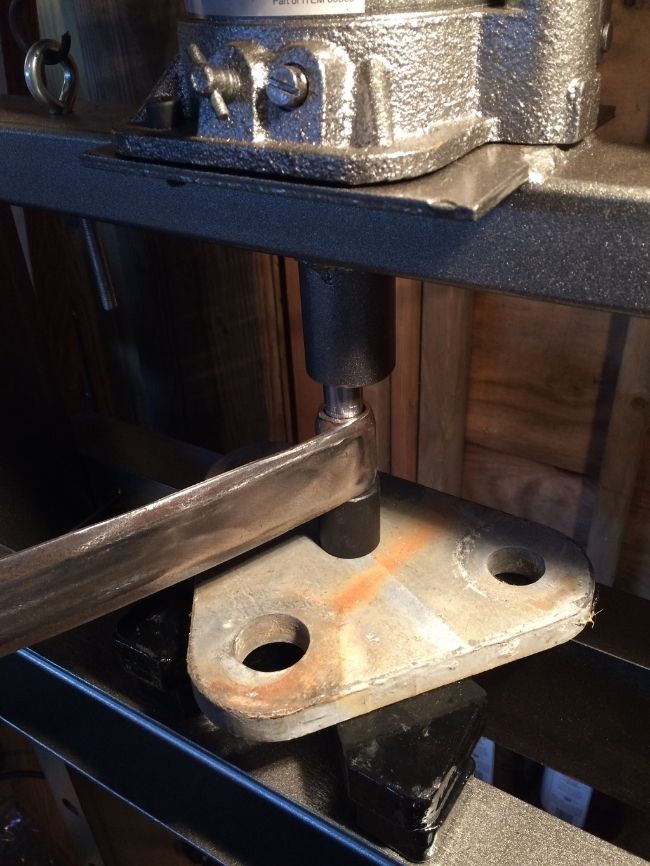 . in with the new . http://s1304.photobucket.com/user/mbullism/media/CJ2A%2069750/F603923C-70A2-48E5-BB54-D7EE6827E2DF_zpskelfyr6m.jpg.html" rel="nofollow"> 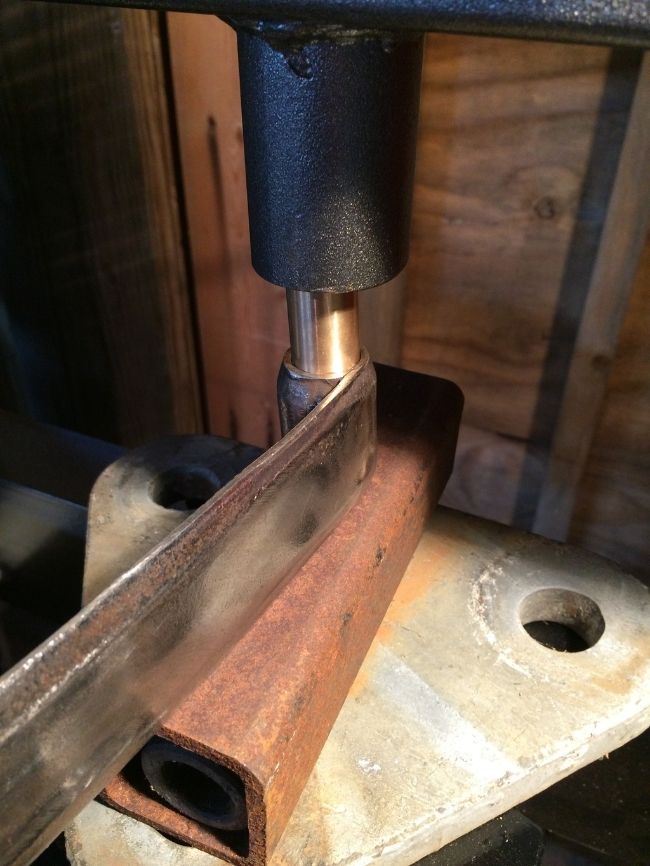
------------- Those who do not learn from history are doomed to repeat it... Welcome to 1930's Germany |
Posted By: mbullism
Date Posted: 29 Apr. 2016 at 8:12pm
|
Let's just say putting the rebound clips on, tight, looks a lot easier on TV, lol . http://s1304.photobucket.com/user/mbullism/media/CJ2A%2069750/5A24D4B1-10CC-4606-8623-B4E29CB852F1_zpsbydz5rop.jpg.html" rel="nofollow"> 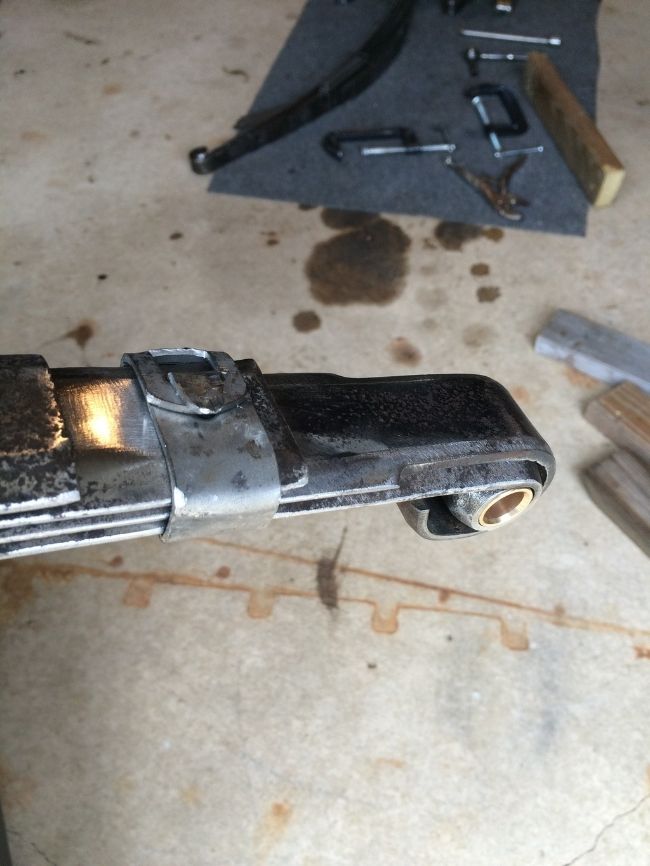 . but a little perseverance, and abundance of clamps ") . http://s1304.photobucket.com/user/mbullism/media/CJ2A%2069750/5D6BD57F-FC45-4325-A8F7-F93D98AB98DF_zpsi36uoexk.jpg.html" rel="nofollow"> 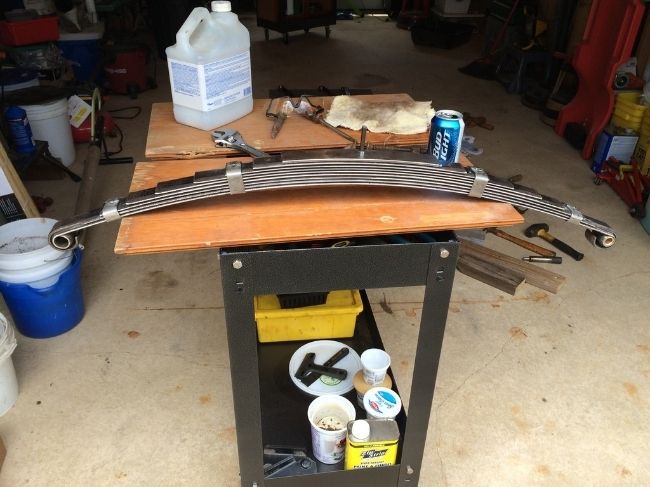 http://s1304.photobucket.com/user/mbullism/media/CJ2A%2069750/C6F0704F-9918-4324-82A9-E6819D361ED8_zpsda18m86h.jpg.html" rel="nofollow"> 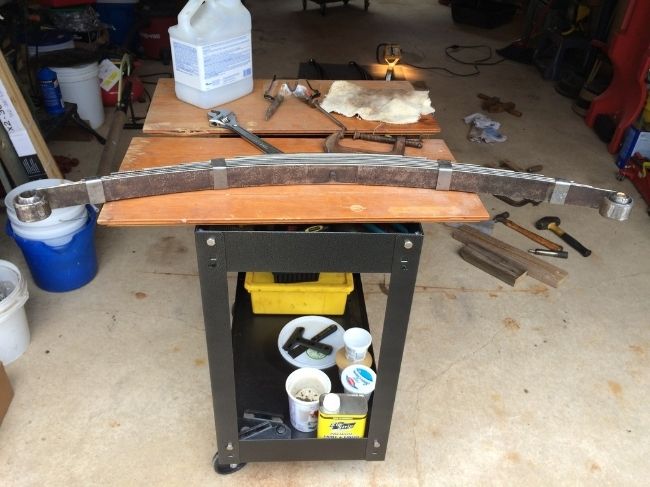 ------------- Those who do not learn from history are doomed to repeat it... Welcome to 1930's Germany |
Posted By: mbullism
Date Posted: 01 May 2016 at 5:25pm
|
What you are witnessing, ladies and gentlemen, if this doesn't work out, is undoubtedley the LAST time I will be attempting this It's gonna be fine... these have come together, the curse words have bounced off them cuz they're steel, and we're headed for paint. Finally. . http://s1304.photobucket.com/user/mbullism/media/CJ2A%2069750/E91138D9-7CBD-4957-92B8-19F02DA86CC8_zpsgy1jqhyi.jpg.html" rel="nofollow">  ------------- Those who do not learn from history are doomed to repeat it... Welcome to 1930's Germany |
Posted By: mbullism
Date Posted: 01 May 2016 at 9:12pm
|
The springs are downstairs in paint...hangin' around... end of a sunday, last day of a weeks vacay... rainin'.... Figured I'd go outside and take the temperature on the aluminum top I bought, start to get a feeling for what it was and wasn't going to let me get away with... it's got dents and creases to hammer out, holes to fill, yada yada... step one? a bath. It became apparent early on a sponge or bristle brush was not going to cut it, saving the patina was likely out and matching any soldered patches is folly anyway.... dish soap and a scotch brite pad, first pass on the roof: . http://s1304.photobucket.com/user/mbullism/media/CJ2A%2069750/Boston%20Top/8171FDBA-AF96-4E5B-9581-73C9E0B969EE_zpsmgadilbq.jpg.html" rel="nofollow"> 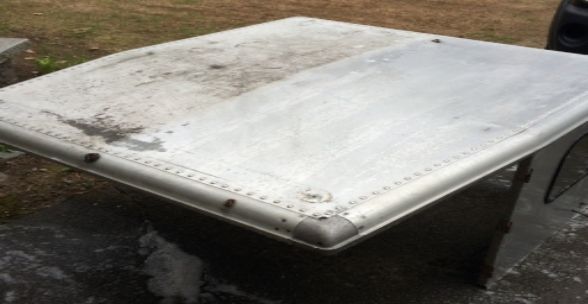 . http://s1304.photobucket.com/user/mbullism/media/CJ2A%2069750/Boston%20Top/317E8253-B6C4-4C23-963B-7741C05894AC_zps6cdmtbsi.jpg.html" rel="nofollow">  ------------- Those who do not learn from history are doomed to repeat it... Welcome to 1930's Germany |
Posted By: SE Kansas 46 CJ-2A
Date Posted: 01 May 2016 at 11:20pm
|
Looks like there may have been a little liquid lubrication in one of the photos of the finished springs...sometimes there is just no other way to look at a job ------------- 46 CJ-2A #64462 "Ol' Red" (bought April 1969)(second owner)(12 V, 11" brakes, M-38 frame, MD Juan tub) U.S. Coast Guard Chief Petty Officer(ret.) U.S. Army Vietnam veteran and damned proud of it. |
Posted By: markcl52
Date Posted: 01 May 2016 at 11:30pm
| I was looking at my springs today. My front springs are 10 leaf and with the weight of the jeep they are completely flat. I'd be interested to see how much arch you have on the front once installed. |
Posted By: mbullism
Date Posted: 02 May 2016 at 12:10am
|
My current front springs are 8 leaf and significantly reverse arched/sagging... the current plan is to compare old and "new" during the swap, as well as before and after install. To be clear, simply cleaning the new 10 leafs, rebanding and painting isnt going to make them anything they weren't already when I picked them up. It will make them flex smoother and possibly extend their life, but any arch they did or didnt have is what it is... that said, I firmly believe they are significantly better than what I have now- As for the liquid lube, lol, revamping and painting 38 leafs times two sides each is worthy of a glass with an ice cube in it...that beer can can't scratch the surface ------------- Those who do not learn from history are doomed to repeat it... Welcome to 1930's Germany |
Posted By: mbullism
Date Posted: 09 May 2016 at 1:59pm
|
So time has been a little limited lately, but I managed to get the front passenger side spring out, and the front drivers side is 85% out... letting some shackles soak. I'm feeling generally better about my outcome after the swap. Rear pivot, front passenger side: . http://s1304.photobucket.com/user/mbullism/media/CJ2A%2069750/5a786a77-f240-4e7e-8b23-03585a3c8e17_zpsdnh3ojv4.jpg.html" rel="nofollow">  . original 8 leaf next to the two 10 leaf fronts I just cleaned up (noticeably longer unsprung) . http://s1304.photobucket.com/user/mbullism/media/CJ2A%2069750/1B845344-1E85-409F-89F8-AD5A3259BF39_zpsu7vnhimu.jpg.html" rel="nofollow"> 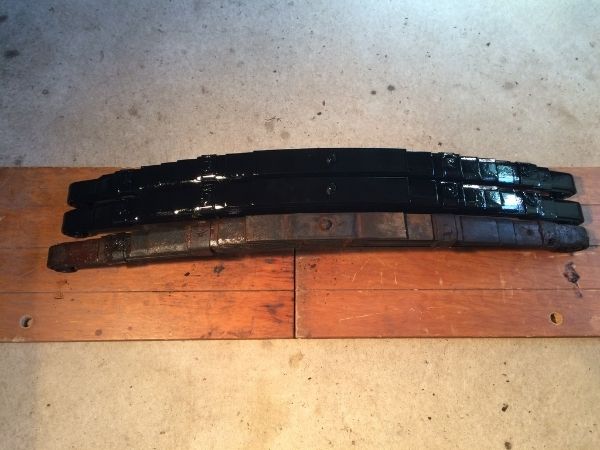 . I didn't catch it in this pic, but measured from the plywood up to the main leaf where the axle sits, the old stack is 3-3/4"+/-, the "new" ones are 4-1/4"...Assuming the military wrap loops are similar. I took measurements floor to fender and axle to bump stop at the frame before disassembling. Will be interesting to see what happens here afterwards.... . http://s1304.photobucket.com/user/mbullism/media/CJ2A%2069750/1369871A-DEE6-41C8-A32A-22E7A0E8F344_zpsdnhetoyk.jpg.html" rel="nofollow"> 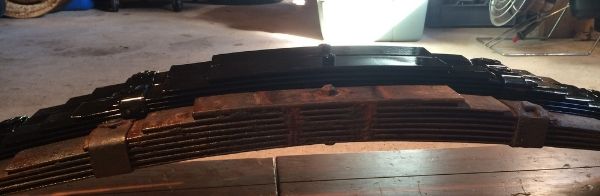 . So I'm sure I'm not breaking new ground here, but I was a little surprised that my 8 leaf originals have staggered end gaps, that is to say they appear to use the same length leafs as the 10 leaf stacks (which have a uniform layout). If I call the main leaf "1", and the full length military wrap "2" and so on, the 8 leafs are missing #3 and #7. I hadn't really thought about it to be honest, but I had anticipated even leaf end gaps instead of two places either side of center where the leaf above has to go twice as far from the last support it receives from the leaf below... I cannot say what effect #7 will have for sure, but it's my understanding the longer leafs go towards ride and the shorter ones towards capacity. That said, the problem that my originals were having that was most noticeable was out towards the ends, where #3 is "missing"...the lack of support appears to have hastened their demise. What you cannot see in the pics is that there is a HA-uge difference if I stand on one of the refurbs vs. standing on the original. Even so, if I'm being honest with myself I'll have to get the vehicle weight back on these and take it down the road before I can yammer on intelligently about it, lol ------------- Those who do not learn from history are doomed to repeat it... Welcome to 1930's Germany |
Posted By: markcl52
Date Posted: 09 May 2016 at 2:56pm
| Looking forward to the axle to bump stop measurements so that I can compare to mine. I have some homemade brackets welded on to my front spring plates that probably held some sort of plow at one point. |
Posted By: mbullism
Date Posted: 09 May 2016 at 3:28pm
|
Whatever comes of it will be solely a function of the donor springs in the condition I found them, it's not like anything I did created arch, stiffness or capacity that wasn't there when I bought them... that said, my originals were obviously buggy whipped so almost anything will be an improvement- ------------- Those who do not learn from history are doomed to repeat it... Welcome to 1930's Germany |
Posted By: mbullism
Date Posted: 16 May 2016 at 11:48am
Time continues to be precious. Had a funeral this weekend, family in from out of state in my house for three nights, and still managed some wrench time ") Well, the front springs are out, without "further" damage...THAT was a tussle. I still have one shackle end stuck in an old spring, but the rolling frame i dismantled continues to save my arse with parts... Old rear pivot bolts on the bottom, reclaimed pivot bolts at the top... . http://s1304.photobucket.com/user/mbullism/media/CJ2A%2069750/7D5E8170-D799-4589-BFF0-9B224EA14449_zpss4z9ccwg.jpg.html" rel="nofollow"> 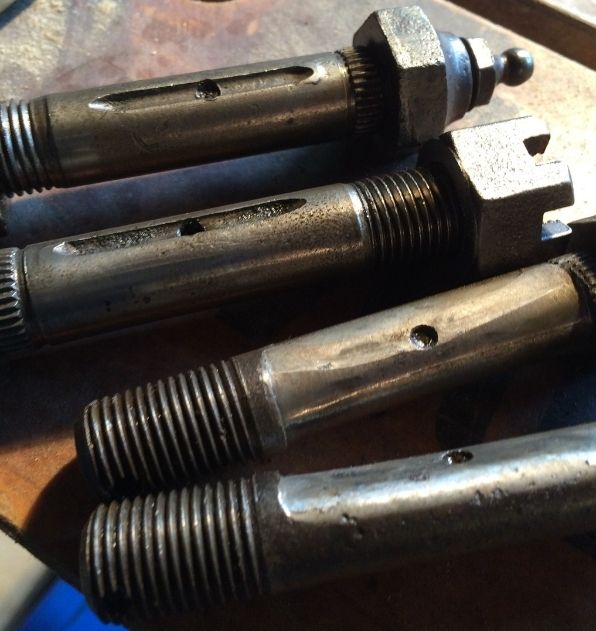 . plates and Ubolts waiting on paint... Gawd, I hate cleaning, lol... . http://s1304.photobucket.com/user/mbullism/media/CJ2A%2069750/1D78C33A-F05D-468D-9729-7E71371953E8_zpstmzmb99y.jpg.html" rel="nofollow"> 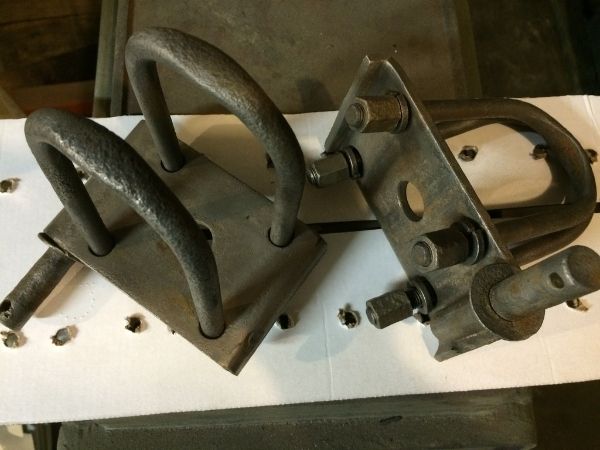 . Got some new shackle seal rubber from Walks last week. Between what I took off the '46 and salvaged from the rolling frame I'll be able to make up all the shackles I need, including the dreaded left hand threads, lol. Hopefully clean up a set some night after work, get stuff in paint, and at some point next weekend my front feet should be back on the ground. Fingers crossed. . Did I mention I hate cleaning parts? . . . . ------------- Those who do not learn from history are doomed to repeat it... Welcome to 1930's Germany |
Posted By: mbullism
Date Posted: 22 May 2016 at 11:13pm
|
Got the front springs in, and bolted down... needs a grease and a run down the street. LOOKs much happier, they sit with a positive arch, the shackles dont point straight forward... . http://s1304.photobucket.com/user/mbullism/media/CJ2A%2069750/3E0E9A33-522A-485A-A6F4-7F16A5C4BE7D_zpsmml2rygo.jpg.html" rel="nofollow"> 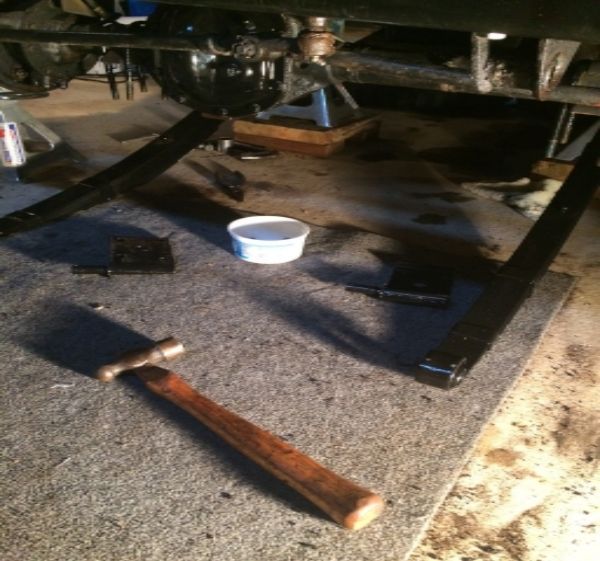 . It was the end of a long day of other stuff, and frankly had to get to rolling to make room in the garage... early measurements are positive... the nose sits about an inch higher, but more importantly the lean is much better. My understaning is the long main leafs go toward ride and height. If that holds true ive only added one leaf. The lower added leaf goes tords capacity when loaded... I think, lol. The drivers side was about an inch lower measured at the front fender on a line through axle center...the difference now is a hair under a half an inch. Not sure the whole story reveals itself until I swap the rears, though. Am going to try to get back to it later today and finish buttoning up... balance of lug nuts, shocks, etc. Will measure axle to frame then. Was caught off guard by the u bolts being a touch short. I recalled them sticking out of the nuts a bit, I had anticipated them being flush with two added leafs. They're about 80 percent engaged, which I know is technically enough, and they torqued fine. I see myself swapping the bolts from the salvage chassis in my future, but it'll keep. Onward- ------------- Those who do not learn from history are doomed to repeat it... Welcome to 1930's Germany |
Posted By: mbullism
Date Posted: 22 May 2016 at 11:15pm
|
So initial measurements (before the rear spring swap, which frankly will take a back seat to my T90 swap, Kempton PA and Hillsboro NH... I have a stretch of time between Hillsboro and my family vacay in Duxbury mid august to catch up...) The pre/post measurements are as follows: slab to underside fender through centerline axle drivers side 31.5/32.5 pass side 32.375/33 Top of axle (bump stop shelf) to frame in front of bumpstop (at bump stop plate) drivers side 2.875/4 pass side 3.25/4 I forgot to strip and paint the shock retention washers, so they are down stairs now... Once I pop them in I'm goin around the block, though it may be midweek ------------- Those who do not learn from history are doomed to repeat it... Welcome to 1930's Germany |
Posted By: mbullism
Date Posted: 28 May 2016 at 4:23pm
|
So the front springs are a rousing success It's nice out, so I just turned a 10 mile required trip to walmart into about a 40 mile joy ride with a stop at walmart, lol... Who'dve thought that adding two leafs would add an inch, reduce lean and result in a softer, more civilized ride? To be fair I did just add new gas charged shocks as well, but hitting a bump or a hole no longer elicits thoughts of whether my dental insurance is paid up  I'm going to wait on doing the rears for now, but am pondering whether to tackle a valve adjustment or T90 swap with so little (free) time between now and PA, and then again NH. The gearbox is cranky and the throwout bearing wines a touch, but they're "serviceable" so I'm thinking valve adjustment... Right now I gotta mow, then new rear axle seals and brakes in the Taco... ------------- Those who do not learn from history are doomed to repeat it... Welcome to 1930's Germany |
Posted By: mbullism
Date Posted: 19 June 2016 at 6:12pm
|
Trying not to start anything too big before NH next weekend... leaky wheel cylinder, easy peasy right?. The smallest seed can grow into the biggest nastiest PITA daylong struggle, lol...all you have to do is plant it . What I continue to forget is that it's a safe bet that no matter where I go in the 46, somebody has been there before me. Let's just say they were no indy car mechanic- Only one wheel cylinder leaking up front, needed new shoes, and that meant pairs, so both sides...of bearing nuts chewed to ship, homemade castle nuts on the axles (and I'm not just talking hand cut slots homemade, I'm talking home ground hex facets so that a socket wont fit homemade, and no nice way to put a wrench on it down in the hub housing  ) and two of four wheel cylinder bolt heads rounded off, and behind the "S" steel brake lines...which are stuck.... and on and on. Nothing 10-12 hours won't fix, lol. ) and two of four wheel cylinder bolt heads rounded off, and behind the "S" steel brake lines...which are stuck.... and on and on. Nothing 10-12 hours won't fix, lol. . I'm about three hours to this point: . http://s1304.photobucket.com/user/mbullism/media/CJ2A%2069750/BE0C4932-F732-4B67-96DA-EA2E2964DD72_zps9ad6gsq5.jpg.html" rel="nofollow"> 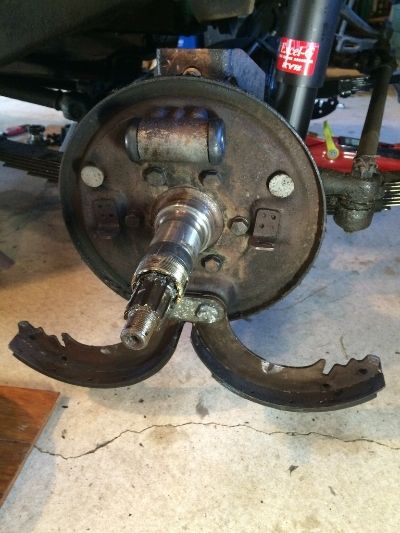 . if you look close, you can see where even the heads on the bottom adjusters are dog chewed... Best part of the whole job? Test drive to the beer store- Then, as more of a tinkering while rehydrating thing, finally swapped out the pedals which have been driving me nuts... out with the old . http://s1304.photobucket.com/user/mbullism/media/CJ2A%2069750/733040E1-3E39-42B9-86BC-C9BE5B15180A_zps68vhqf0j.jpg.html" rel="nofollow"> 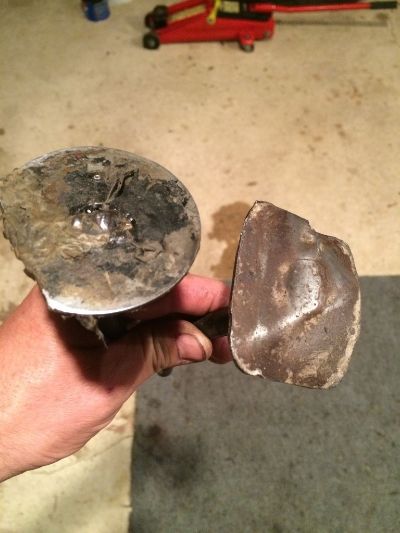 . in with the much better . http://s1304.photobucket.com/user/mbullism/media/CJ2A%2069750/587865F0-70C1-4842-A567-C7BA774A0570_zpswaqou4mg.jpg.html" rel="nofollow"> 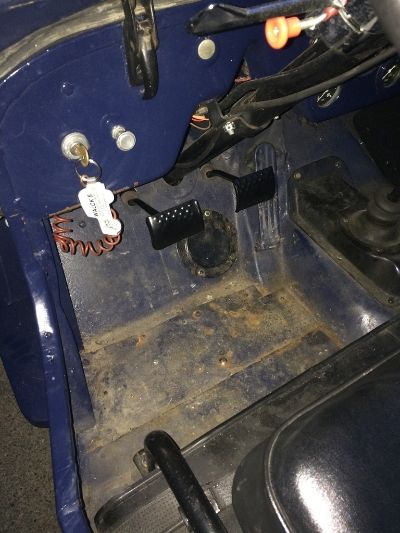 ' '. . Happy feet!
------------- Those who do not learn from history are doomed to repeat it... Welcome to 1930's Germany |
Posted By: mbullism
Date Posted: 20 June 2016 at 2:31pm
|
So, answering the age old question of what to do when you wake up at 5:15a on fathers day, and don't want to wake up the whole house... The obvious answer is take the factory floor mats out of your wife's 35k JKU and cut them up for your Willys ") http://s1304.photobucket.com/user/mbullism/media/CJ2A%2069750/D1FAE942-0949-4486-AFD0-727D933AA63A_zpsab0pdl5p.jpg.html" rel="nofollow"> 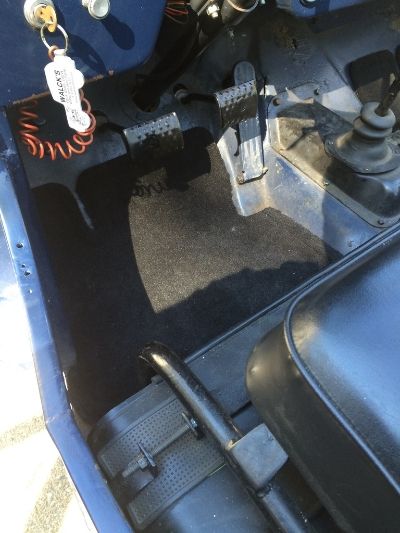 http://s1304.photobucket.com/user/mbullism/media/CJ2A%2069750/6E390FB5-BBCA-4298-B660-B00F7A6147F0_zps5zjcv6mb.jpg.html" rel="nofollow"> 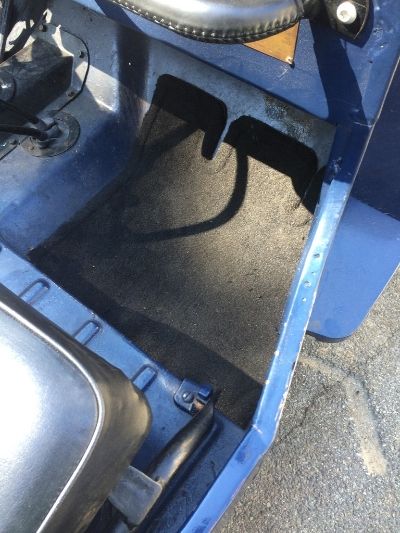 (it's all good, lol... the mats came out day one in favor of Weathertech liners. Hell, my 10 year old Taco factory mats came out like day five and they're up in the attic, all branny new...somewhere) ------------- Those who do not learn from history are doomed to repeat it... Welcome to 1930's Germany |
Posted By: SE Kansas 46 CJ-2A
Date Posted: 20 June 2016 at 2:48pm
|
Re: Happy feet! Yes, it was high time those dogs were replaced...no sense in putting new carpet in the rig without changing those clown feet out. I'm still watching your project closely because of the nearby serial numbers on our 2A's. Keep up the good work. ------------- 46 CJ-2A #64462 "Ol' Red" (bought April 1969)(second owner)(12 V, 11" brakes, M-38 frame, MD Juan tub) U.S. Coast Guard Chief Petty Officer(ret.) U.S. Army Vietnam veteran and damned proud of it. |
Posted By: mbullism
Date Posted: 20 June 2016 at 3:51pm
They were awful, lol... one round, one square, beat to snot with S shaped stems... and "originally" (when I came in) had CJ5 style rubber pads on them. All I will say is they worked... and were awful ------------- Those who do not learn from history are doomed to repeat it... Welcome to 1930's Germany |
Posted By: mbullism
Date Posted: 18 July 2016 at 3:19am
|
Gawd, I hate this part... http://s1304.photobucket.com/user/mbullism/media/CJ2A%2069750/D18%20rebuild/80AEAAFA-77F0-4573-9917-136F5B315A89_zpswcu197dh.jpg.html" rel="nofollow">  BUT, this is one of my favorite parts... nowhere to go but forward http://s1304.photobucket.com/user/mbullism/media/CJ2A%2069750/D18%20rebuild/5056223E-CAA6-4682-9A04-B8A6CD5D4147_zpssgayz0pk.jpg.html" rel="nofollow"> 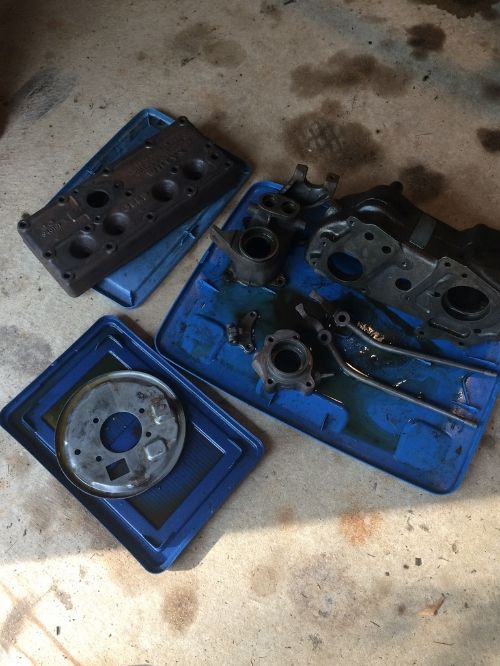 ------------- Those who do not learn from history are doomed to repeat it... Welcome to 1930's Germany |
Posted By: markcl52
Date Posted: 21 July 2016 at 8:09pm
I finally got around to measuring my springs and my axle to bumpstop measurement is only 1.5", and this is with a 10 leaf front. As you can see in the picture, there are some homemade brackets that likely held something heavy in the past and caused the springs to lose their spring.  Looks like I need to go down the same path you did with either new or used but better springs.
|
Posted By: Flatfender Ben
Date Posted: 22 July 2016 at 1:08am
|
Your bump stops have metal spacers between them and the frame. I have a jeep with the same metal spacers under the rear bump stops. Normally the bumper is bolted directly to the frame rail. |
Posted By: mbullism
Date Posted: 01 Aug. 2016 at 3:00pm
|
So this has been in the background as far as "my jeep project", but has crossed the line over to now being on point... picked up a PE95K late '52 military genset out of a scrapyard, where it had been for I'm told 2 years... 800+ hours showing on the meter. http://www.thecj2apage.com/forums/pe95k-genset-engine-questions_topic38015.html" rel="nofollow - http://www.thecj2apage.com/forums/pe95k-genset-engine-questions_topic38015.html Anyway, I started to get into the RMC engine, and early indications are promising. Got the engine out and on a stand, successfully loosened all the headbolts without that sick feeling you get when one snaps, lol. Degreased yesterday, and started to poke around a bit. Cautiously optimistic, as both the oil pan gasket and head gasket have ODG on them... Found the floating oil sump pick up i was hoping to- http://s1304.photobucket.com/user/mbullism/media/pe%2095k%20genset/6B95E16A-6F92-44C0-BE39-196EE5C987D4_zpsyojnii40.jpg.html" rel="nofollow"> 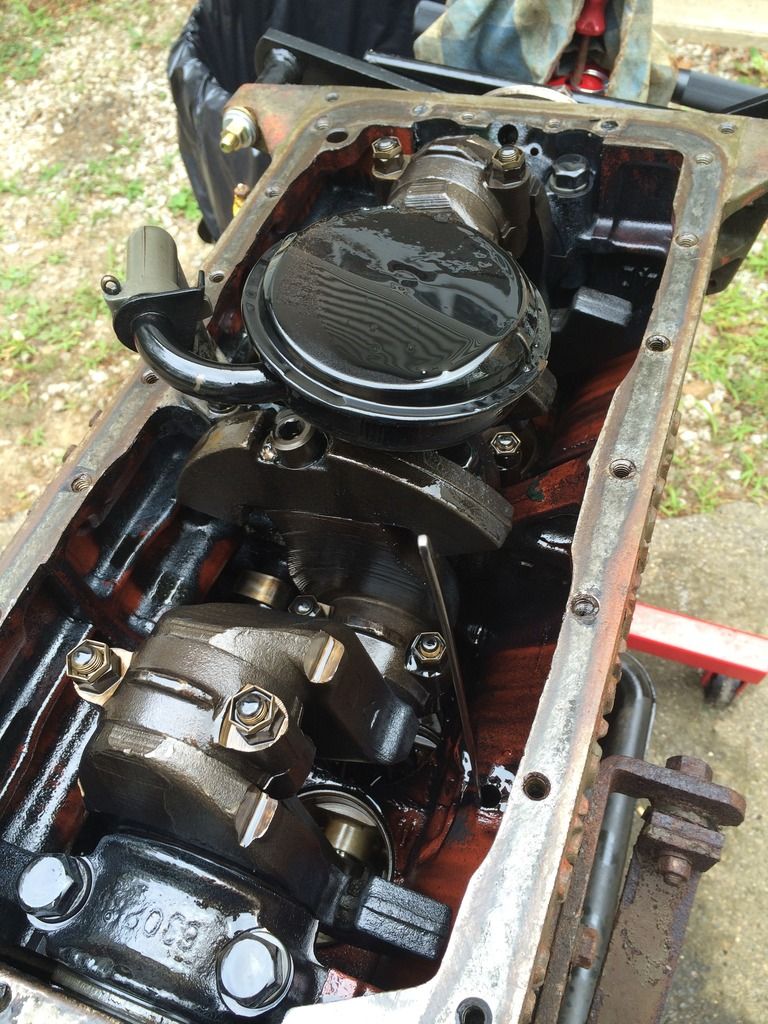 Also found the anticipated sludge in the pan (boo) but the internals look pretty clean. The oil I drained out was BLACK, but the viscosity was decent and there weren't any chunks or clumps, or bits lol http://s1304.photobucket.com/user/mbullism/media/pe%2095k%20genset/A34EFD37-F47D-4B9C-8E28-BF7F9A095D12_zps5mr288qz.jpg.html" rel="nofollow"> 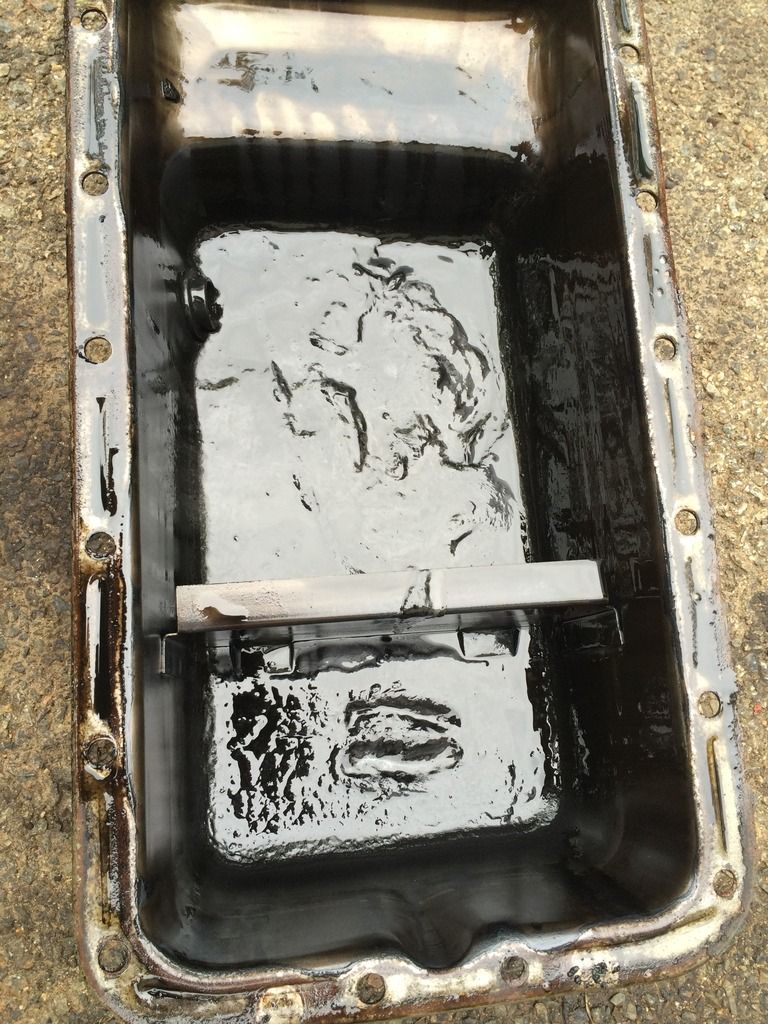 http://s1304.photobucket.com/user/mbullism/media/pe%2095k%20genset/18363133-03C7-4796-B010-B1C30AAE444C_zpsotb2tajh.jpg.html" rel="nofollow"> 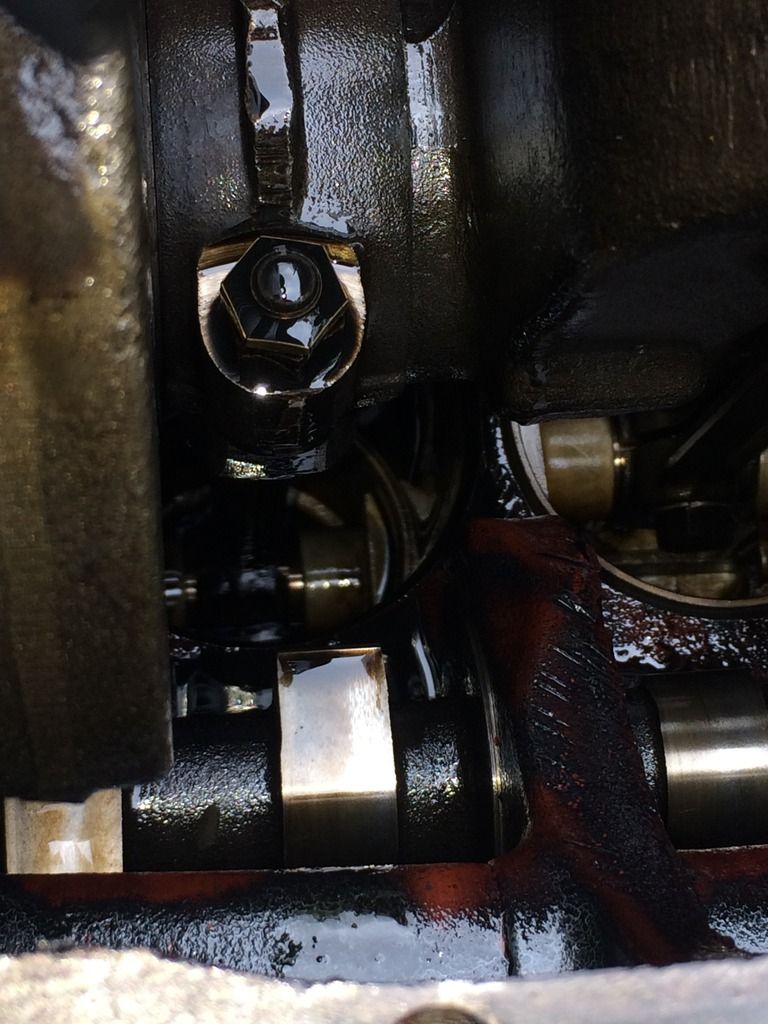 Given that the gaskets top and bottom have ODG, I'm thinking no one has been here since the early 50's. If that continues to hold true as I go along I think this will be a score... I can still see cross hatching on the cylinder walls Full confession: a brief ten minute panic  After I removed the oil pan, I put a wrench on the pulley nut to turn it over, and was met with resistance.... it would only go 340 degrees, but there is a hard stop from either direction. Heart sinkage. I'm almost positive i put this thing through a full revolution before embarking on this journey (gulp)...I think I did, lol...I'm sure I did... only thing I've done is remove the dizzy...that wont do anything, right?! calm down... think stupid, think. Valve...I have a bad valve... must be everytime that cam lobe comes around to a stuck valve.... . . . . . . . OR, some idiot didn't run the nut fully up on one of the flywheel studs, and it's hitting an arm on the engine stand  ------------- Those who do not learn from history are doomed to repeat it... Welcome to 1930's Germany |
Posted By: mbullism
Date Posted: 07 Aug. 2016 at 11:46am
|
The eagle has landed... and the eagle is happy ...a work in progress- http://s1304.photobucket.com/user/mbullism/media/pe%2095k%20genset/284232DF-A3F4-42A6-B0FB-58E072C56CF5_zpscydqbryq.jpg.html" rel="nofollow"> 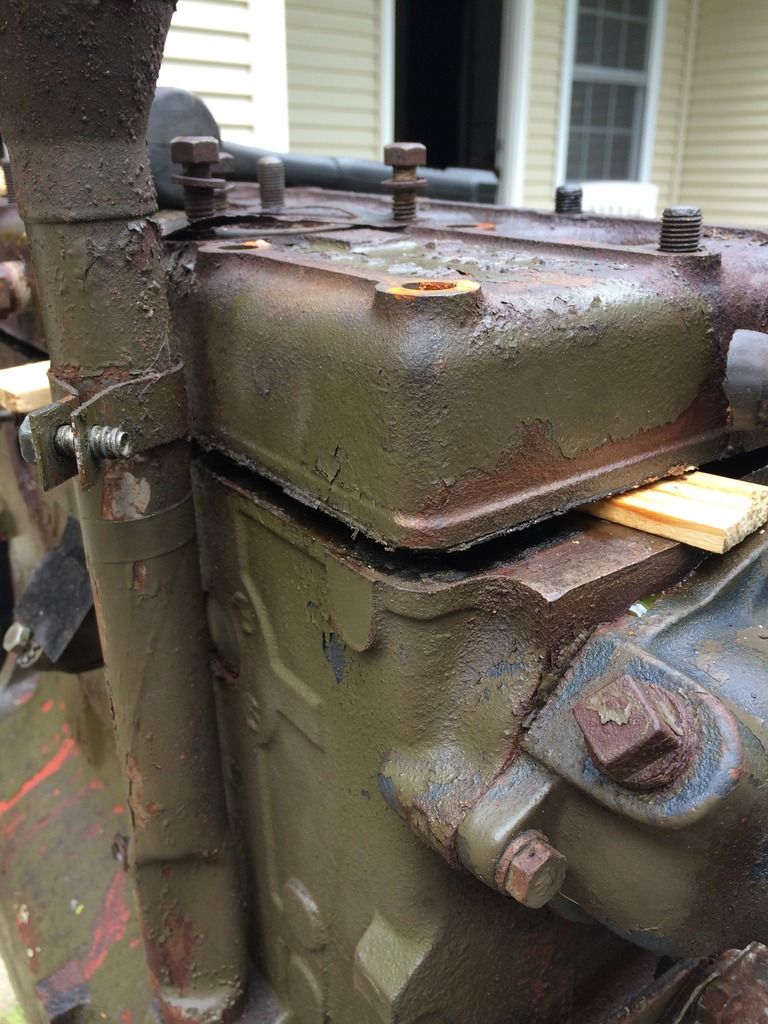 . http://s1304.photobucket.com/user/mbullism/media/pe%2095k%20genset/C95C1C06-1736-42E9-8D5A-F87D8DD211A7_zpsjprqgwqq.jpg.html" rel="nofollow"> 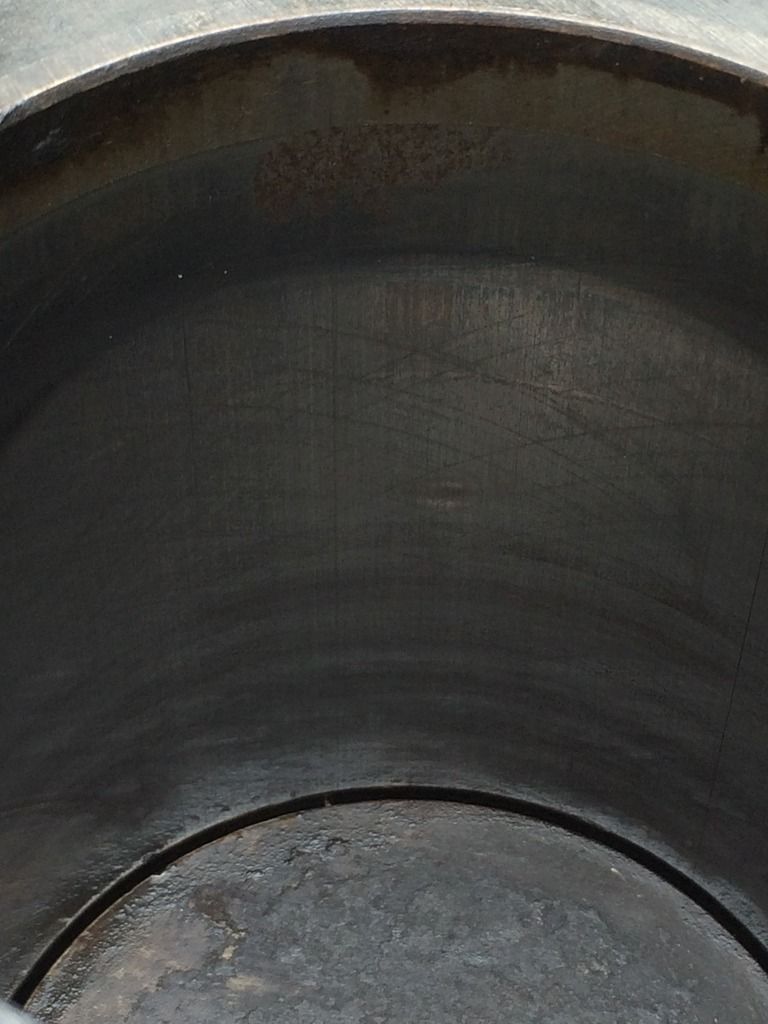 . RMC105103, no "A", no "B", no "AB", etc for bearings or bores . http://s1304.photobucket.com/user/mbullism/media/pe%2095k%20genset/12BD2A47-254E-4BFC-A463-3078F485F63A_zpsbbyjc4zy.jpg.html" rel="nofollow"> 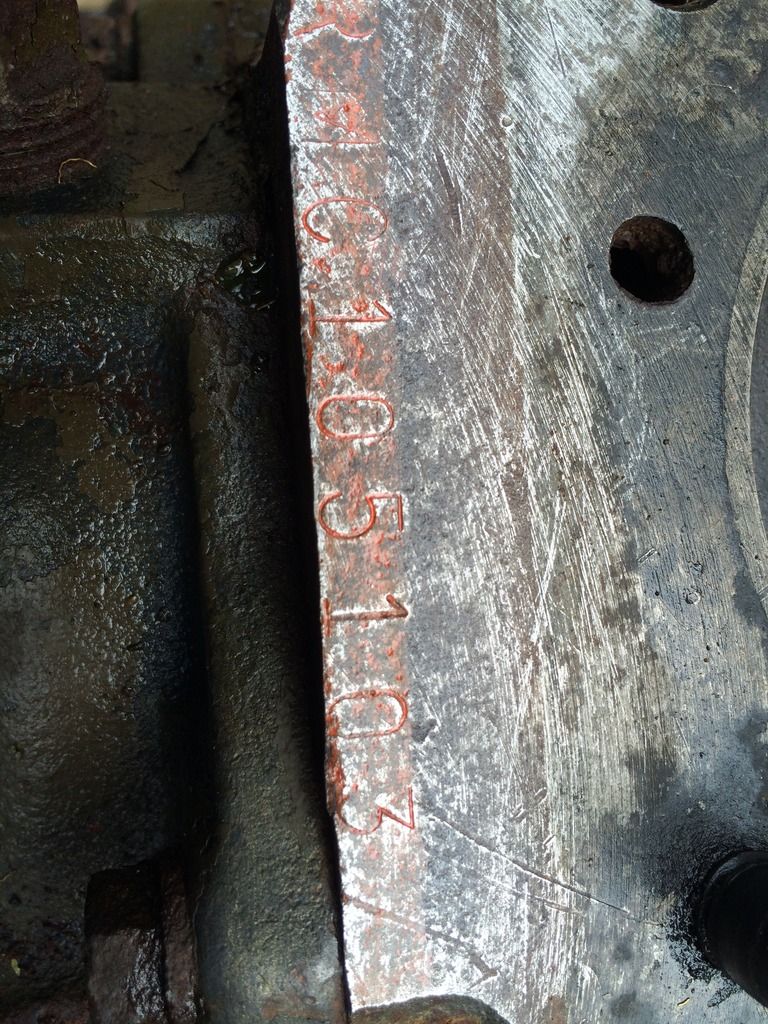 . No ".020", ".030", etc... . http://s1304.photobucket.com/user/mbullism/media/pe%2095k%20genset/23026111-D261-48CE-A7BD-C599B4FA85CA_zpslirba1hq.jpg.html" rel="nofollow"> 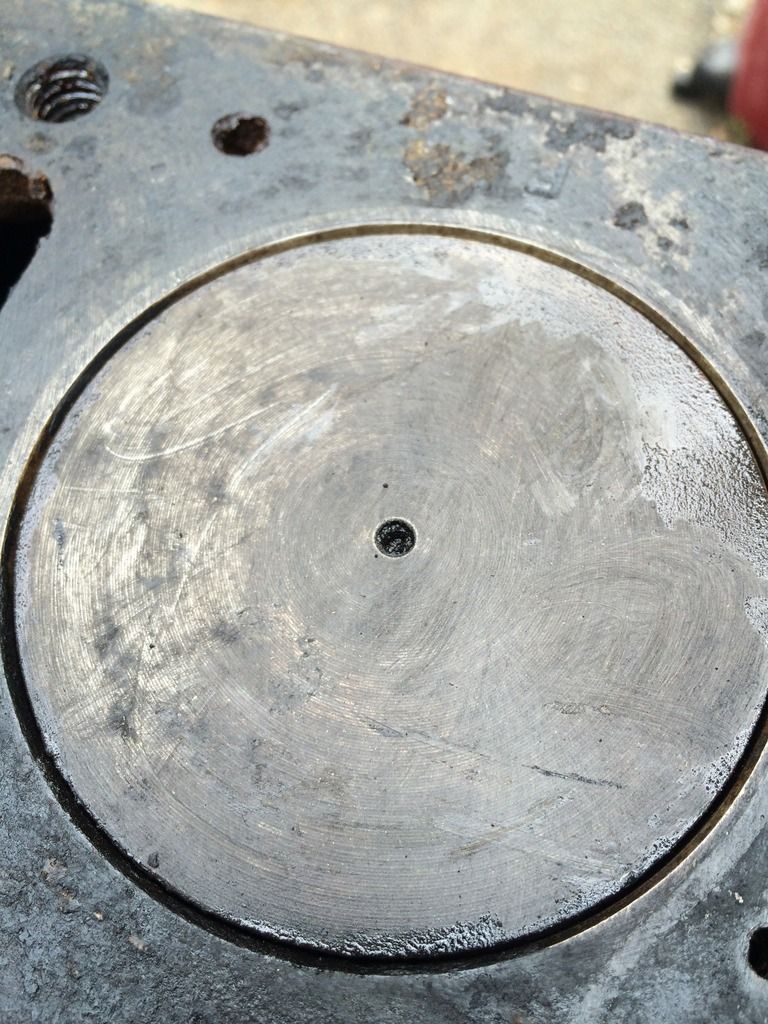 . . ..No discernable ring ridge, a fingernail goes across without a catch, and a QUICK bore measurement with a telescoping gauge measured with a digital caliper returns repeatable measurements in the 3.125"-3.127" range...  So now the question... I recall reading that it was sometimes practice to select engines with non standard (slightly bigger bore, slightly oversize bearings..."A", "B", "AB", etc) specs for utility work, but I'm not finding that... no stamp after the ESN, the bores seem to measure original spec (I'll go in depth on them top to bottom and for out of round before I put this aside)... but I'm finding "F" and "G" stamps on the deck at each bore. I recall reading about this at some point in the past but I'll be damned if I remember what it means or where I saw it... Front to back, F G F G... . http://s1304.photobucket.com/user/mbullism/media/pe%2095k%20genset/692EB7B2-AC33-44EB-97DD-34C09D519D90_zpsdjqlb7or.jpg.html" rel="nofollow"> 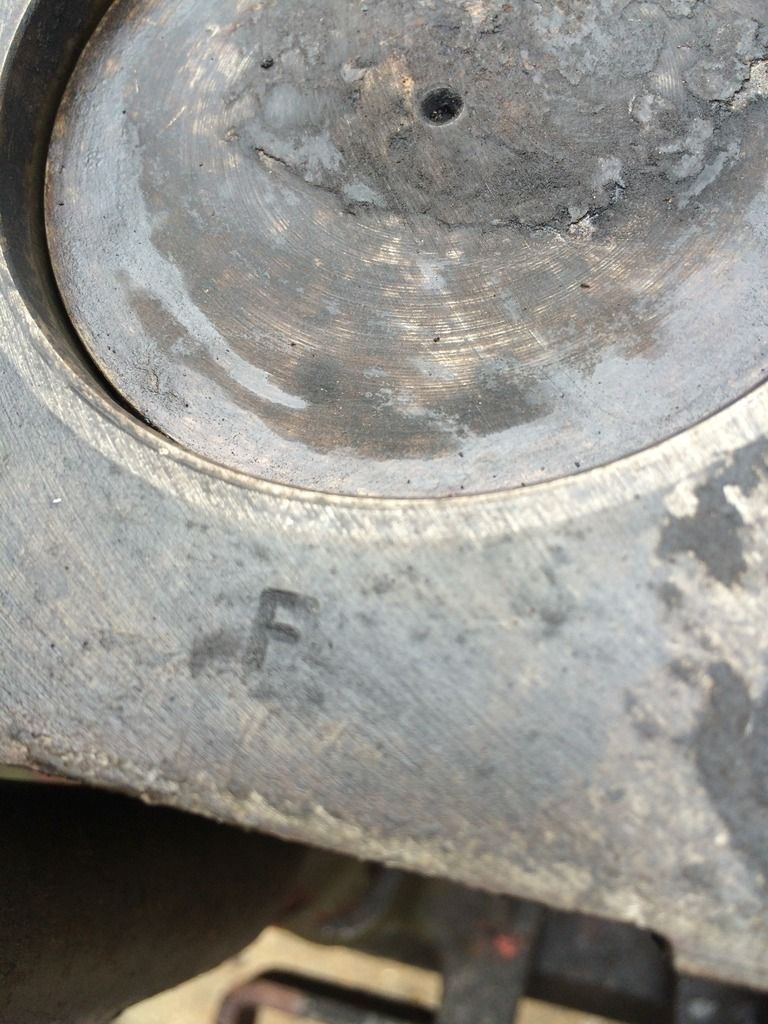 . http://s1304.photobucket.com/user/mbullism/media/pe%2095k%20genset/ED22E3F9-66E4-493B-8831-99E0450997C0_zpswwy6lafm.jpg.html" rel="nofollow"> 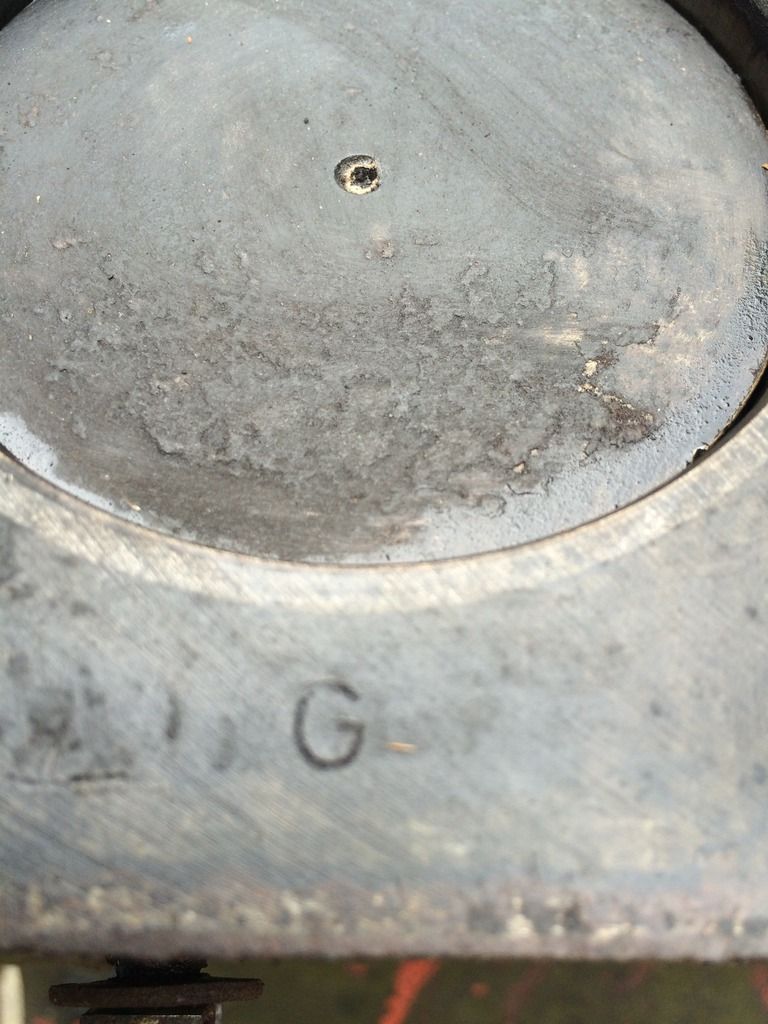 . . Lol... anyone wanna save me hours of retracing my steps? ------------- Those who do not learn from history are doomed to repeat it... Welcome to 1930's Germany |
Posted By: mbullism
Date Posted: 09 Aug. 2016 at 2:28pm
ugh... I knew things were going too well, lol... got the manifolds off without snapping a stud (beyond the one that was already snapped)...pulled the valve cover off. Funny how that which should be obvious sometimes takes a while to register  For as many times I've spun the crank by wrench looking for this or that, once I popped the valve cover off it took about four seconds to see that one of the valves that was open was well above the adjustable lifter below... my stuck valve scenario has come to fruition http://s1304.photobucket.com/user/mbullism/media/pe%2095k%20genset/948803EB-6C9D-4B4B-86EE-48C5E88B3062_zps8wnnwmuq.jpg.html" rel="nofollow"> 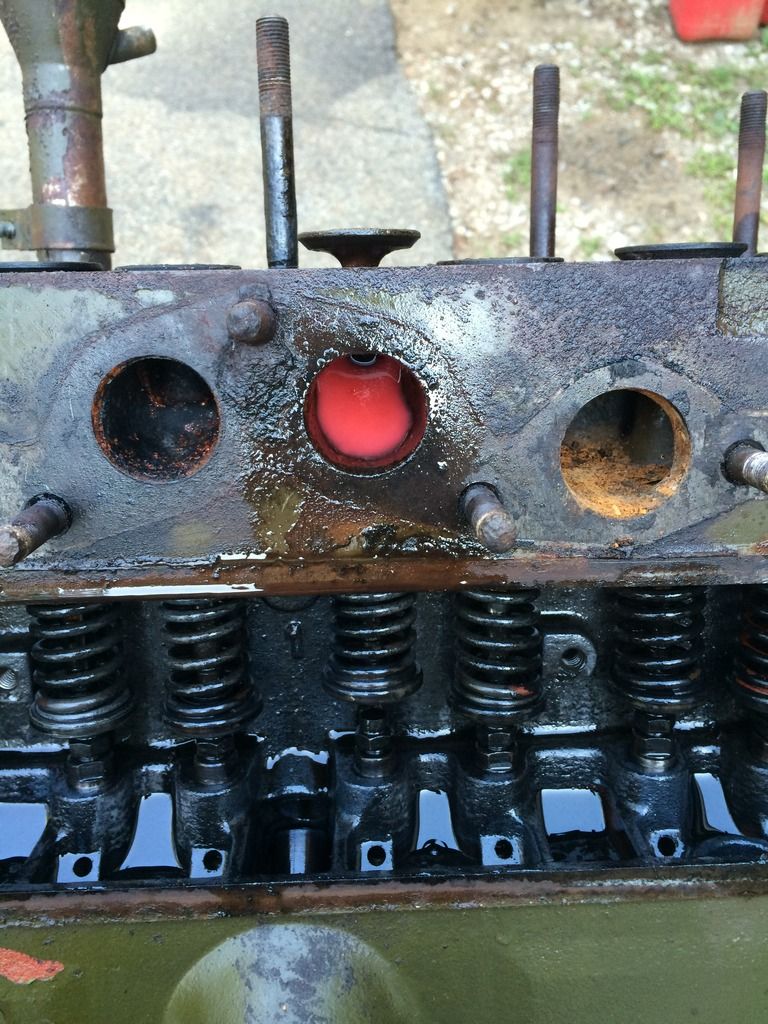 I have no way of knowing if the stuck exhaust valve was why the genset found its way to the scrap yard, or if it stuck while sitting two years basically in the elements while open. The stem of the valve is visibly rusted, not heavily, but not hazed either. No matter, definitelynot insurmountable. Short term, soaking in atf/acetone. gonna give it a couple days soak, clean it up and try and coerce it free, and reassess. If this has to go to a shop to get squared away I'm considering seats and guides. Too soon. Tonight we soak. ------------- Those who do not learn from history are doomed to repeat it... Welcome to 1930's Germany |
Posted By: mbullism
Date Posted: 09 Aug. 2016 at 2:29pm
|
Exhale... soaked the valve overnight and all day. Got home tonight and tried to turn it by hand...no dice. got a block of wood and a small ball peen hammer with the intent of tapping on it, just to see. Put the block on the valve and effectively breathed on it with the hammer..."SNAP" as the valve spring pulled it closed. I turned the whole thing over once and put the valve back open, then refilled the port with atf/acetone. Another nights soak. I'm going to take this a little at a time, but I may end up removing the valves to polish the seats and stems... In other news, the balance of the head studs gave up to the double nut method with no casualties... Sorting out some bell housing fitment issues now ------------- Those who do not learn from history are doomed to repeat it... Welcome to 1930's Germany |
Posted By: mbullism
Date Posted: 30 Aug. 2016 at 1:42pm
|
Spent a while sunday pulling valves to clean things up... some light rust here and there, and a TON of carbon and what looks like tar, almost thick paint like, on the valves above the guides. Guessing low RPM's, crappy or old gas and a lack of carb adjustment...and probably short duration runs . http://s1304.photobucket.com/user/mbullism/media/CJ2A%2069750/CD26531F-A7D1-46E9-A80C-547F8A2D7C65_zpsnfhbfgpc.jpg.html" rel="nofollow">  . Put all the valves across a bronze/brass wire wheel and was quite happy with the results (will have to get a pic)... the seating surfaces look awesome, the stems decent. Going to roll them for straight and go with them. Currently have the block sideways on the stand soaking the manifold studs. There was one broken when I got it, that's been drilled for an easy out attempt but it's soaking with the rest just now. Of the valve seats in the block, 6 of 8 will be fine, one looks like it'll clean up, one gives me a little pause. Currently considering a quick re-lapping after I bronze wire them...one step at a time. . I also have two valve spring roto cap style bases (that accept the keepers) that don't turn freely...currently soaking to see if they'll free up- ------------- Those who do not learn from history are doomed to repeat it... Welcome to 1930's Germany |
Posted By: mbullism
Date Posted: 31 Aug. 2016 at 12:32pm
|
Typical exhaust valve... . http://s1304.photobucket.com/user/mbullism/media/CJ2A%2069750/1B3B42BA-3CA4-4098-AD70-6287704B3396_zpsdypeybaq.jpg.html" rel="nofollow">  http://s1304.photobucket.com/user/mbullism/media/CJ2A%2069750/94CA8277-B472-42BD-B468-FEE6BDF9FEC3_zpsvmp2qkok.jpg.html" rel="nofollow">  . typical intake . http://s1304.photobucket.com/user/mbullism/media/CJ2A%2069750/C0CD98EC-89CA-4F8B-AB49-2D3169D55A19_zpsx5bwsnmz.jpg.html" rel="nofollow">  . So Eaton... the rotocaps have been eluding me, but I think are later style F-head exhaust. Have not been able to find any reference that puts these on the intake valves L134 or F134, but they are... . http://s1304.photobucket.com/user/mbullism/media/CJ2A%2069750/47915308-D4E8-44EB-9054-8EF92CE55975_zpsq9bffyw0.jpg.html" rel="nofollow">  http://s1304.photobucket.com/user/mbullism/media/CJ2A%2069750/C774FD7F-8ACF-4DA9-81C7-556B4F02241C_zpsgtlmie1g.jpg.html" rel="nofollow"> 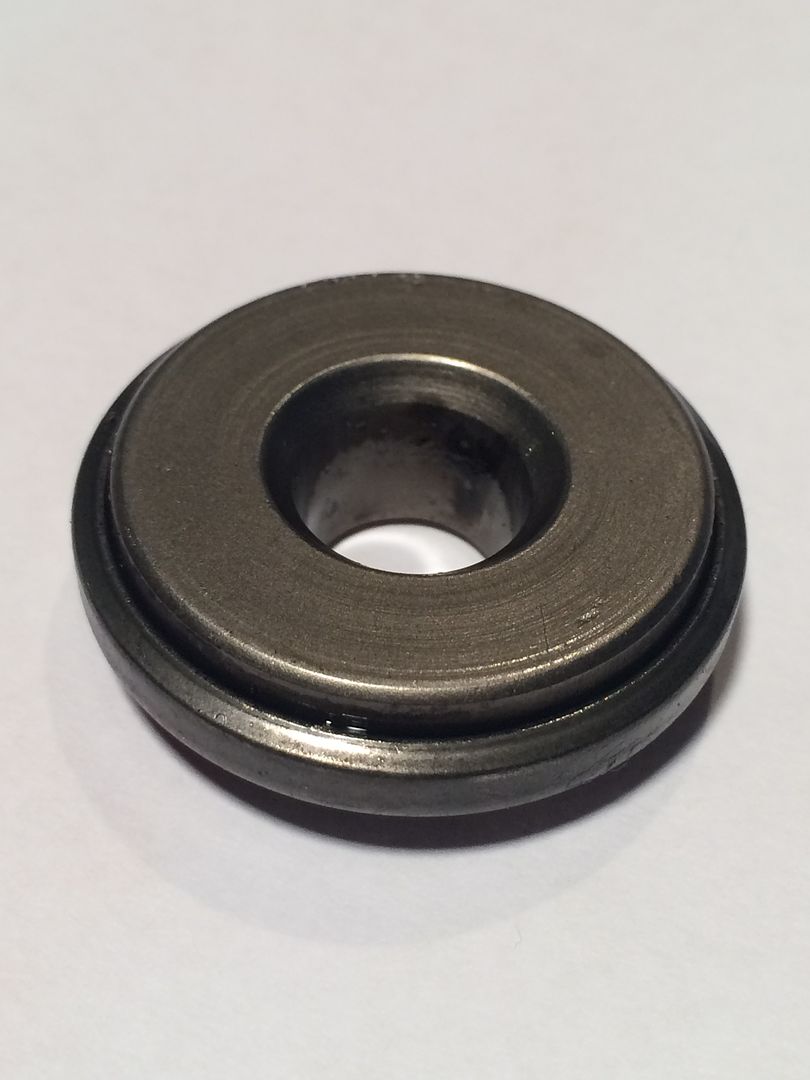 . the stems on all 8 are the same . http://s1304.photobucket.com/user/mbullism/media/CJ2A%2069750/B7806208-A9F1-4080-AF06-C4397D1DDA02_zpsbrijkveu.jpg.html" rel="nofollow"> 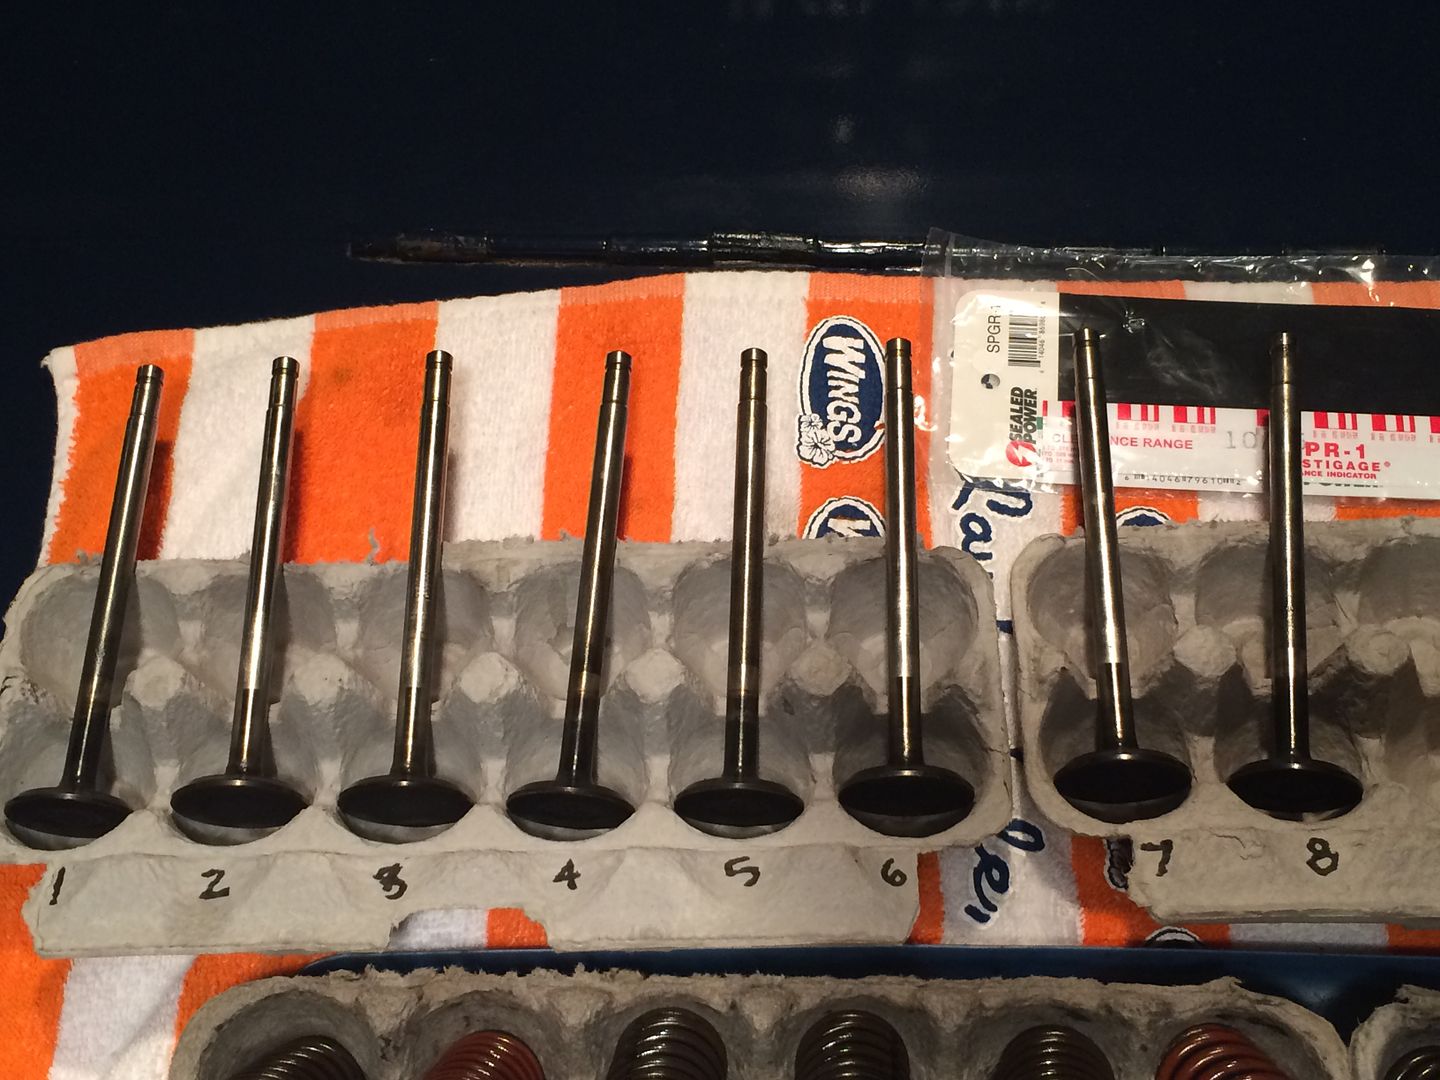 . There are 3 red springs and 5 black, no rhyme or reason to the red ones (2 in, 1 ex)...they do however measure slightly shorter than the black on a consistent basis... like 2.43" vs. 2.49. . http://s1304.photobucket.com/user/mbullism/media/CJ2A%2069750/D30EA4C7-81FF-4C04-9F01-3F5C68EDEF4F_zpsbadz2wjy.jpg.html" rel="nofollow"> 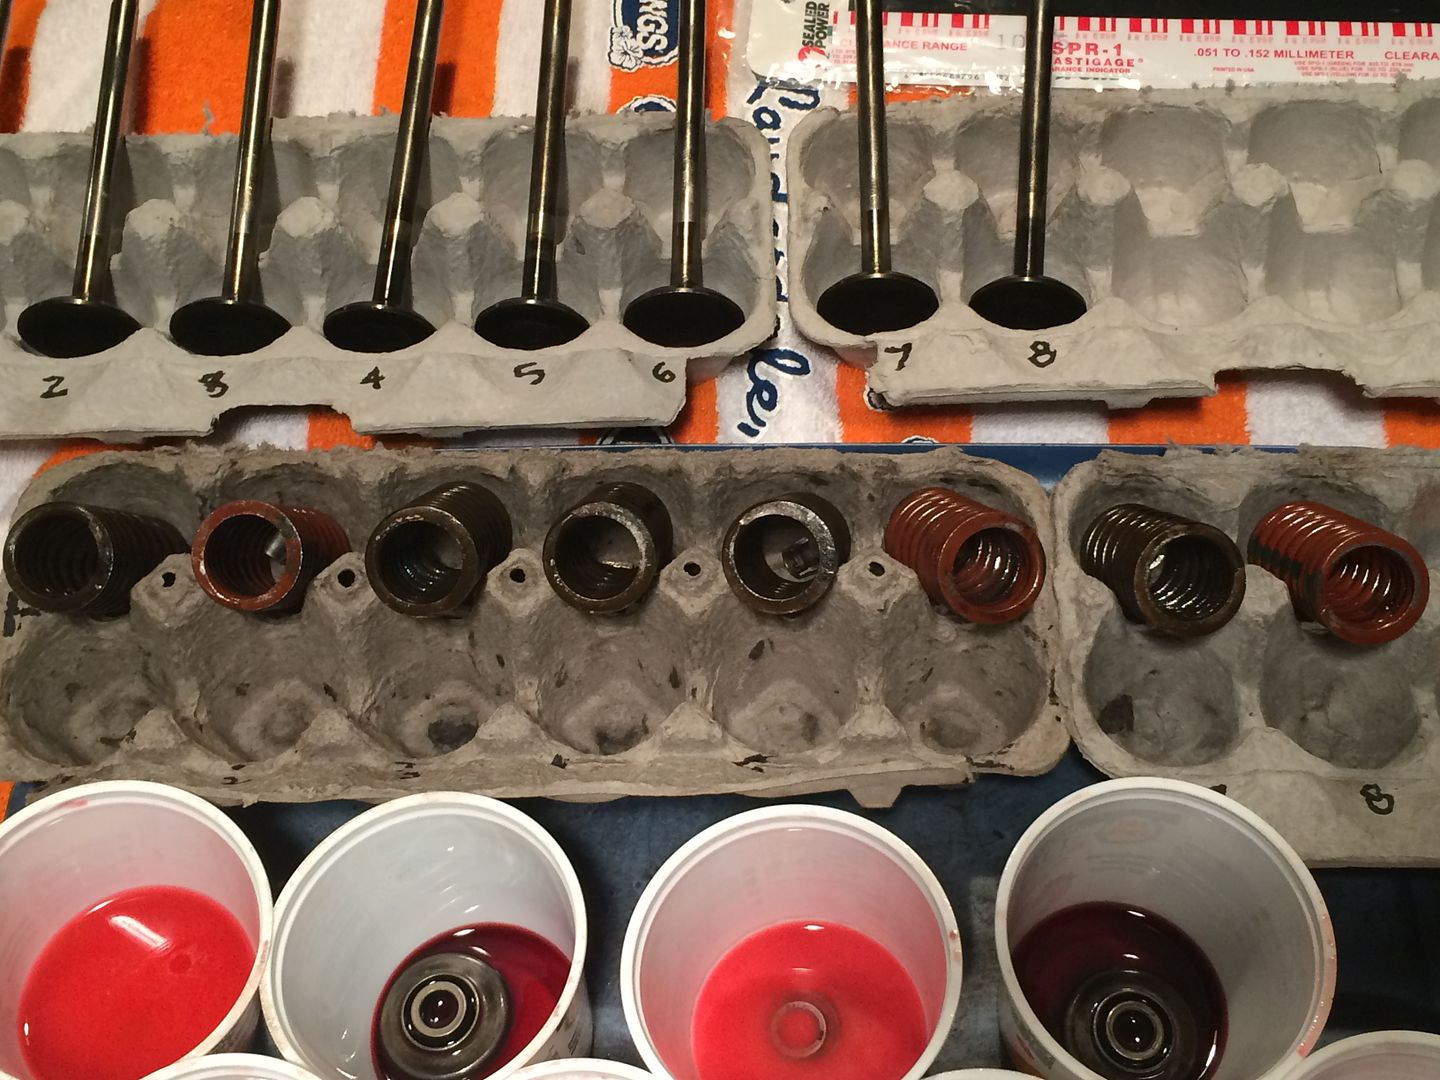 . The oddity of this arrangement in general makes me consider someone else may have been in here (the broken manifold stud in the back of my head), but I'm just going to push forward-
------------- Those who do not learn from history are doomed to repeat it... Welcome to 1930's Germany |
Posted By: mbullism
Date Posted: 03 Sep. 2016 at 8:46pm
 
http://s1304.photobucket.com/user/mbullism/media/CJ2A%2069750/A7D32331-5E50-4B1A-B686-7C4E1681CAA8_zpswtkqugwy.jpg.html" rel="nofollow"> 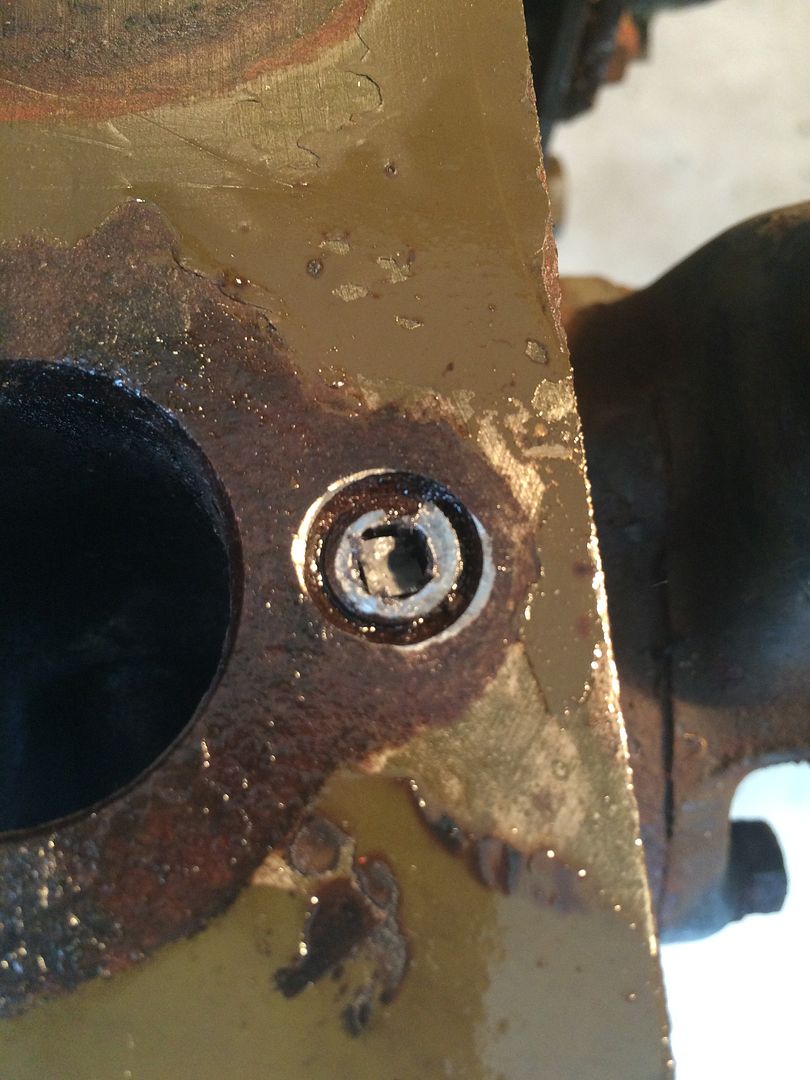 ------------- Those who do not learn from history are doomed to repeat it... Welcome to 1930's Germany |
Posted By: mbullism
Date Posted: 03 Sep. 2016 at 8:58pm
|
Ok, so I snapped an EZout off in the broken manifold stud... deep breath Two approaches come to mind in the aftermath... weld a nut to it, or try and grind it out with the dremel. Neither really appealing at 9pm. Step back, regroup. Forward to 3am. Awake for other reasons, but pondering the EZout... what if...(?) That head stud in that corner goes in to the same water jacket. What if I can get a screwdriver, with a bent tip thru the stud hole, protect the threads with a strip of wood and push it out from the backside? Measure for "depth" . http://s1304.photobucket.com/user/mbullism/media/CJ2A%2069750/1A4C1892-D2E2-454A-80D3-AA94AB0A834A_zpsp3kdwzxm.jpg.html" rel="nofollow"> 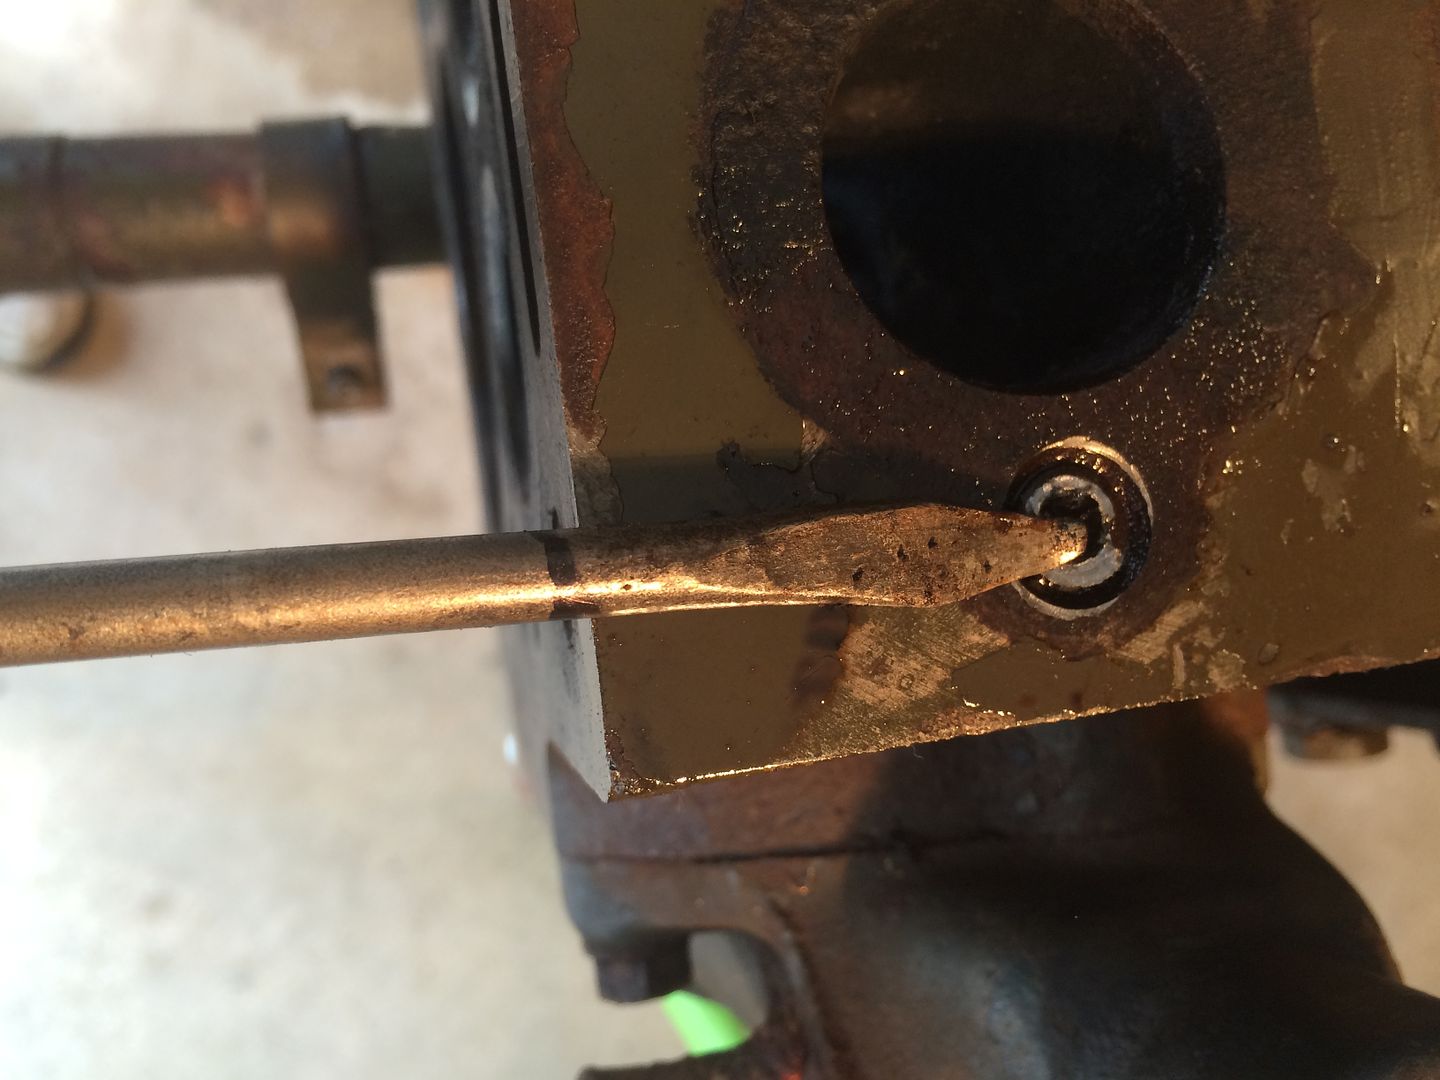 . Insert, feel for effect and gently apply a shi(t) ton of leverage, lol, and DO NOT put you face directly in the line of fire . http://s1304.photobucket.com/user/mbullism/media/CJ2A%2069750/FF36DC4E-D38B-4585-8C61-A02E32CDBB30_zpscm4ibqji.jpg.html" rel="nofollow"> 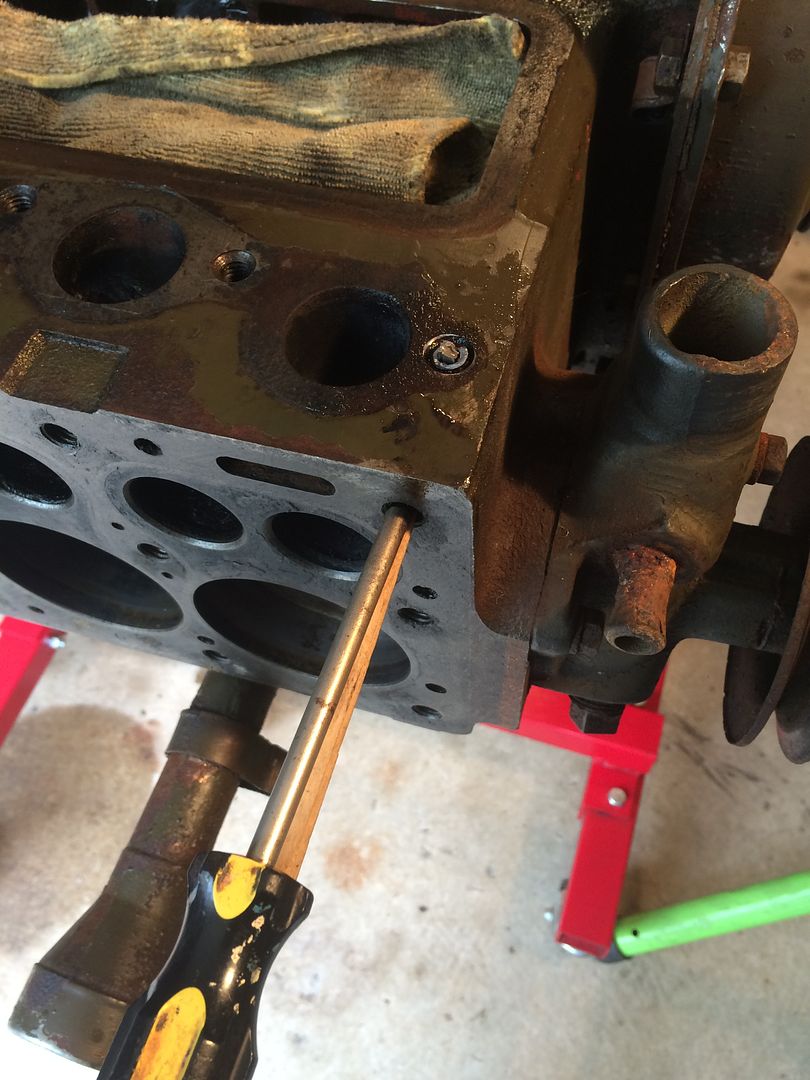 . VIOLA! . http://s1304.photobucket.com/user/mbullism/media/CJ2A%2069750/F030ABC1-E2F9-4E41-9544-FD33B72920F9_zpspiultvwy.jpg.html" rel="nofollow">  . No worse off than I was when I was this worse off... Going to drill just a bit more and try the next size up... this attempt was after a week of soaking in 50/50 atf/acetone, and applied heat during the attempt... going to see if additional drilling will relieve it somewhat ------------- Those who do not learn from history are doomed to repeat it... Welcome to 1930's Germany |
Posted By: SE Kansas 46 CJ-2A
Date Posted: 03 Sep. 2016 at 9:35pm
|
Try the larger easy-out (that is a misnomer if there ever was one!) but when you apply pressure with the wrench, also repeatedly and gently tap on the end of the easy-out with a small hammer. This has almost always helped me in the past. Patience is virtue and one does need to allow the atf-acetone plenty of time to do its magic. The hammer trick is one I learned from my dad 45 years ago when I broke exactly the same manifold stud flush with the block. Good luck and I hope my suggestion helps. ------------- 46 CJ-2A #64462 "Ol' Red" (bought April 1969)(second owner)(12 V, 11" brakes, M-38 frame, MD Juan tub) U.S. Coast Guard Chief Petty Officer(ret.) U.S. Army Vietnam veteran and damned proud of it. |
Posted By: mbullism
Date Posted: 03 Sep. 2016 at 10:25pm
|
Tried the larger EZout, and have been using the tap on it while turning trick, though I'm not certain my Dad ever knew your Dad... I had that one passed on to me 35 years ago, lol. Miss my Dad. With all he taught me I often wonder how much he took with him... since I have two daughters with absolutely zero interest in things mechanical (beyond where the gas goes in, lol) I also ponder how much stops with me. Amazing we move forward as a species. The broken stud was having none of the EZout bullship... since my pilot hole was so well centered I went for broke, drilled about 1/8" deep with a 5/16" bit to tap for 3/8"x16, peeled the thread spiral with a hardened pick and used that to index a tap to clean the remaining threads... . http://s1304.photobucket.com/user/mbullism/media/CJ2A%2069750/88DF2DDC-EE3A-4B37-9282-62C422E30F42_zpsxe6rzukc.jpg.html" rel="nofollow">  http://s1304.photobucket.com/user/mbullism/media/CJ2A%2069750/04FDF080-9842-4C95-B574-73CE26A24179_zps2ckoxsjz.jpg.html" rel="nofollow">  http://s1304.photobucket.com/user/mbullism/media/CJ2A%2069750/77ACF733-9BB1-405D-9278-652906987CE9_zpsxjpaumjq.jpg.html" rel="nofollow">  ------------- Those who do not learn from history are doomed to repeat it... Welcome to 1930's Germany |
Posted By: SE Kansas 46 CJ-2A
Date Posted: 03 Sep. 2016 at 10:34pm
|
...and there you go! More than one way to skin a cat. Now you can move on to other problems. Glad you solved the stud problem...still watching your project with interest as my 2A is fairly close to mine (#64462). ------------- 46 CJ-2A #64462 "Ol' Red" (bought April 1969)(second owner)(12 V, 11" brakes, M-38 frame, MD Juan tub) U.S. Coast Guard Chief Petty Officer(ret.) U.S. Army Vietnam veteran and damned proud of it. |
Posted By: SE Kansas 46 CJ-2A
Date Posted: 03 Sep. 2016 at 10:38pm
|
should have read: Glad you solved the stud problem...still watching your project with interest as YOUR 2A is fairly close to mine (#64462).This is frustrating not even being able to edit my own posts without getting a server error message. Any suggestions? ------------- 46 CJ-2A #64462 "Ol' Red" (bought April 1969)(second owner)(12 V, 11" brakes, M-38 frame, MD Juan tub) U.S. Coast Guard Chief Petty Officer(ret.) U.S. Army Vietnam veteran and damned proud of it. |
Posted By: mbullism
Date Posted: 03 Sep. 2016 at 10:44pm
|
Always welcome a second set of eyes... keeps me from cheatin', lol... the stud issue resolved, going to chase threads for the remaining studs and then clean gasket surfaces in prep for a quick valve lap. ------------- Those who do not learn from history are doomed to repeat it... Welcome to 1930's Germany |
Posted By: shadow
Date Posted: 09 Sep. 2016 at 3:59pm
|
your valves look really good, for me it must be the wet coast air as my exuast valves were so badly pitted if i tried to lap or grind they would have fallen through
|
Posted By: mbullism
Date Posted: 12 Sep. 2016 at 12:12pm
|
So Saturday was valve lap day... Won't bore ya to tears with before and after pics of all 8, just the prime offender should cover it Exhaust on number 3, which was the valve that was stuck open when I got the engine... The before is as far as atf/acetone and a brass wire brush will go, it was much worse ... they all cleaned up decent. It's not a mirror finish, but I expect it'll wear in fine.. http://s1304.photobucket.com/user/mbullism/media/CJ2A%2069750/301CD2B2-A9C9-433D-ADDA-1466EA854B80_zpsf08dyrfq.jpg.html" rel="nofollow"> 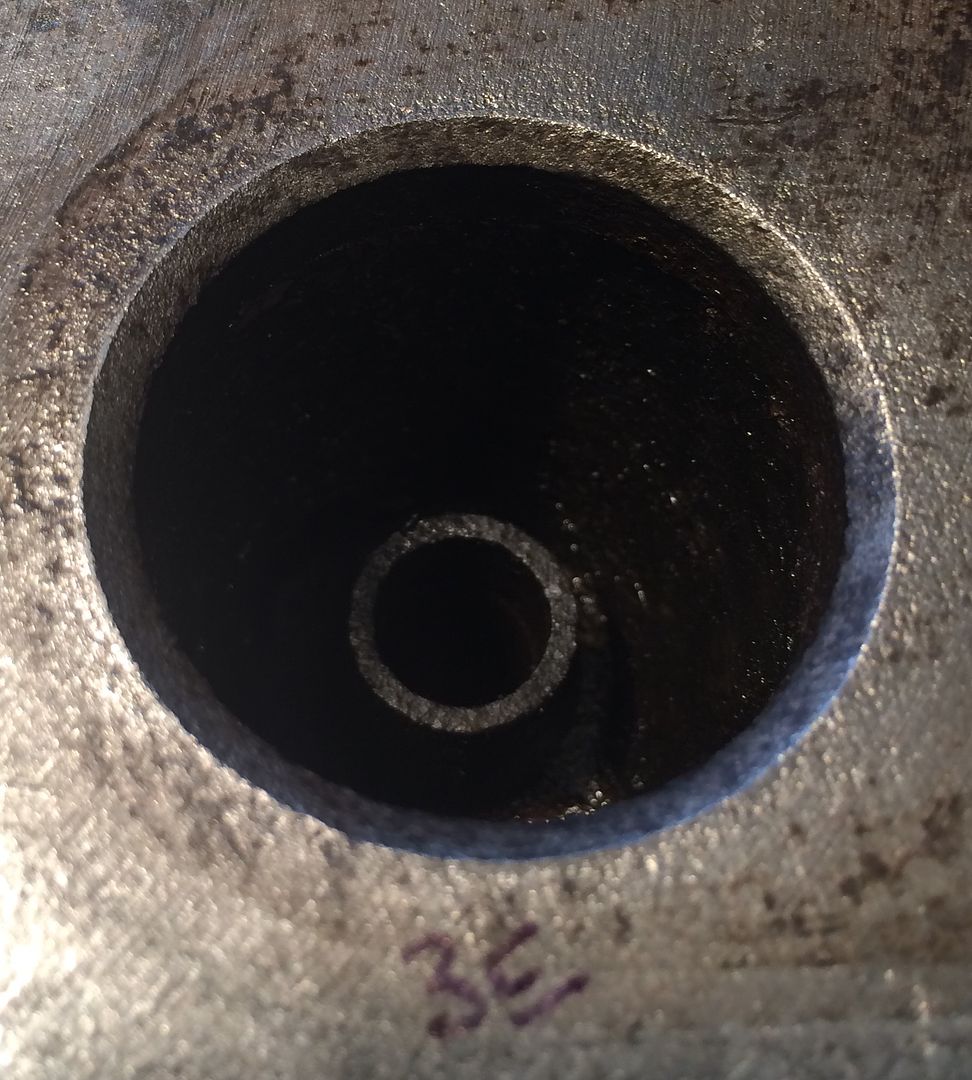 . http://s1304.photobucket.com/user/mbullism/media/CJ2A%2069750/ED8E20BE-62BF-47C5-9CE6-BE9D372BFA37_zps5yxw5vum.jpg.html" rel="nofollow"> 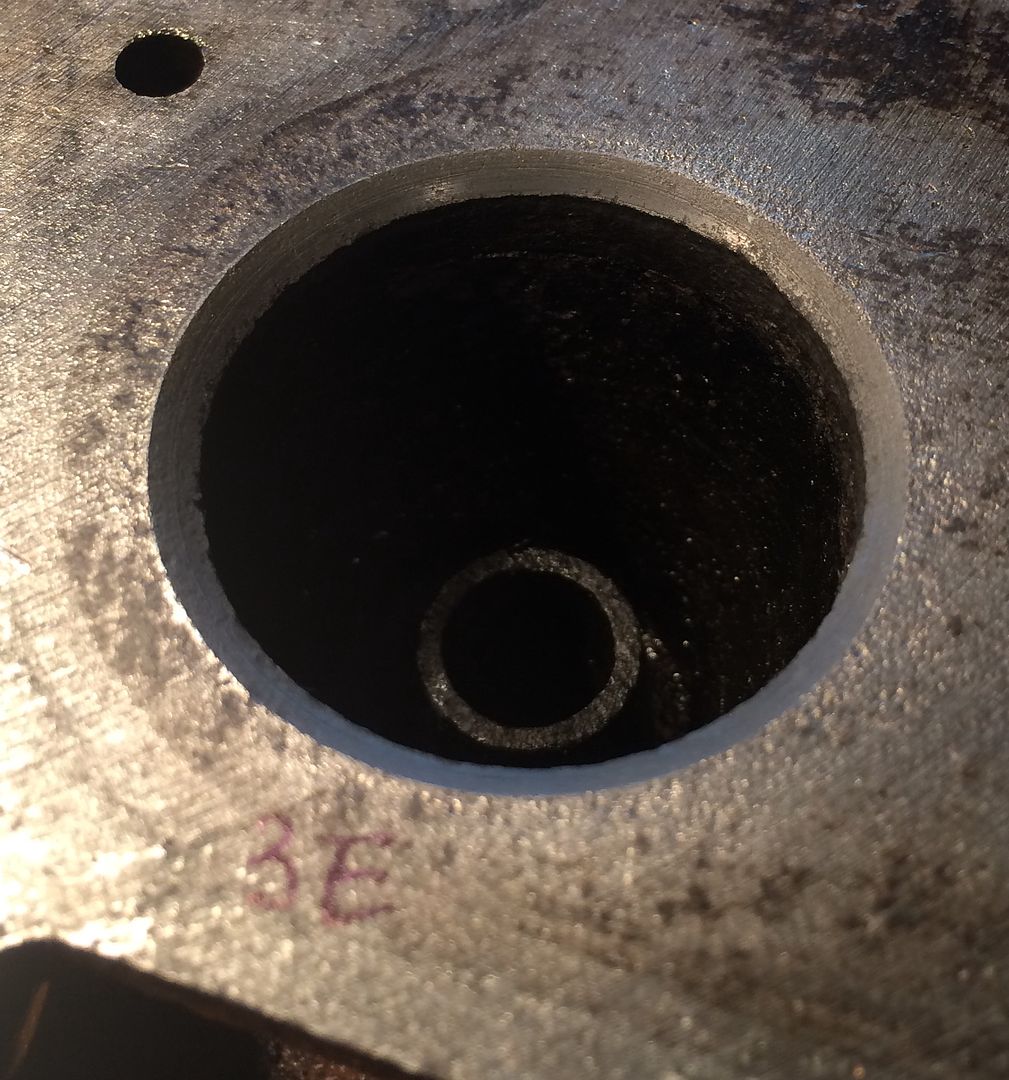 ------------- Those who do not learn from history are doomed to repeat it... Welcome to 1930's Germany |
Posted By: mbullism
Date Posted: 12 Sep. 2016 at 12:14pm
|
So with the valves tightened up, I had thoughts of pulling pistons, running a hone and re-ringing...but I can still see cross hatching in every bore. I decided to measure the bores and let that be my guide on what to do next. I think I'm done, lol. To the extent I can repeat measurements using a telescoping bore gage and a digital caliper, the bores are spec... the only minor hiccup is the 3.1265 transverse at the top of number one. Not for being over the 3.127 max, just it's a bit over it's longitudinal partner at 3.125... I'm gonna run with it. I think the only risk is not finding a broken ring that may be lurking, but the bores look so good I'll risk that- . http://s1304.photobucket.com/user/mbullism/media/CJ2A%2069750/B8DA7A55-8D80-4467-91C5-5A497132D18B_zpsjoyrofge.jpg.html" rel="nofollow"> 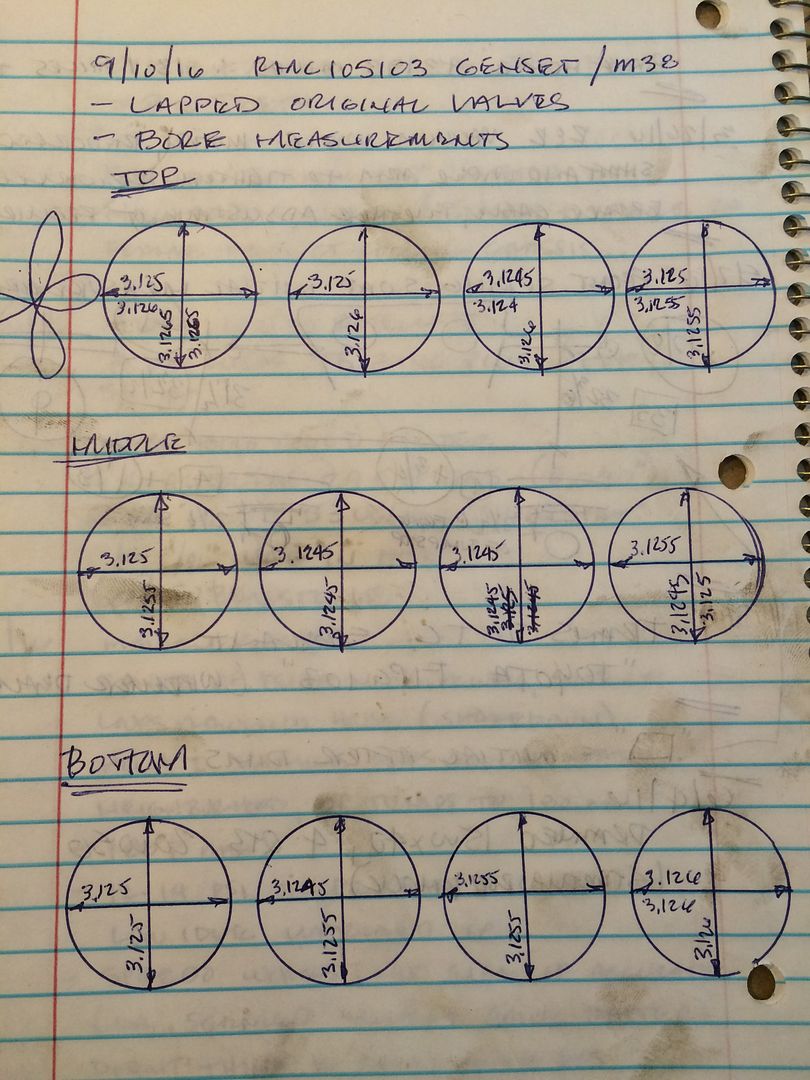 ------------- Those who do not learn from history are doomed to repeat it... Welcome to 1930's Germany |
Posted By: mbullism
Date Posted: 12 Sep. 2016 at 12:16pm
|
Flipped over, and went through the rods and mains... well, two of three mains as I didn't take the rear main seal cap off... everything looks decent, and meets spec. . http://s1304.photobucket.com/user/mbullism/media/CJ2A%2069750/8DAC1918-2A40-4D58-9CEC-57B823ABBB98_zpscdrfhkcd.jpg.html" rel="nofollow"> 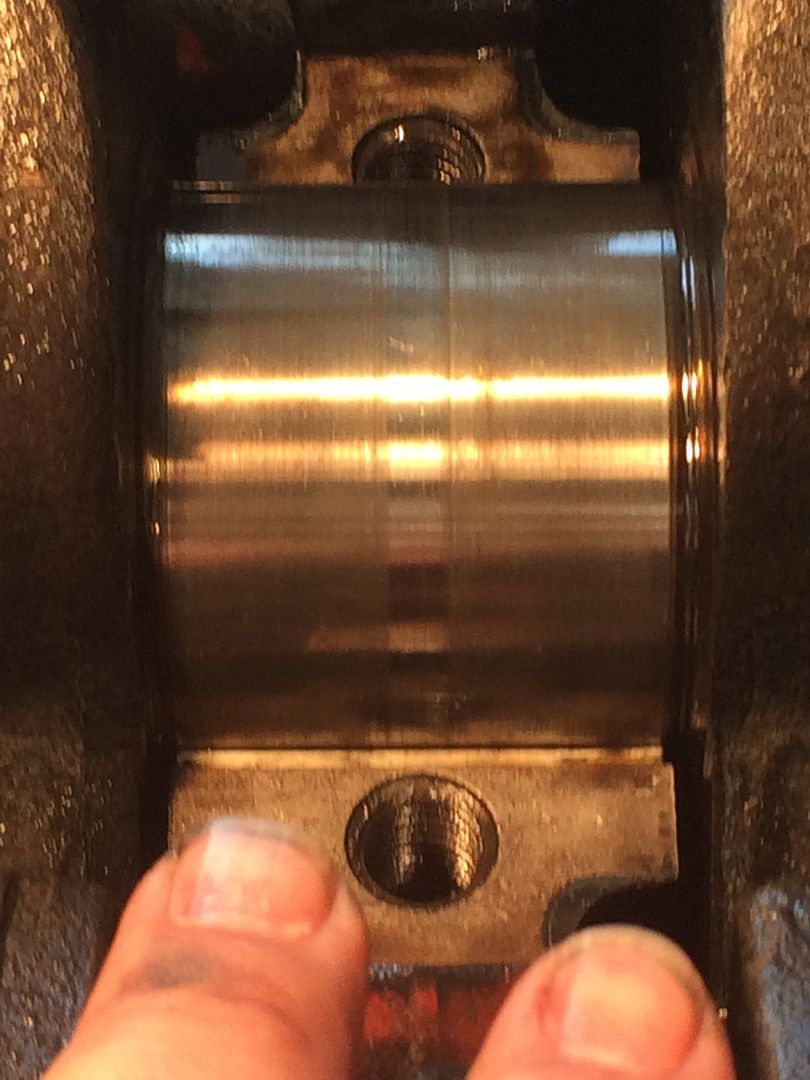 . http://s1304.photobucket.com/user/mbullism/media/CJ2A%2069750/8013C62B-F5D1-404B-A427-61026A1491EE_zpsqy7seisd.jpg.html" rel="nofollow"> 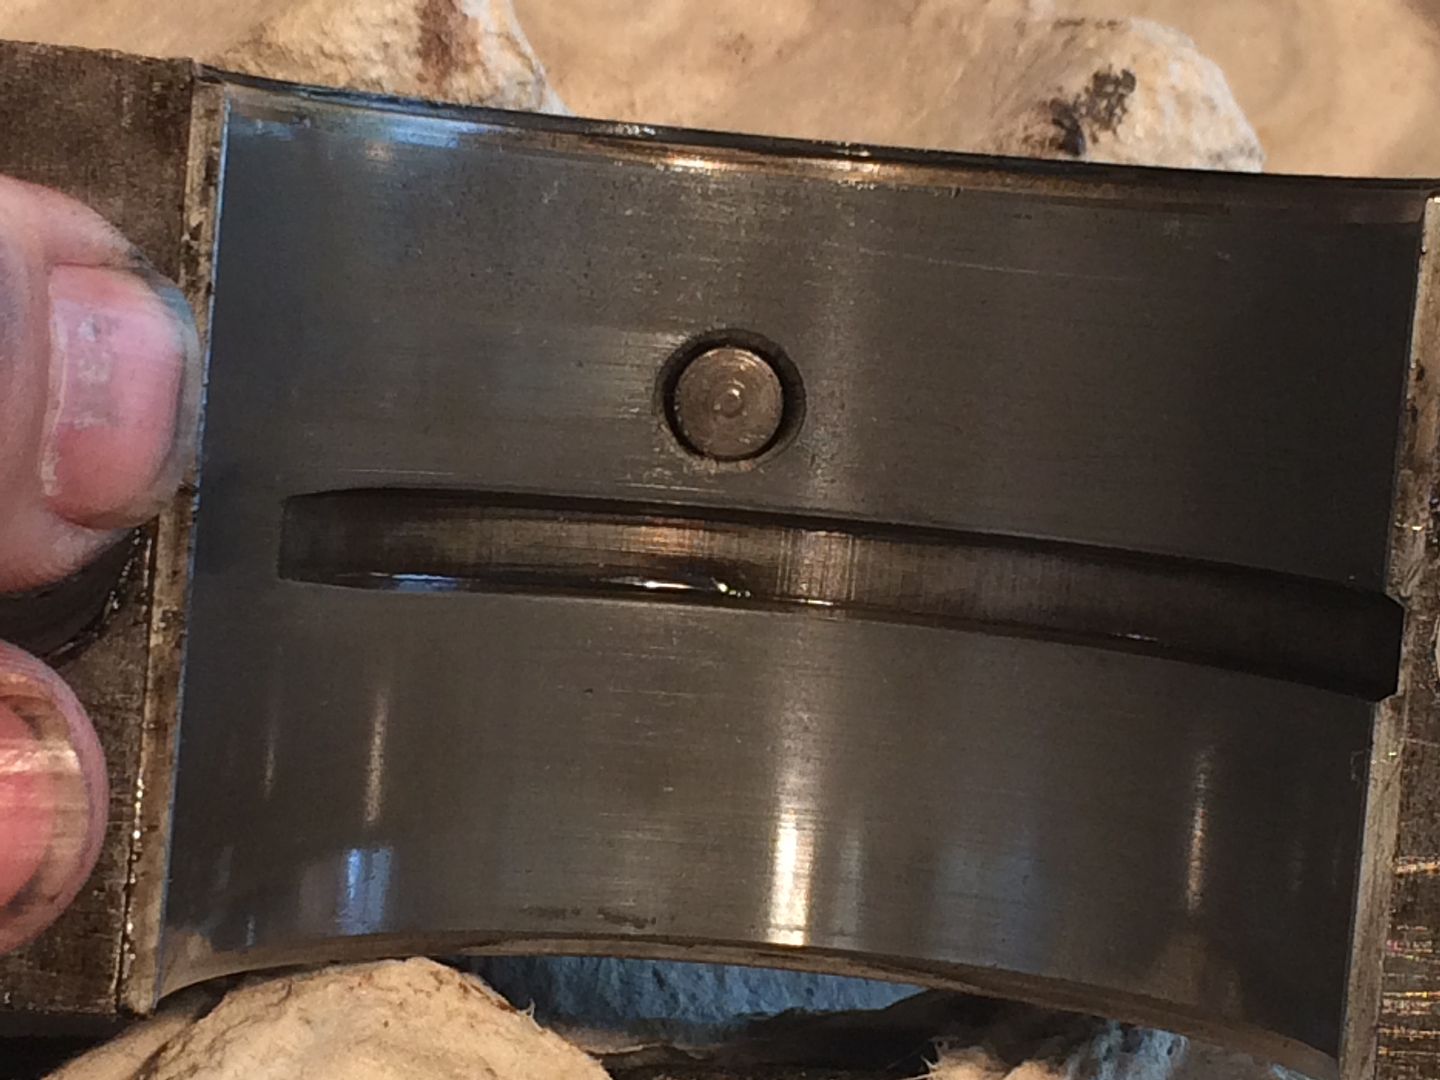 . http://s1304.photobucket.com/user/mbullism/media/CJ2A%2069750/687A06CA-4B33-4EE5-9EA8-9EE9E7076F30_zpsrmcagsls.jpg.html" rel="nofollow"> 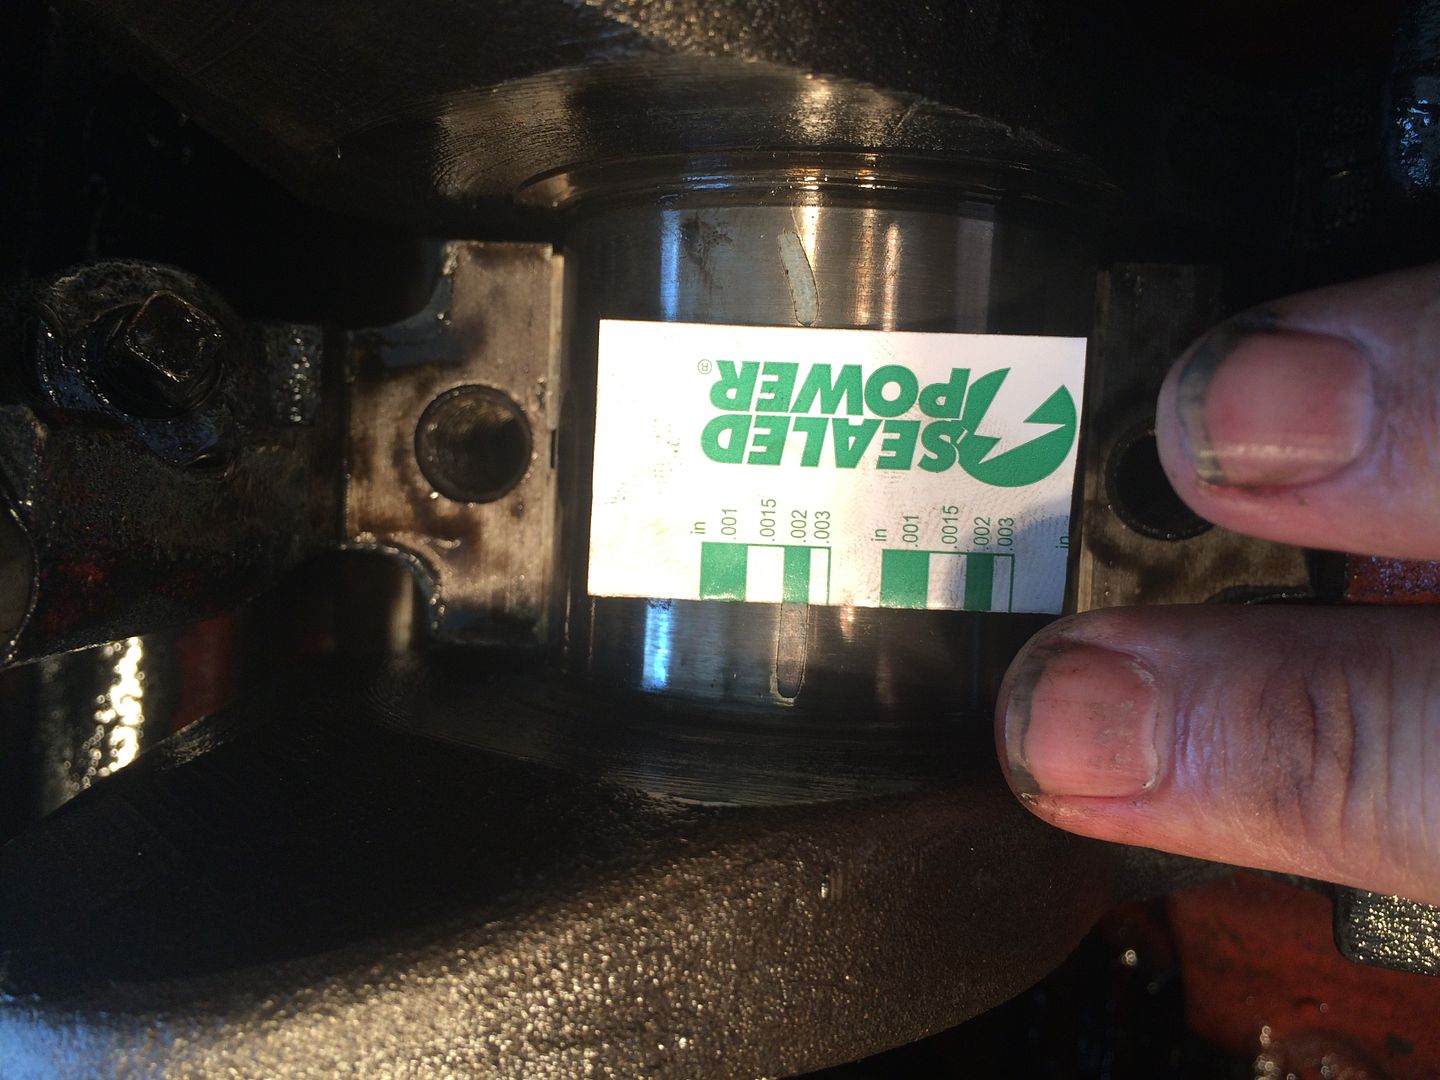 . The front main was 0.0017ish, the middle a hair under 0.002, both under the 0.0025 max, the rods are 0.0014/0.0017/0.0015/0.0015, again with a max of 0.0025"... Time to start putting things back together instead of taking things apart ------------- Those who do not learn from history are doomed to repeat it... Welcome to 1930's Germany |
Posted By: shadow
Date Posted: 14 Sep. 2016 at 3:17pm
|
Its nice when you are into a motor and you dont have a oh s*#! moment and its a i have a good motor ------------- lets go for a rip eh bud Andy |
Posted By: mbullism
Date Posted: 10 Oct. 2016 at 12:44pm
|
Last couple weekends cluttered with other "stuff", the best I could manage was using the 2A for errands, runs to the (beer) store... long weekend now, so gotta get things moving forward instead of back... chasing some threads with taps, some with brushes, some with both... W-T-H is that? what starts out looking like a bit of something at the bottom of a water jacket port becomes "this" with a little judicious use of needle nose pliers: . http://s1304.photobucket.com/user/mbullism/media/CJ2A%2069750/223435D7-33E9-4F9A-AD70-0322AB906089_zpswpaidfsw.jpg.html" rel="nofollow"> 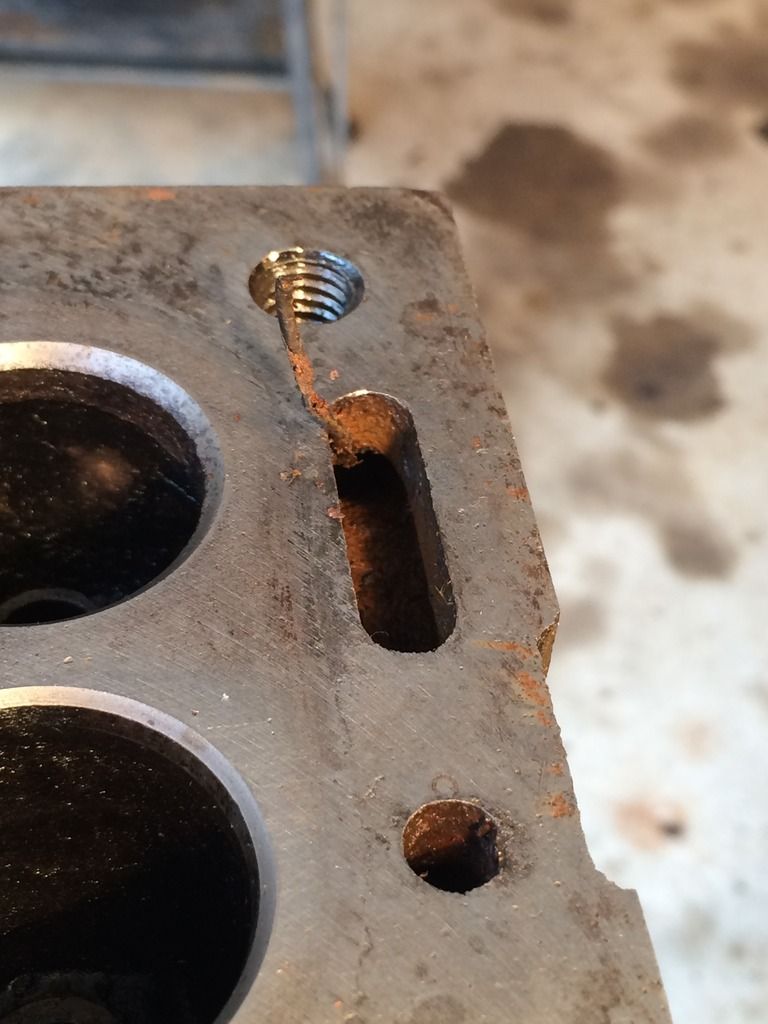 . and then this.... like pulling a thread on a sweater . http://s1304.photobucket.com/user/mbullism/media/CJ2A%2069750/2664FE1E-8089-44DE-840B-BC15637BF357_zps4pow9zl7.jpg.html" rel="nofollow"> 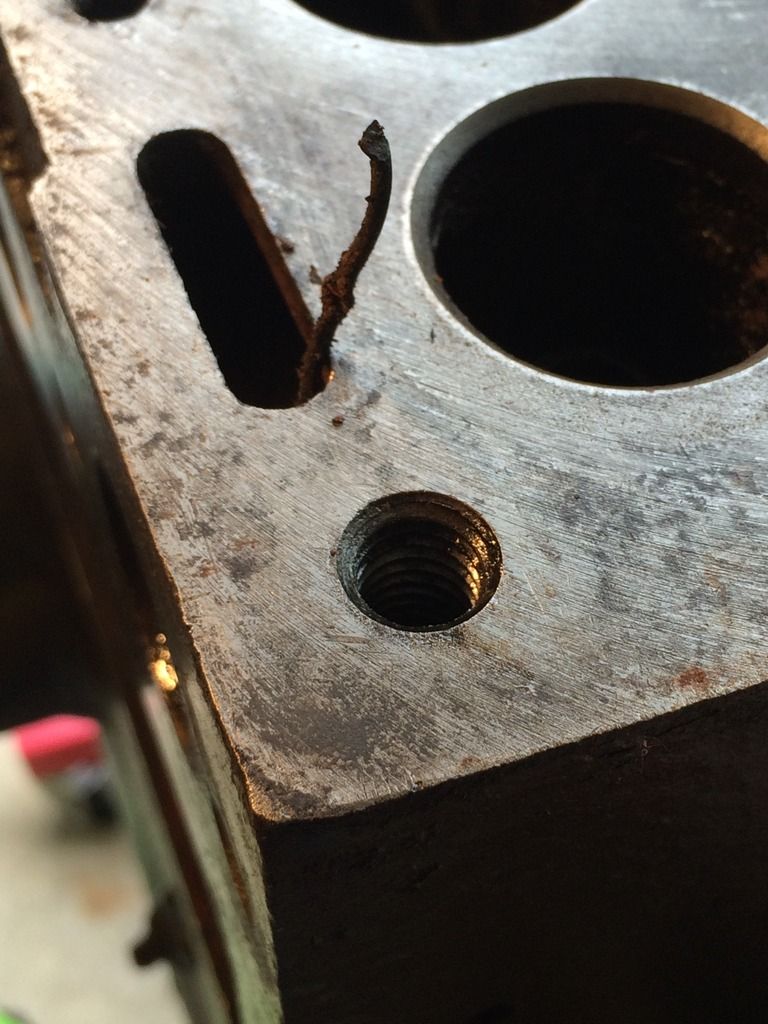 . http://s1304.photobucket.com/user/mbullism/media/CJ2A%2069750/B6985BB7-FB29-4FE7-A986-874BB599DCD3_zps3gcqzpoa.jpg.html" rel="nofollow"> 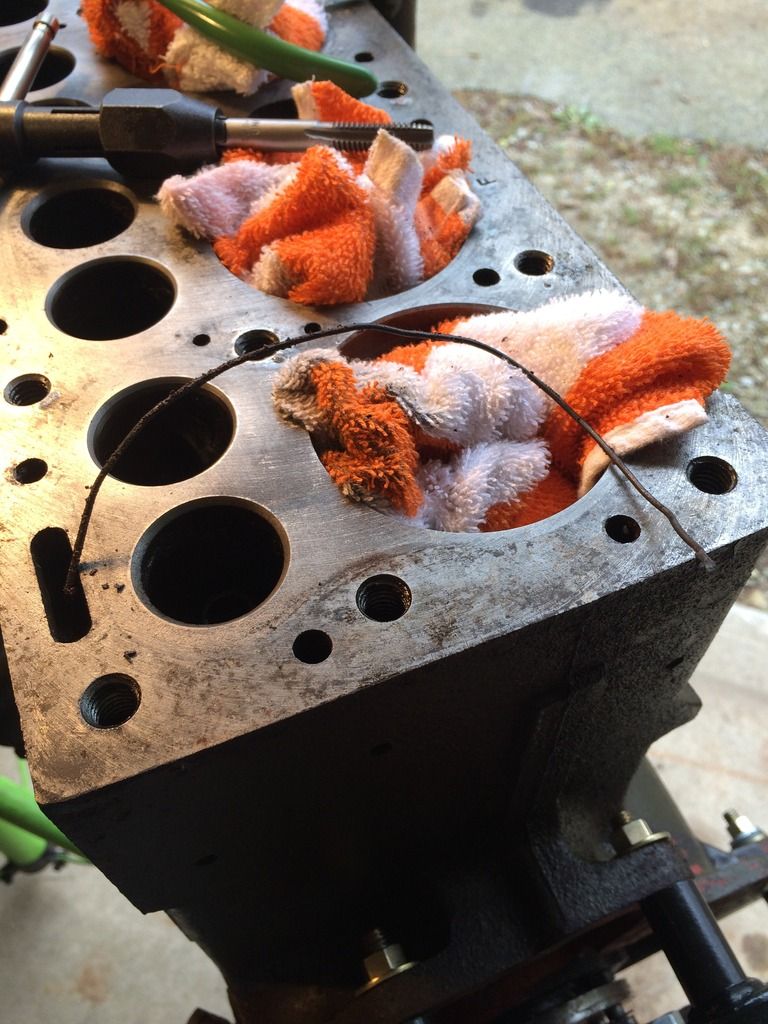 . http://s1304.photobucket.com/user/mbullism/media/CJ2A%2069750/2235A1F3-63AF-46F5-B5F1-C6CFE9447C0D_zpsebqguxhf.jpg.html" rel="nofollow"> 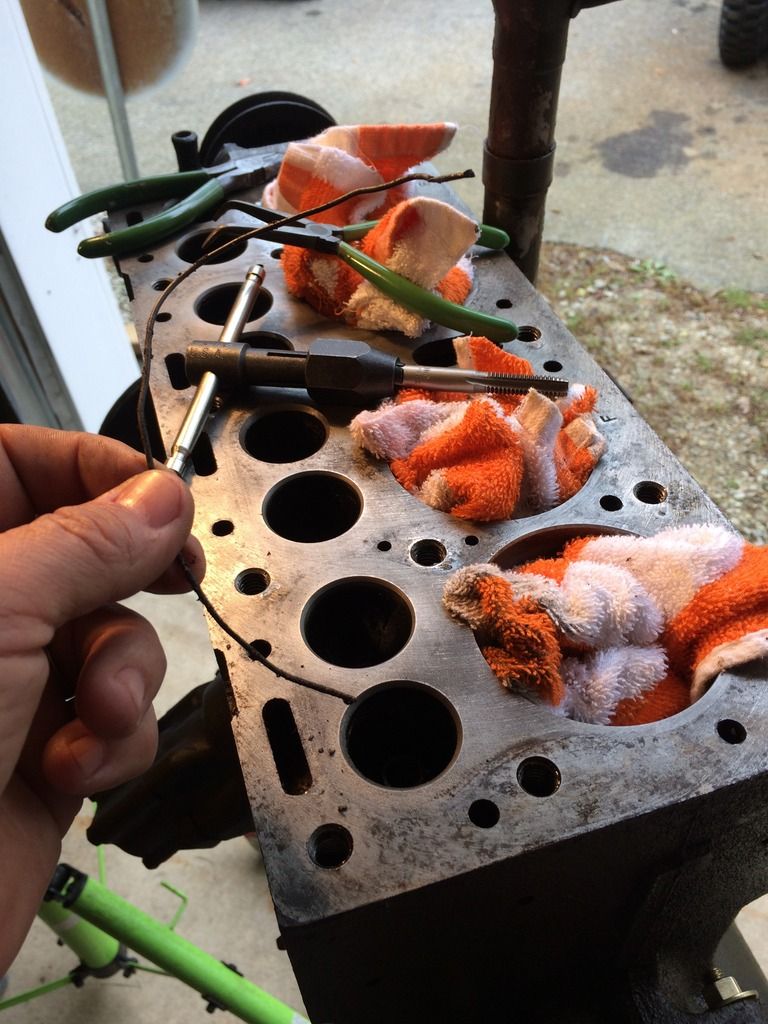 . . It was quite a tug... whilst I was pulling this out the back I kept looking up the front to see if the water pump pulley was spinning-
------------- Those who do not learn from history are doomed to repeat it... Welcome to 1930's Germany |
Posted By: mbullism
Date Posted: 10 Oct. 2016 at 12:55pm
|
few more threads... . http://s1304.photobucket.com/user/mbullism/media/CJ2A%2069750/ea2c2f9e-8bb5-4e15-8d07-571a3ecf91da_zpsfdqglly9.jpg.html" rel="nofollow"> 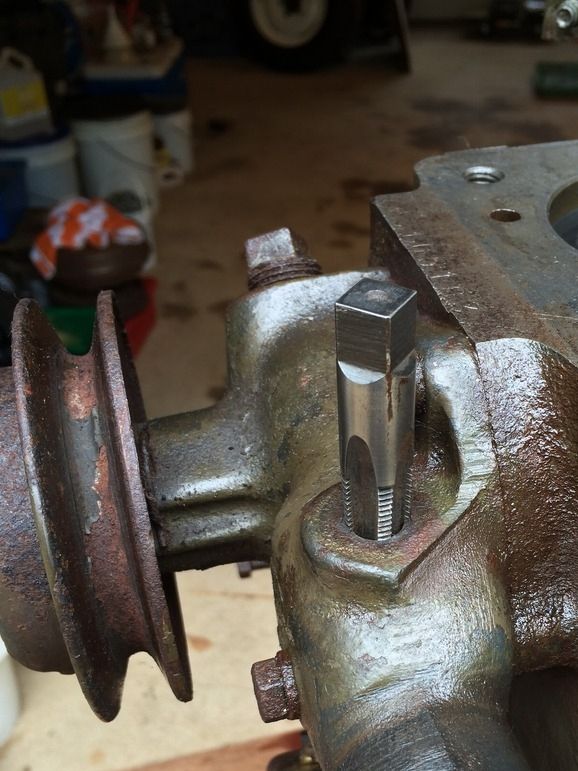 . http://s1304.photobucket.com/user/mbullism/media/CJ2A%2069750/D58095FB-1F30-46CE-A7BC-4DAFE2B0A381_zpsgq1rffpf.jpg.html" rel="nofollow"> 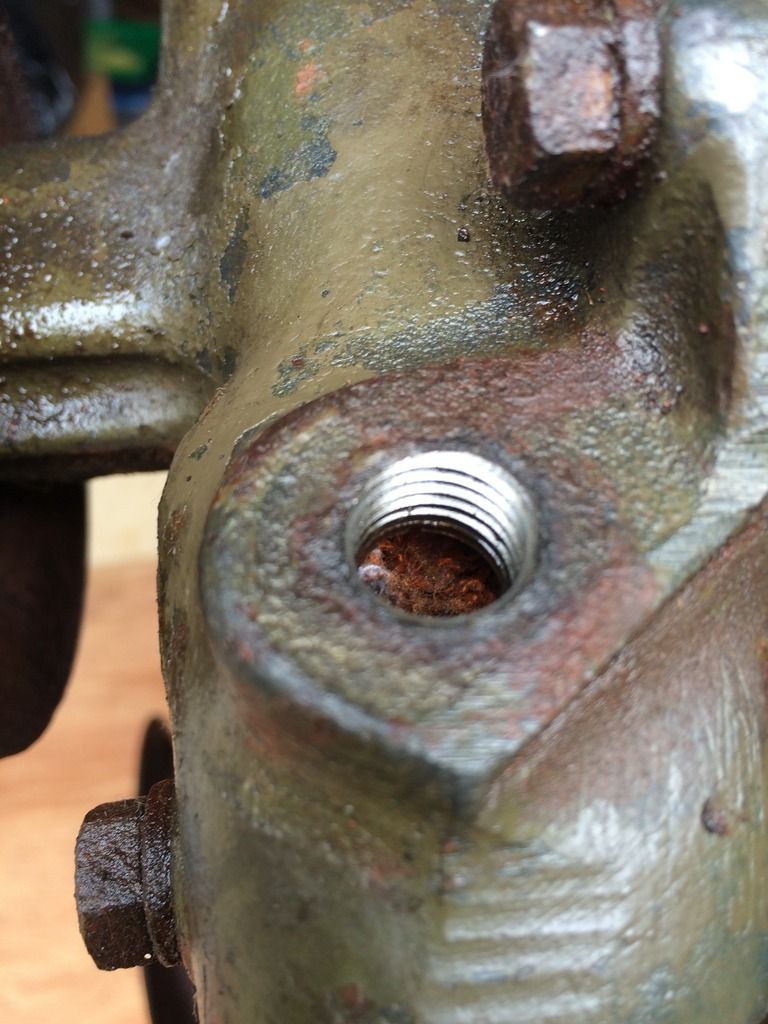 . The rough work done, time to clean everything and get moving forward (finally) . valves going in... . http://s1304.photobucket.com/user/mbullism/media/CJ2A%2069750/C4BBDAFD-C7D5-4195-9510-81BA38D92B58_zps43jjlu2d.jpg.html" rel="nofollow">  . A proper valve adjust (three times around) . http://s1304.photobucket.com/user/mbullism/media/CJ2A%2069750/E687BCFC-C77B-487E-9946-B42A80B0193B_zpsiucimny0.jpg.html" rel="nofollow"> 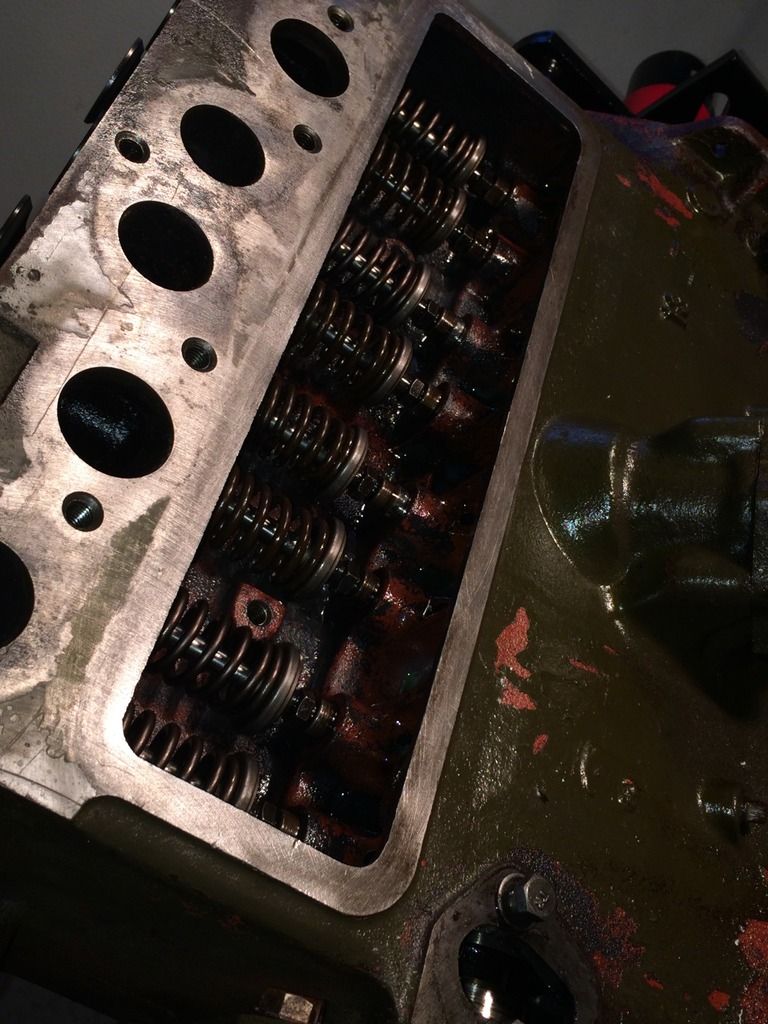 . Hide them away ... it feels good not seeing them anymore, lol. http://s1304.photobucket.com/user/mbullism/media/CJ2A%2069750/C0ABAD6F-E03F-48A3-9629-3410EC4CCD86_zpsqpvwntoz.jpg.html" rel="nofollow"> 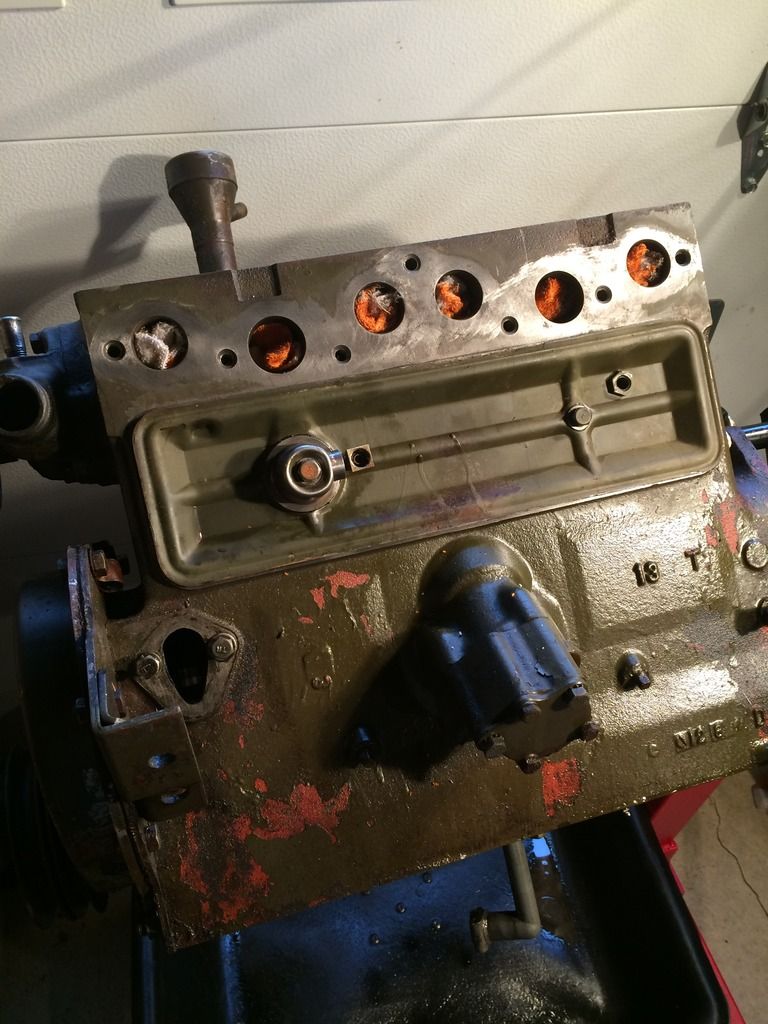 . Studs "R" us... . http://s1304.photobucket.com/user/mbullism/media/CJ2A%2069750/E43D65A4-0F25-4C69-8780-E4F5D9136D99_zpskz3v0ps0.jpg.html" rel="nofollow"> 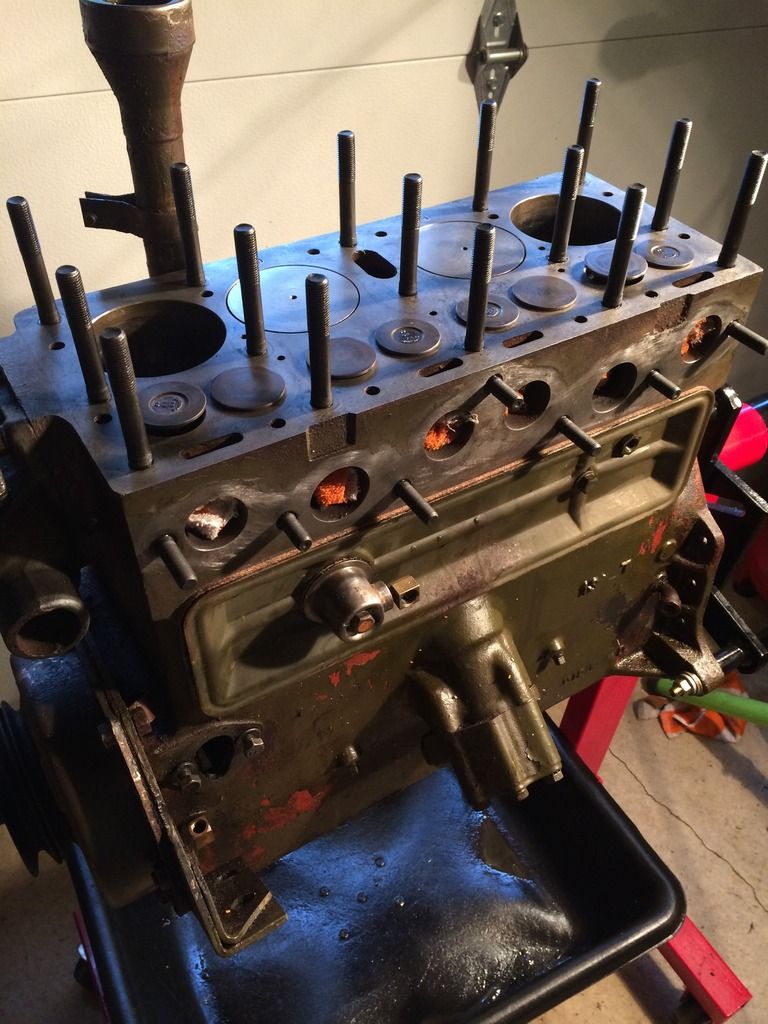 . . . So the last of the day, Pat's game on in the background, cleaned up the oil pan mating surface, re-installed the sump float... hadn't planned on painting the oil pan, but it had been OD'd without primer and the paint was falling off... stripped to bright and a coat of self etching primer. Haven't really decided on what to do with the overall paint... want to get it buttoned back up before crossing that bridge. All the little decal type touches are damaged in one way or another. Part of me wants to keep as much of the original paint as possible, but it's so spotty. I've got an 800376 head coming, I may just install it and give everything a shot of black to seal it up... TBD Oil pan going on this morning-
------------- Those who do not learn from history are doomed to repeat it... Welcome to 1930's Germany |
Posted By: Bruce W
Date Posted: 10 Oct. 2016 at 4:55pm
|
When the sand core was set-up for the block casting process, it was common for a wire(s) to be inserted in the sand to help hold it together. When the sand was washed out of the newly-cast block, the wire remained. We used to find them in Flathead V8 cylinder heads all the time. BW ------------- It is NOT a Jeep Willys! It is a Willys jeep. Happy Trails! Good-bye, Good Luck, and May the Good Lord Take a Likin' to You! We Have Miles to Jeep, Before We Sleep. |
Posted By: mbullism
Date Posted: 10 Oct. 2016 at 11:27pm
|
Thanks, Bruce W... I had no idea- http://s1304.photobucket.com/user/mbullism/media/CJ2A%2069750/A892582E-95ED-4195-94E8-D1C1548D0CB2_zps6yuutlb8.jpg.html" rel="nofollow"> 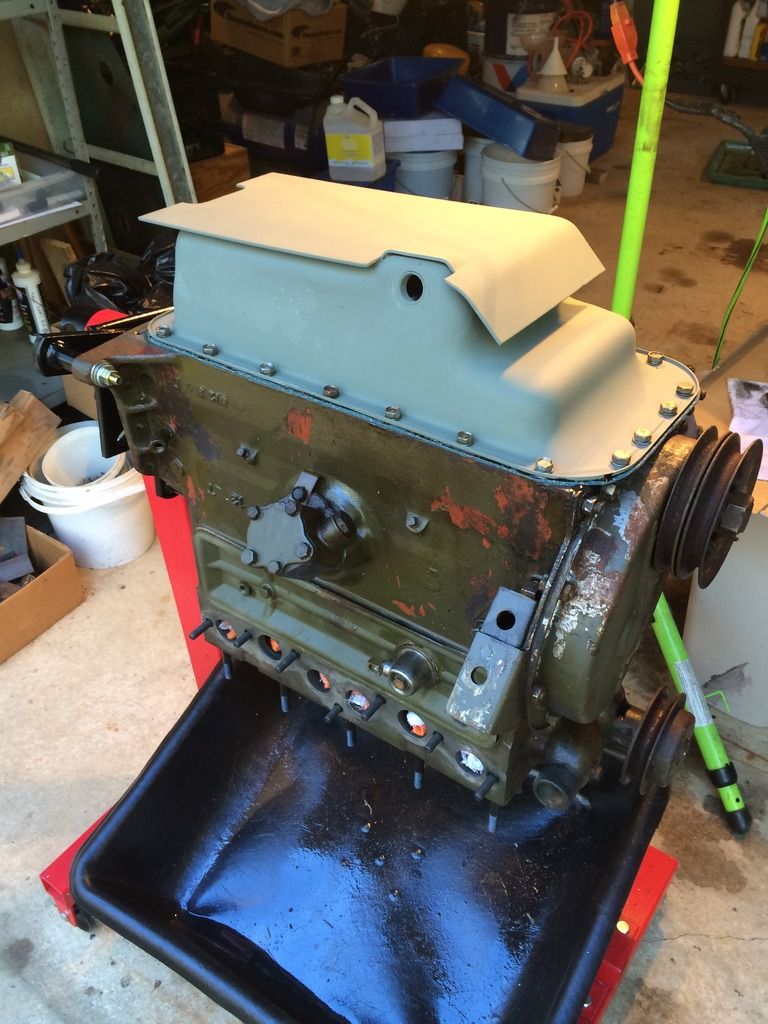
. Who breaks a lock washer at 5 lb-ft? . http://s1304.photobucket.com/user/mbullism/media/CJ2A%2069750/414621F7-B49B-45F3-ACA5-012E385E8DD8_zpscxffudar.jpg.html" rel="nofollow"> 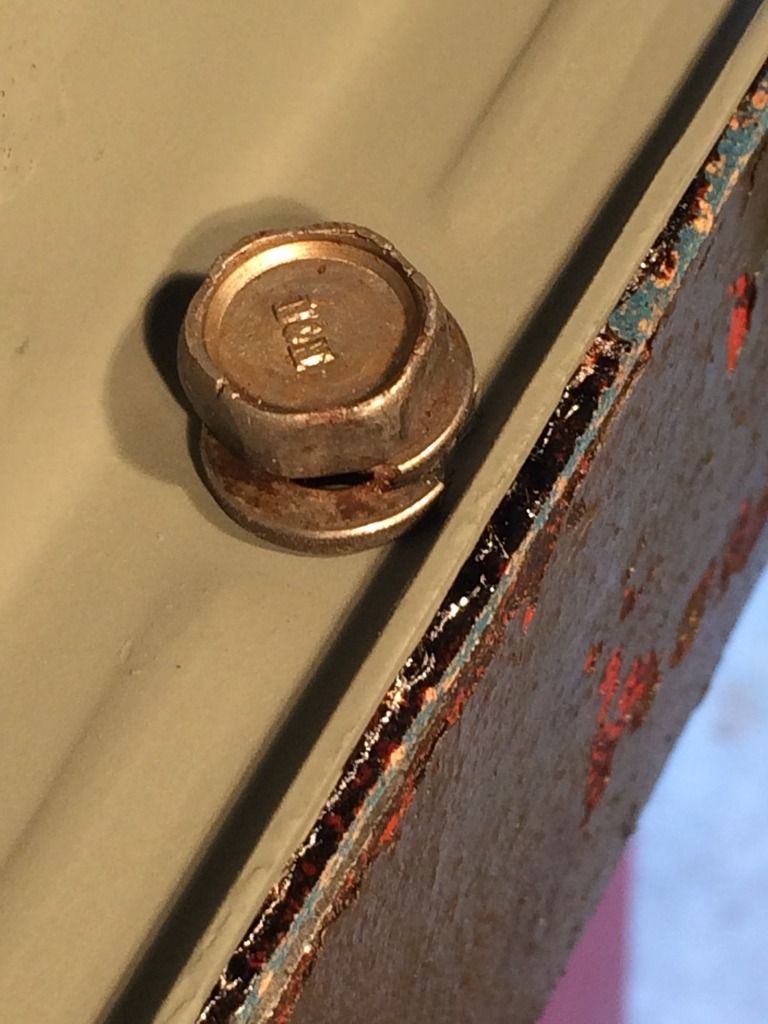 . to add insult to injury, when I removed the bolt, half the washer fell in the gd hole... "chapter 53"  ------------- Those who do not learn from history are doomed to repeat it... Welcome to 1930's Germany |
Posted By: SE Kansas 46 CJ-2A
Date Posted: 11 Oct. 2016 at 12:08am
...sounds just like something that would happen to me...  ------------- 46 CJ-2A #64462 "Ol' Red" (bought April 1969)(second owner)(12 V, 11" brakes, M-38 frame, MD Juan tub) U.S. Coast Guard Chief Petty Officer(ret.) U.S. Army Vietnam veteran and damned proud of it. |
Posted By: mbullism
Date Posted: 11 Oct. 2016 at 12:40pm
|
So not directly project related, I've been the last year waiting for a fitting name for my rig to present itself... sort of know it when you hear it kinda thing- I've wrestled with various monikers, and none have fit, or stuck. Given the 2A's direct lineage to it's military bretheren, and the VEC the forging transition to what would become the '46 et al, "Plowshare" seems fitting ((With apologies to anyone else flying this flag...a search here revealed none) ------------- Those who do not learn from history are doomed to repeat it... Welcome to 1930's Germany |
Posted By: Unkamonkey
Date Posted: 11 Oct. 2016 at 1:56pm
|
I have problems coming up with names as well. The white 3B is the B. The camo Commando is the C. My motorhome has been called a lot of things by people. I just call it the Runamucca. ------------- uncamonkey |
Posted By: mbullism
Date Posted: 25 Nov. 2016 at 7:22pm
|
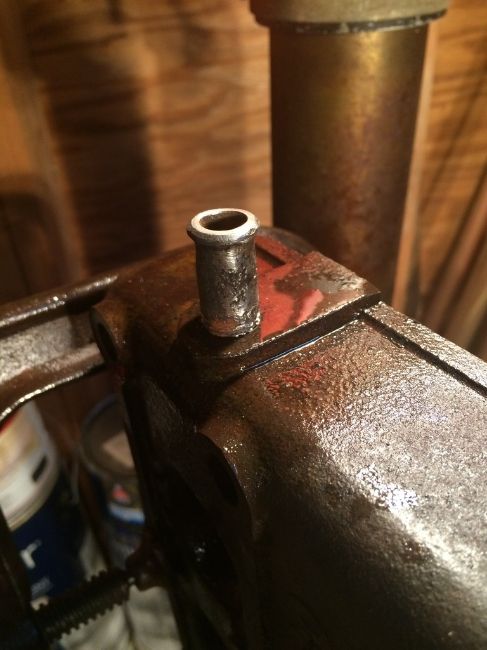
so after several weeks of room renovations, deer season,college campus visits and applications yada yada I finally squirreled away enough credits to be able to say "not today, Hon"... I'm playing jeep today My 800376 civy head gets "militarized" with a bypass hose nipple installation. Absolutely nothing like taking a perfectly good part you searched out and paid fair money for...and drilling a hole in it- . . http://s1304.photobucket.com/user/mbullism/media/CJ2A%2069750/6b3b18f3-e3c6-47f2-ba48-54b6471c7cba_zpscoa3vngx.jpg.html" rel="nofollow">  . . http://s1304.photobucket.com/user/mbullism/media/CJ2A%2069750/61745687-3af9-473c-a462-f322db41addd_zpstn9npywe.jpg.html" rel="nofollow"> 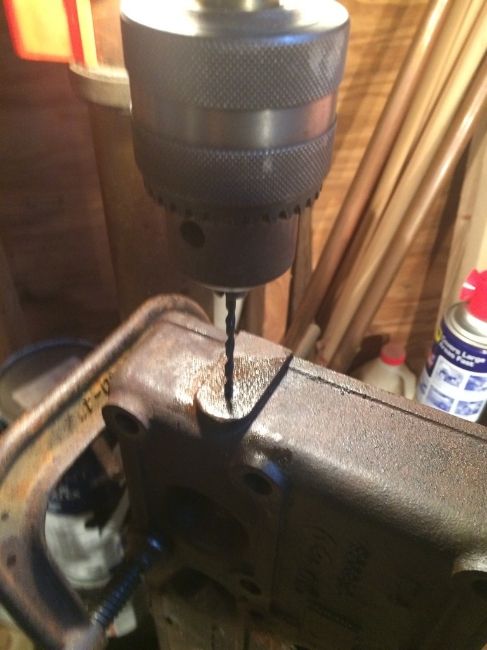 . . http://s1304.photobucket.com/user/mbullism/media/CJ2A%2069750/25024eb4-175b-4cb9-b339-e98a274cd89b_zpsanojy9en.jpg.html" rel="nofollow"> 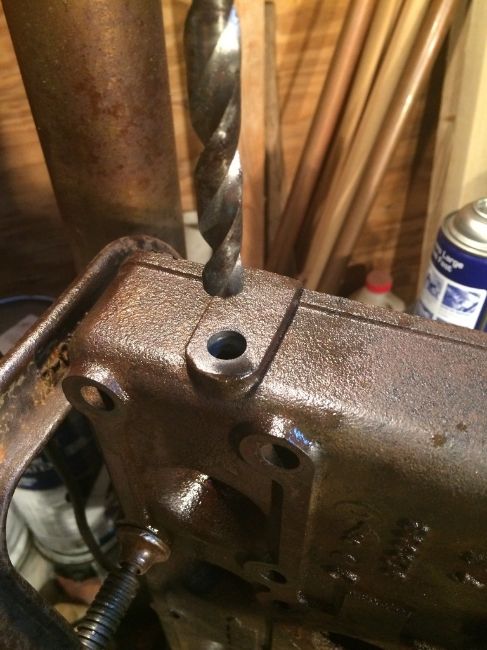 . . http://s1304.photobucket.com/user/mbullism/media/CJ2A%2069750/d7045c26-19f0-4273-96f1-7c4f279d1509_zpsjrwshrup.jpg.html" rel="nofollow"> 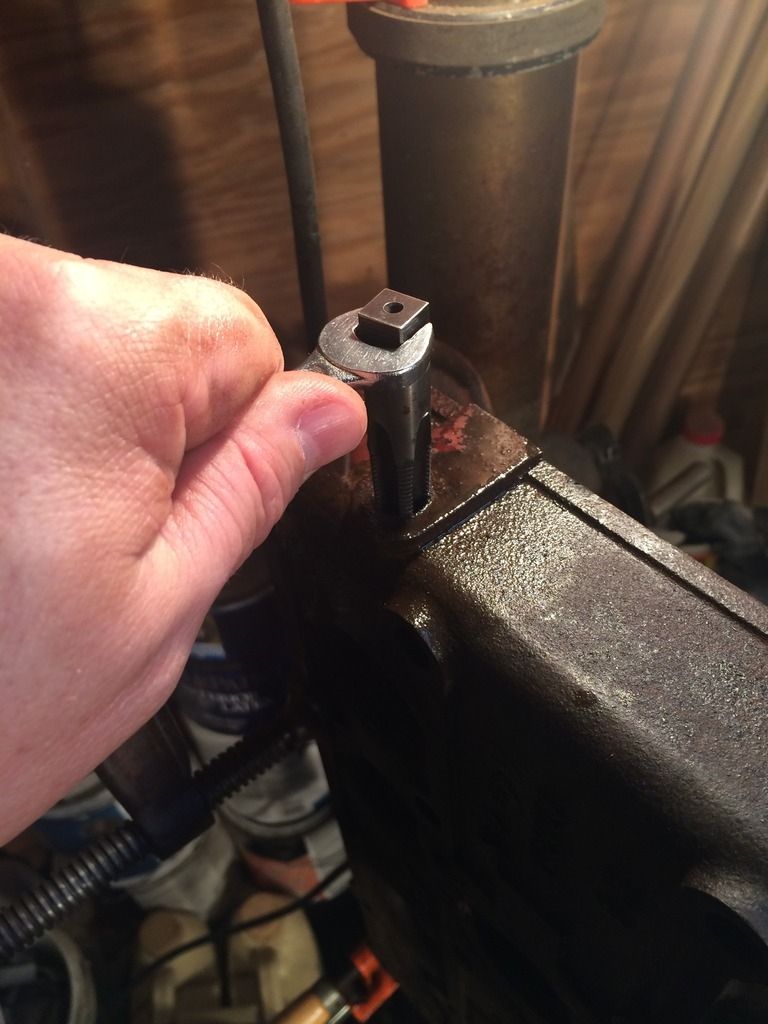 . . http://s1304.photobucket.com/user/mbullism/media/CJ2A%2069750/bb9fdd53-4c33-4eba-925c-dfe26ce4f2a2_zpslwpbkwnt.jpg.html" rel="nofollow">
 ------------- Those who do not learn from history are doomed to repeat it... Welcome to 1930's Germany |
Posted By: Gil
Date Posted: 25 Nov. 2016 at 9:33pm
|
Looking good.nice job
|
Posted By: mbullism
Date Posted: 04 Dec. 2016 at 9:08pm
|
weekend time coming at a premium, trying to drag things forward... Aprils comin', baby . http://s1304.photobucket.com/user/mbullism/media/CJ2A%2069750/EDEB2D87-4A30-4D45-B423-CD94D5A8A7BD_zpsvztl8kte.jpg.html" rel="nofollow">  . http://s1304.photobucket.com/user/mbullism/media/CJ2A%2069750/5565BF95-7034-43F0-BAB9-30355711CBC6_zpsf5goyufu.jpg.html" rel="nofollow"> 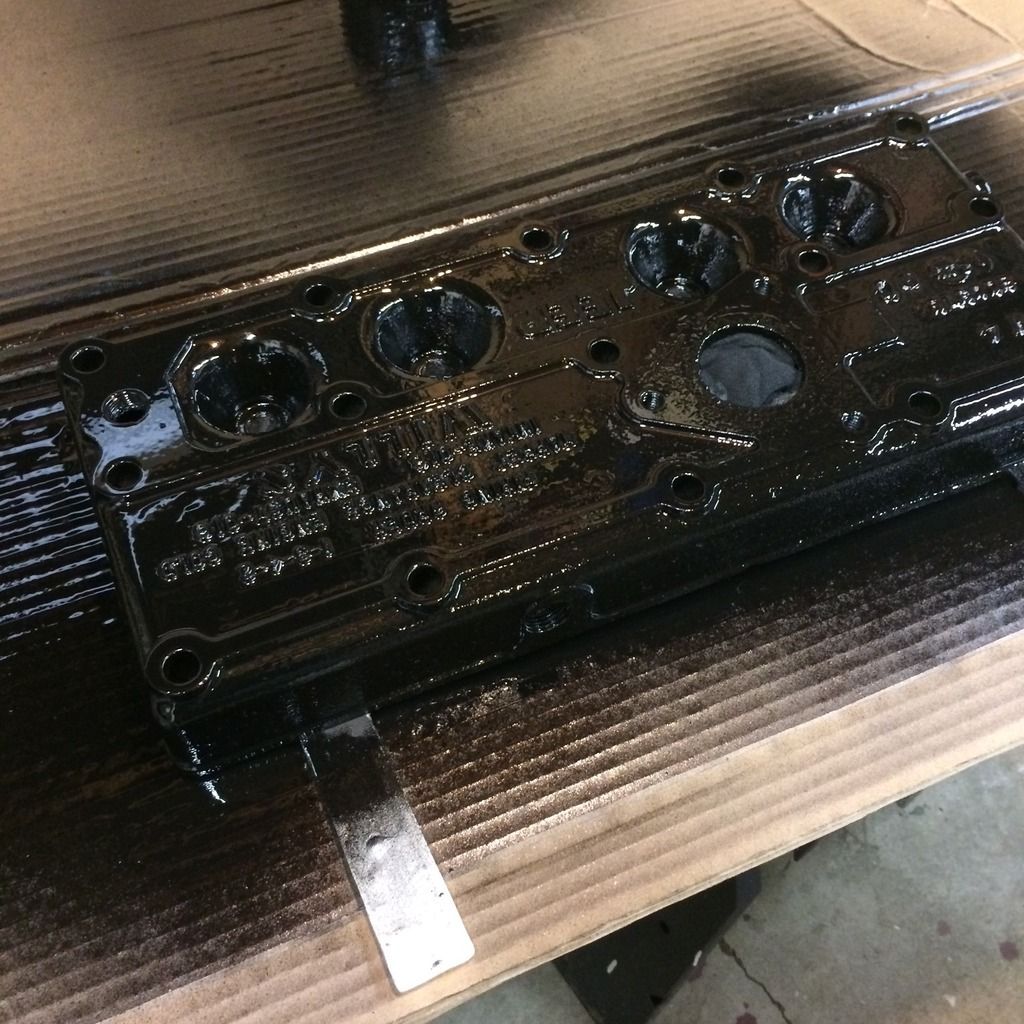 . Two coats of high heat... the plan will be to get everything assembled, scuff em up and give everything one last coat. While I've gone out of my way to keep the 2A running on the chance of an indian summer afternoon, we've reached the point where I'm going to start "scavenging" bolt-ons from the Henry J engine (carb/manifolds/fuel pump/dizzy/etc to assemble as much of the RMC as possible on the stand before the swap... did I mention April is coming? ------------- Those who do not learn from history are doomed to repeat it... Welcome to 1930's Germany |
Posted By: mbullism
Date Posted: 04 Dec. 2016 at 9:42pm
|
...and my vinyl showed up . http://s1304.photobucket.com/user/mbullism/media/CJ2A%2069750/1D469A6F-B76F-45BA-B843-4FF16E87925A_zpsxps9dg7u.jpg.html" rel="nofollow"> 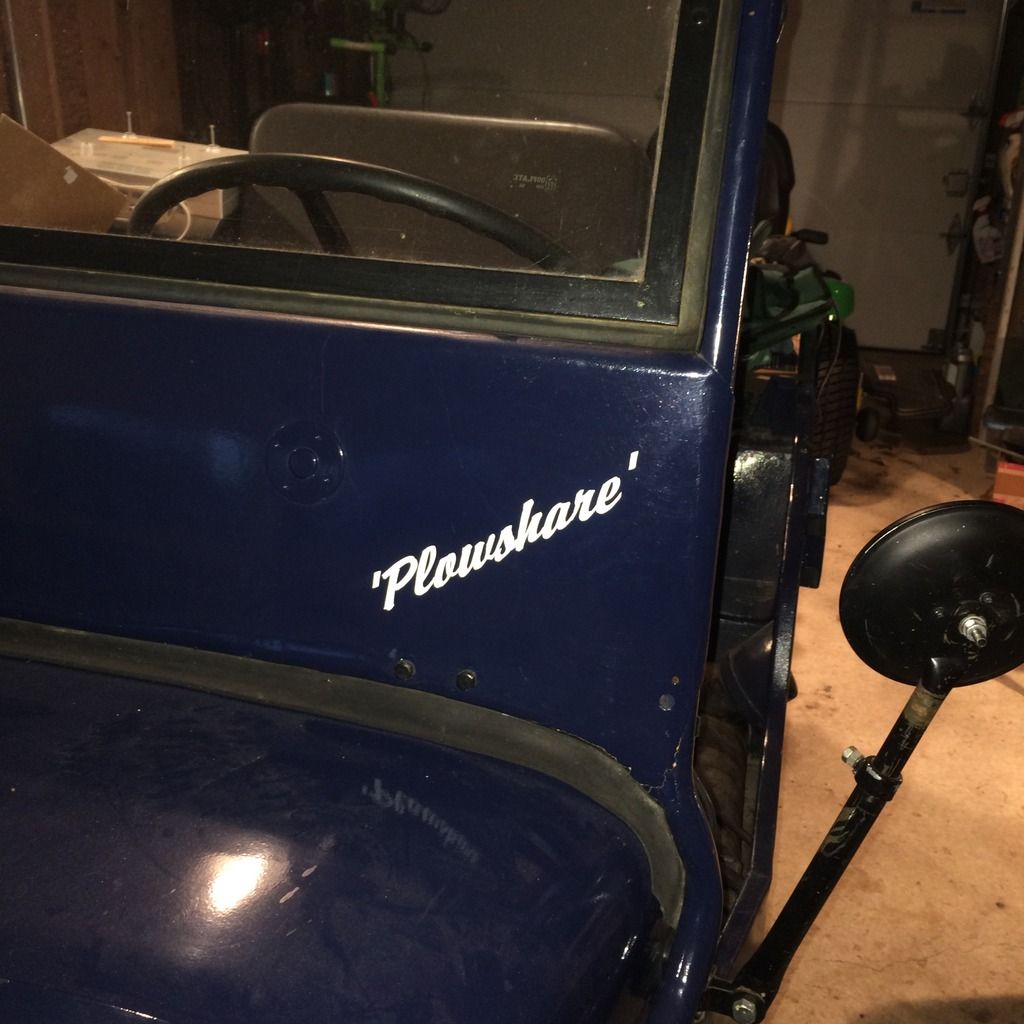 ------------- Those who do not learn from history are doomed to repeat it... Welcome to 1930's Germany |
Posted By: mbullism
Date Posted: 03 Jan. 2017 at 3:57pm
|
UGH... happy freekin new year to me, lol... after dutifully soaking manifold nuts/studs/mating surfaces/etc. over a period of two weeks, and a new years wedding commitment in the rear view, 6:30am found me pulling pieces. You know that sinking feeling you get when things go too well?  Every nut/stud/gasket/whatever gave it up too easy...walk in the park easy... Every nut/stud/gasket/whatever gave it up too easy...walk in the park easy.... http://s1304.photobucket.com/user/mbullism/media/CJ2A%2069750/392680A4-420E-4C7A-BCA3-9EFB92700FFD_zps98hfklod.jpg.html" rel="nofollow">  . and in the end it almost didn't matter a tinkers damn... . http://s1304.photobucket.com/user/mbullism/media/CJ2A%2069750/7BAB2568-0305-424C-8641-D18156E828F6_zps829cb8co.jpg.html" rel="nofollow"> 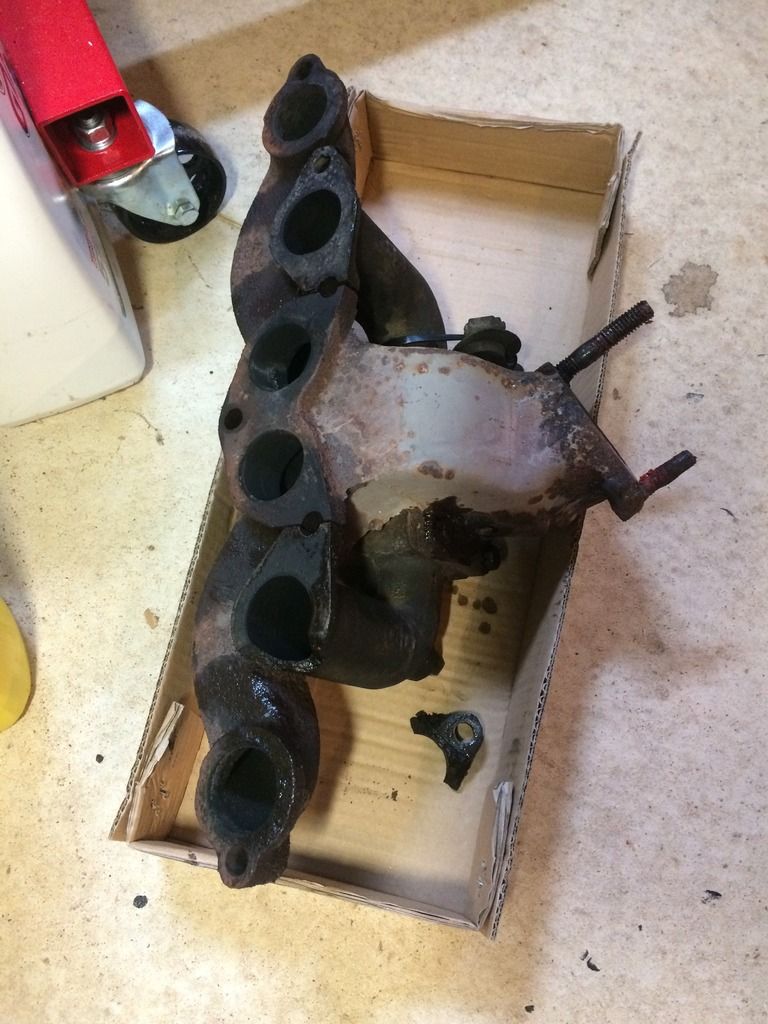 . That extra little piece laying there was broken when I got to it...hell, likely made the trip back from MI broken like that a year ago October, lol. Ya kinda know I was counting on reusing it on the RMC set up. Ah well, it's only money...and time... and grrrrrrrrrr. (I think I may have sourced a replacment, you know who you are, lol... brazing this is not entirely off the table yet) In other news, the lump(s) on the engine stand(s) continue to get heavier, and I have all the parts to marry them together . http://s1304.photobucket.com/user/mbullism/media/CJ2A%2069750/6DA30ED9-C76E-45FA-B1EE-06A200A23DBB_zpstzmrflso.jpg.html" rel="nofollow"> 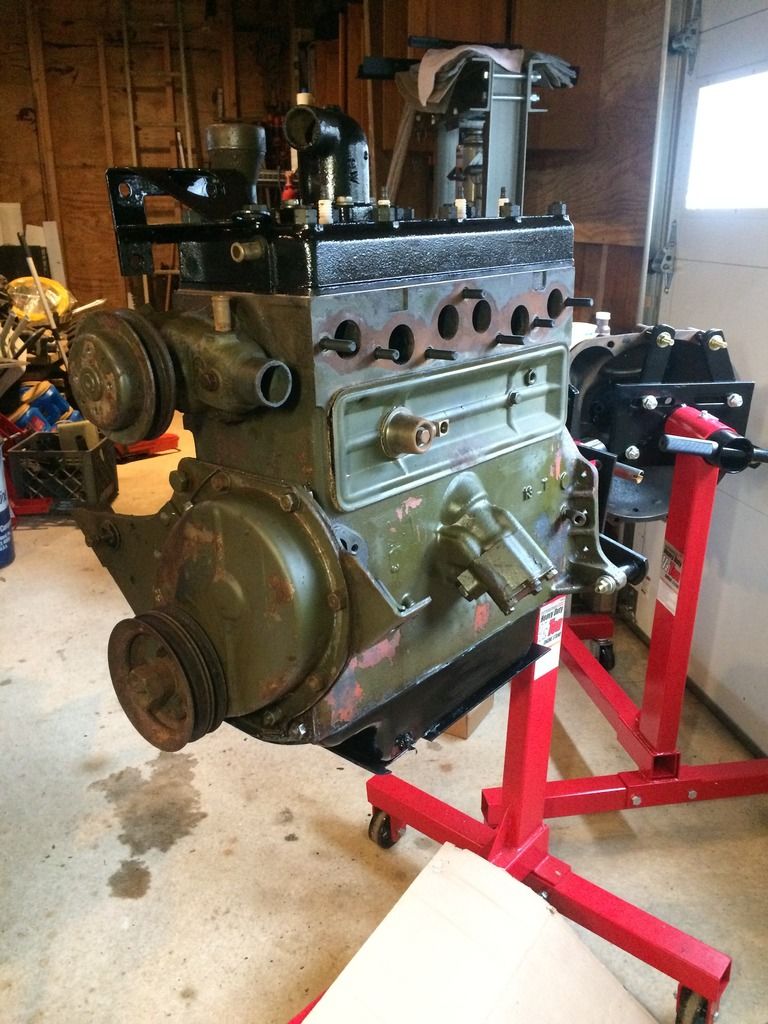 . http://s1304.photobucket.com/user/mbullism/media/CJ2A%2069750/2715E8D5-900D-45D3-8597-1CAFF119BAB1_zpsal4dzagi.jpg.html" rel="nofollow"> 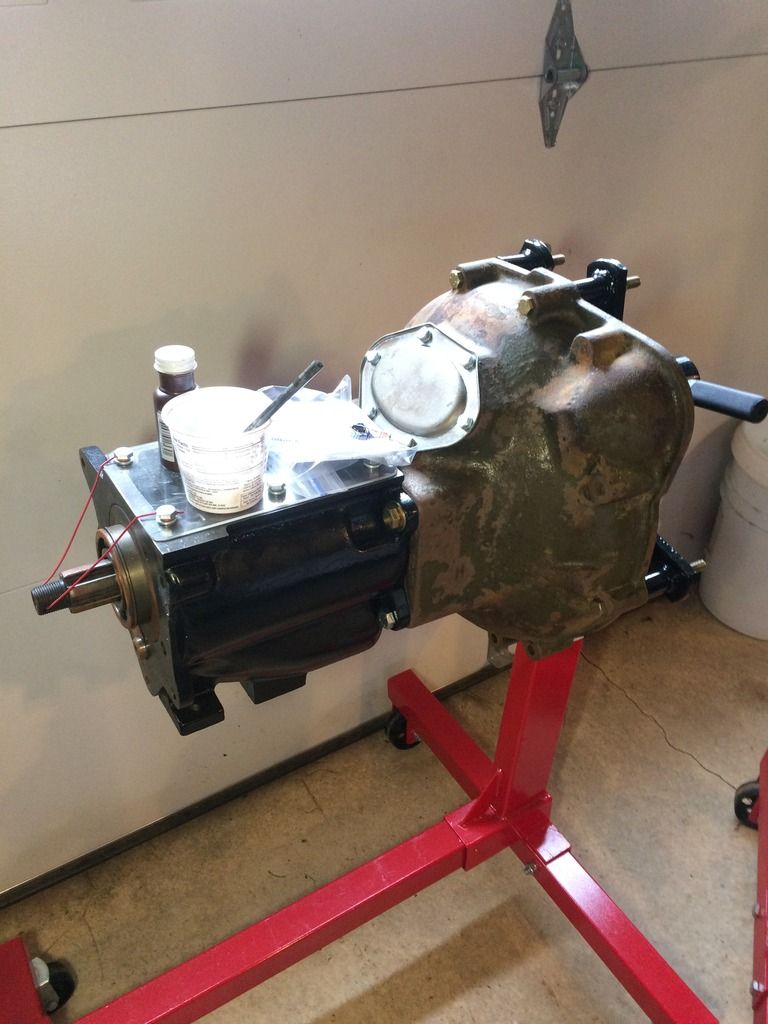 . ...and it's not like I don't have anything to do, lol . http://s1304.photobucket.com/user/mbullism/media/CJ2A%2069750/D18%20rebuild/465F09C7-6C9B-4C4B-896F-2B84EB9BA4C1_zpsojqm6tfw.jpg.html" rel="nofollow"> 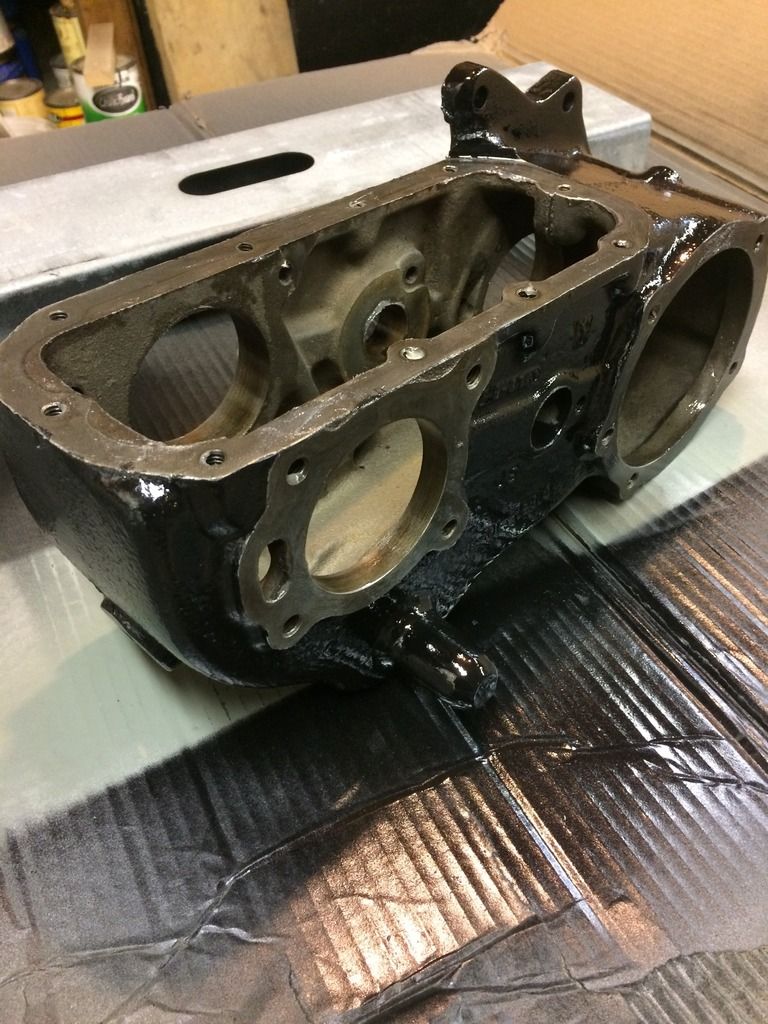 . I truly HATE the cleaning and painting part, lol, but MAN, I love pulling off that masking tape, lol . . . ------------- Those who do not learn from history are doomed to repeat it... Welcome to 1930's Germany |
Posted By: SE Kansas 46 CJ-2A
Date Posted: 03 Jan. 2017 at 6:48pm
|
I like the idea of the cover on the T-90 to keep the odds and ends nuts, bolts, washers, etc. out of the gears while it is being rebuilt and/or installed. ------------- 46 CJ-2A #64462 "Ol' Red" (bought April 1969)(second owner)(12 V, 11" brakes, M-38 frame, MD Juan tub) U.S. Coast Guard Chief Petty Officer(ret.) U.S. Army Vietnam veteran and damned proud of it. |
Posted By: mbullism
Date Posted: 07 Jan. 2017 at 7:49pm
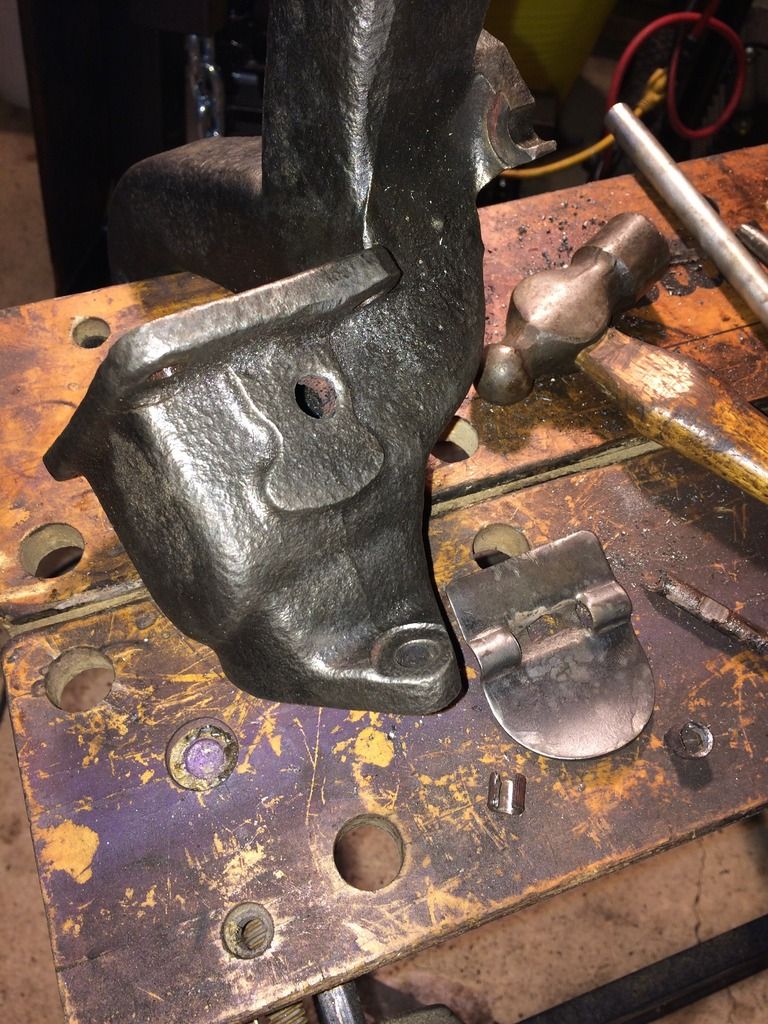
Needed a place to put my beer, and it kept tipping without the plexi O.k.- On the way back. Have an intake (Thank you, Nofender..pleasure to meet you ") ) Going to match it up with either the exhaust manny from the supersonic, or the one from the genset. The one from the supersonic, in the pic above, appears to have been "skinned" with what I'm assuming is JB weld, or similar...I'm assuming rust pock marks, but who knows? The plan is to separate and clean up both, give them a solid soak in "the works", and re assess... ) Going to match it up with either the exhaust manny from the supersonic, or the one from the genset. The one from the supersonic, in the pic above, appears to have been "skinned" with what I'm assuming is JB weld, or similar...I'm assuming rust pock marks, but who knows? The plan is to separate and clean up both, give them a solid soak in "the works", and re assess...Snowing pretty solid out now, going to paint some more TC parts.... it's warm downstairs ") ------------- Those who do not learn from history are doomed to repeat it... Welcome to 1930's Germany |
Posted By: mbullism
Date Posted: 17 Jan. 2017 at 5:46pm
|
(in my best Scarlet O'hara upper crust southern accent...) I have always relied on the kindness of ....Jeepers. Thank you to nofender for hooking me up with an intake- Four snapped, three tall enough to grab onto, one below the plane... http://s1304.photobucket.com/user/mbullism/media/CJ2A%2069750/407E8F52-F5F4-46B4-8ACC-08271FFDC81E_zpsig71sg30.jpg.html" rel="nofollow"> 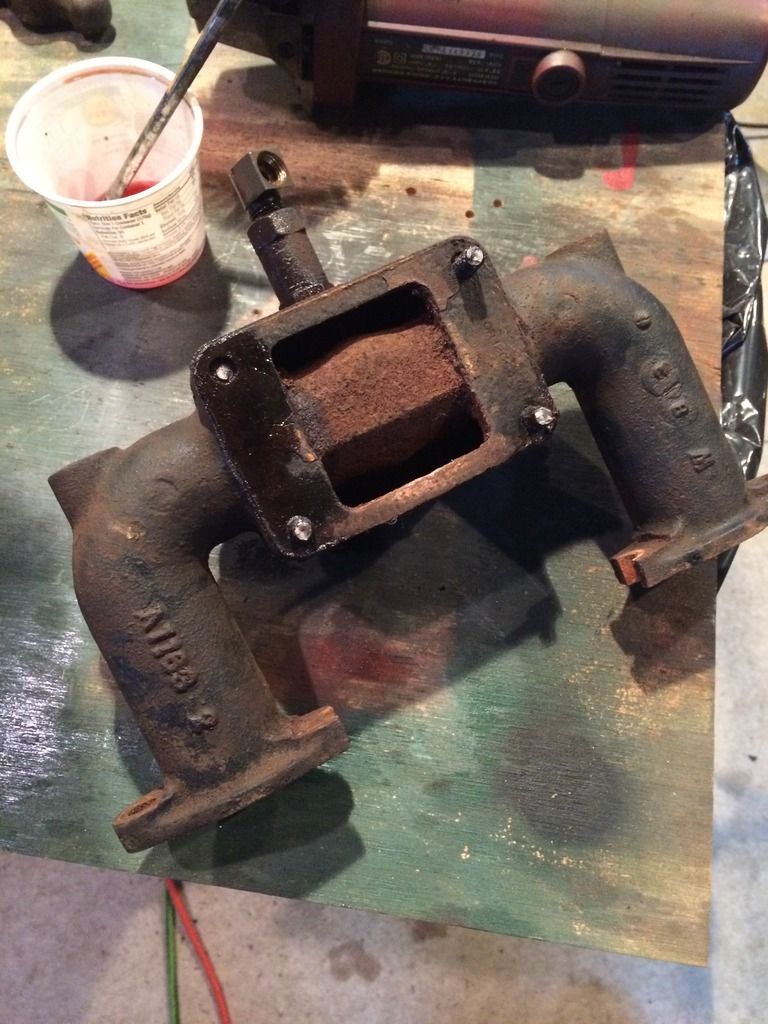 So the first thing you want to do readying for removal is soak them dutifully for a week, then apply generous heat... and snap the tall ones off flush so they match the fourth (I did manage to get one of the three out eventually, leaving three to drill) http://s1304.photobucket.com/user/mbullism/media/CJ2A%2069750/30BB30B7-96F0-4866-BFCE-6CC875997DD5_zpshydf6m9p.jpg.html" rel="nofollow"> 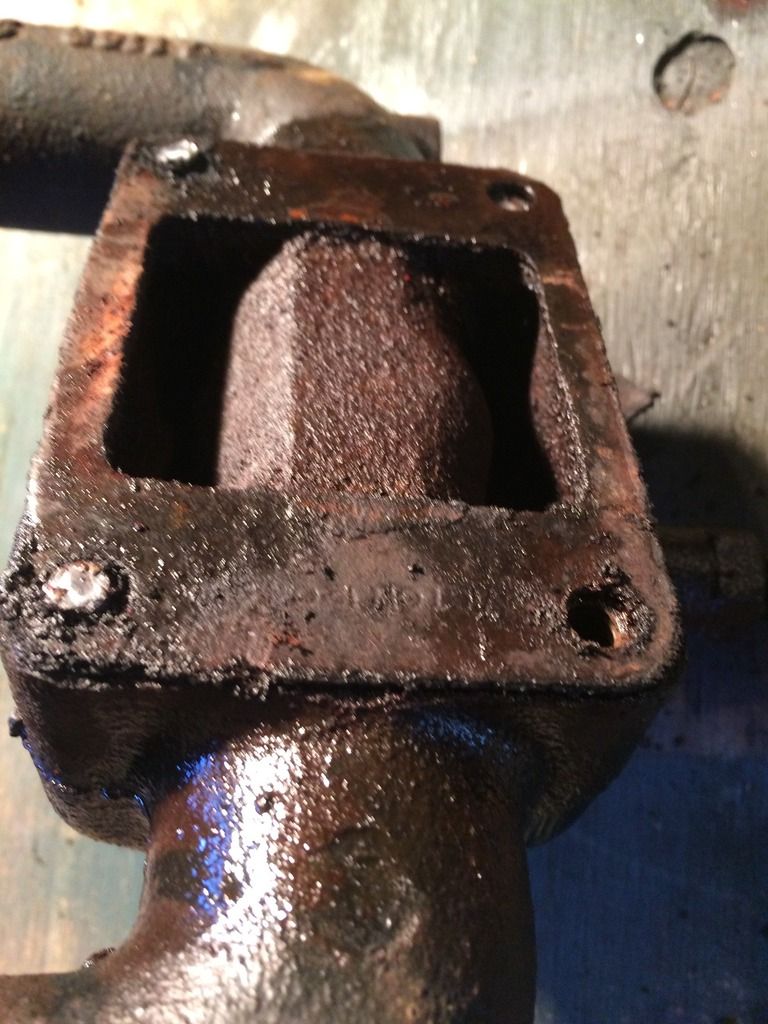 But in the end we got them clear, tapped and cleaned up... http://s1304.photobucket.com/user/mbullism/media/CJ2A%2069750/D9306009-DF53-4A51-BD2A-5FB93AB2C4E2_zpsxujvidxl.jpg.html" rel="nofollow"> 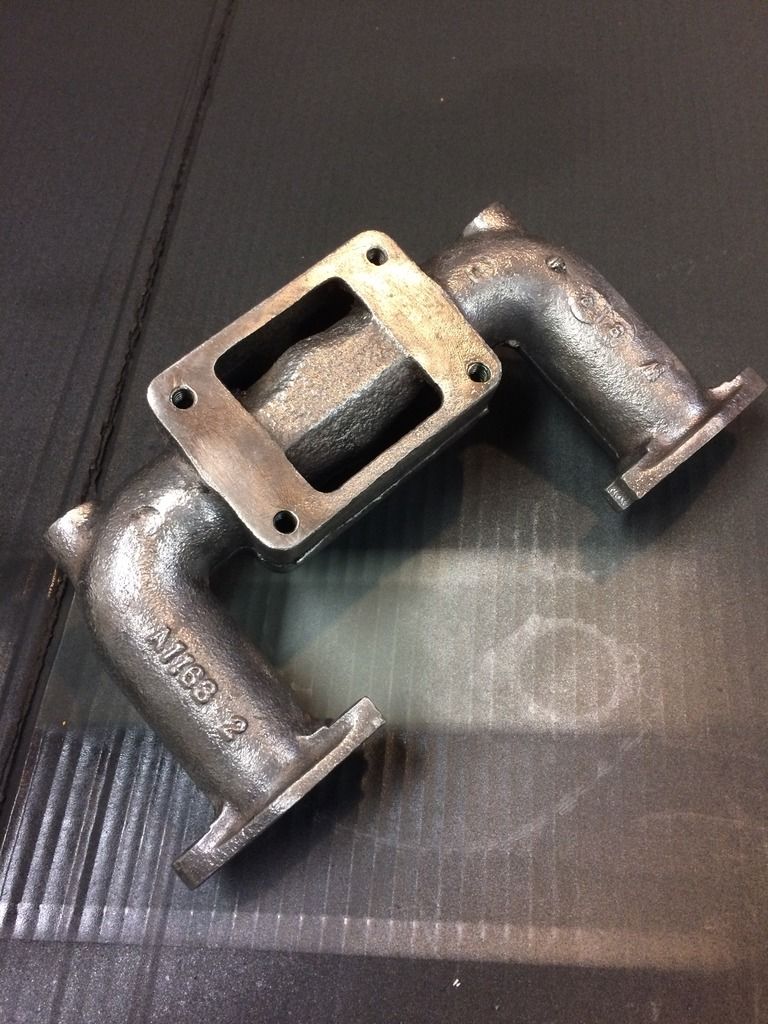 http://s1304.photobucket.com/user/mbullism/media/CJ2A%2069750/9F085CC6-F7AE-4D37-AC3B-5E7646301075_zpsfkwrpkxt.jpg.html" rel="nofollow"> 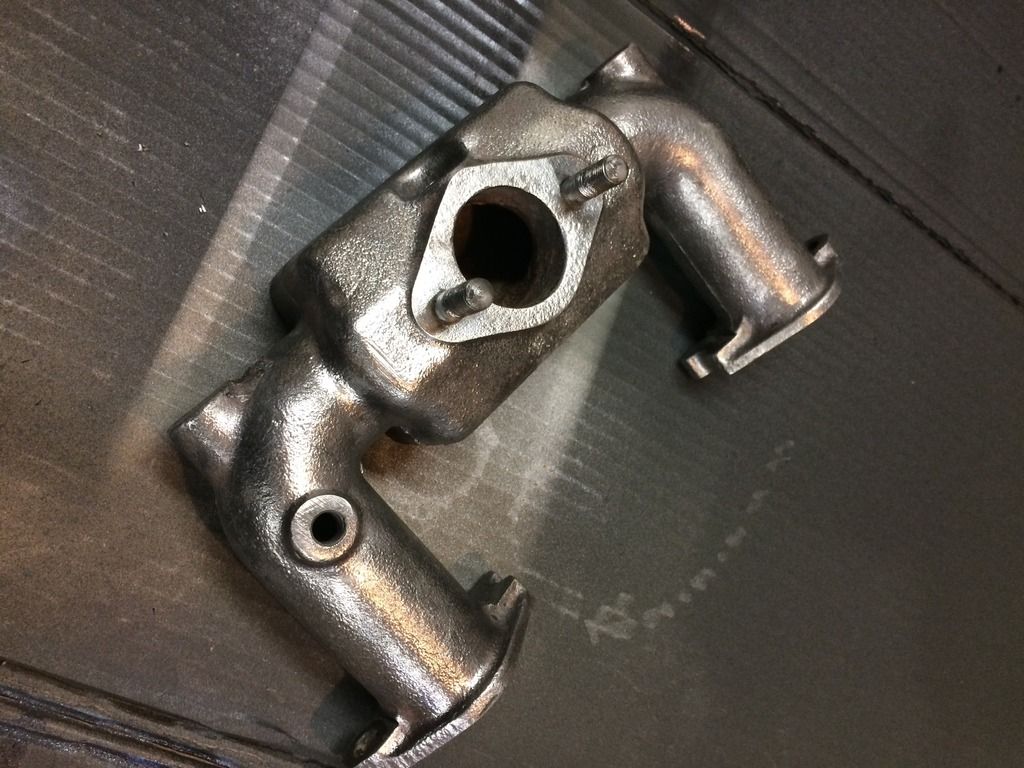 Currently similarly cleaning up an exhaust manifold to pair up, and will check it/them for fit. Painted the intake with 1200*BBQ black flat (was all I had)... have since sourced some BBQ black semi gloss for the pair. Baby steps
------------- Those who do not learn from history are doomed to repeat it... Welcome to 1930's Germany |
Posted By: Ol' Unreliable
Date Posted: 18 Jan. 2017 at 5:51am
|
Woody Allen used that line in "Sleeper", but I think it was Blanche DuBois who always depended on the kindness of Jeepers. ------------- There's a reason it's called Ol' Unreliable |
Posted By: mbullism
Date Posted: 20 Jan. 2017 at 3:37pm
|
Ok, so round two. I don't have a "before" pic of the exhaust manifold, but picture something far crustier than the intake, lol. I maybe spent 3 minutes with the wire wheel before the acid dip, but I really think it was less. This had soaked three days, flipped daily cuz it wouldnt quite fully submerge. The scum on top is a function of this one piece. . http://s1304.photobucket.com/user/mbullism/media/CJ2A%2069750/6AA12791-E56B-4433-931F-BC0CC8834579_zpsxz2pnh6t.jpg.html" rel="nofollow"> 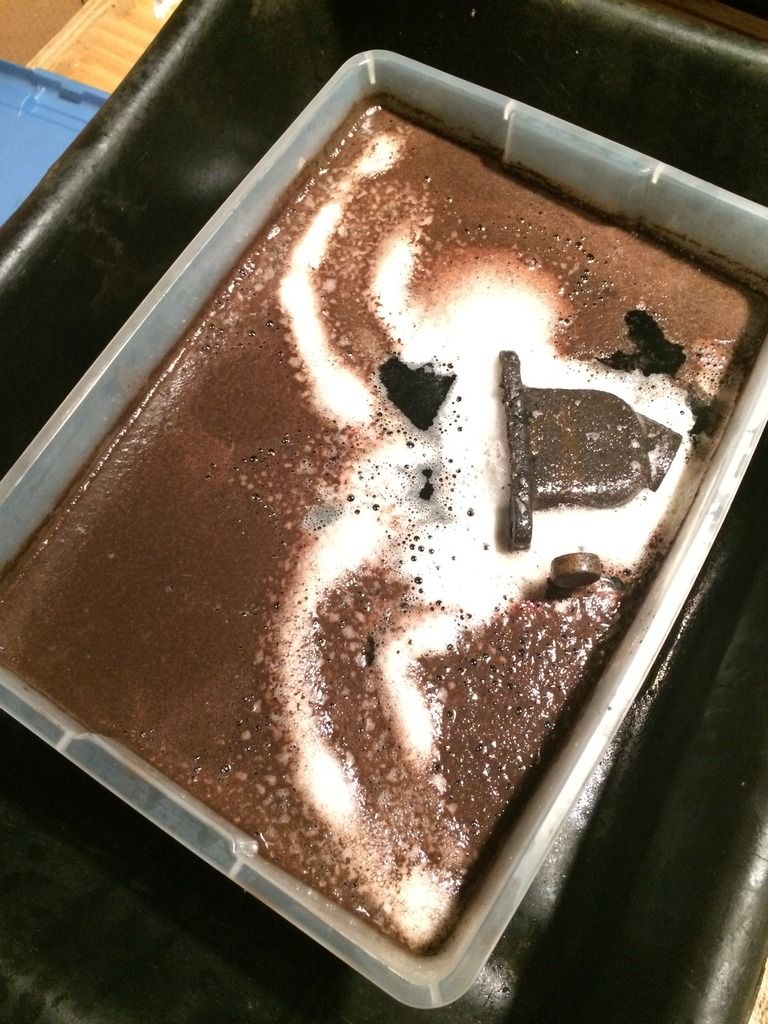 . http://s1304.photobucket.com/user/mbullism/media/CJ2A%2069750/8BE80DD7-54F7-4E0C-A2C5-DEE3755EE42D_zpsg6ifujxt.jpg.html" rel="nofollow"> 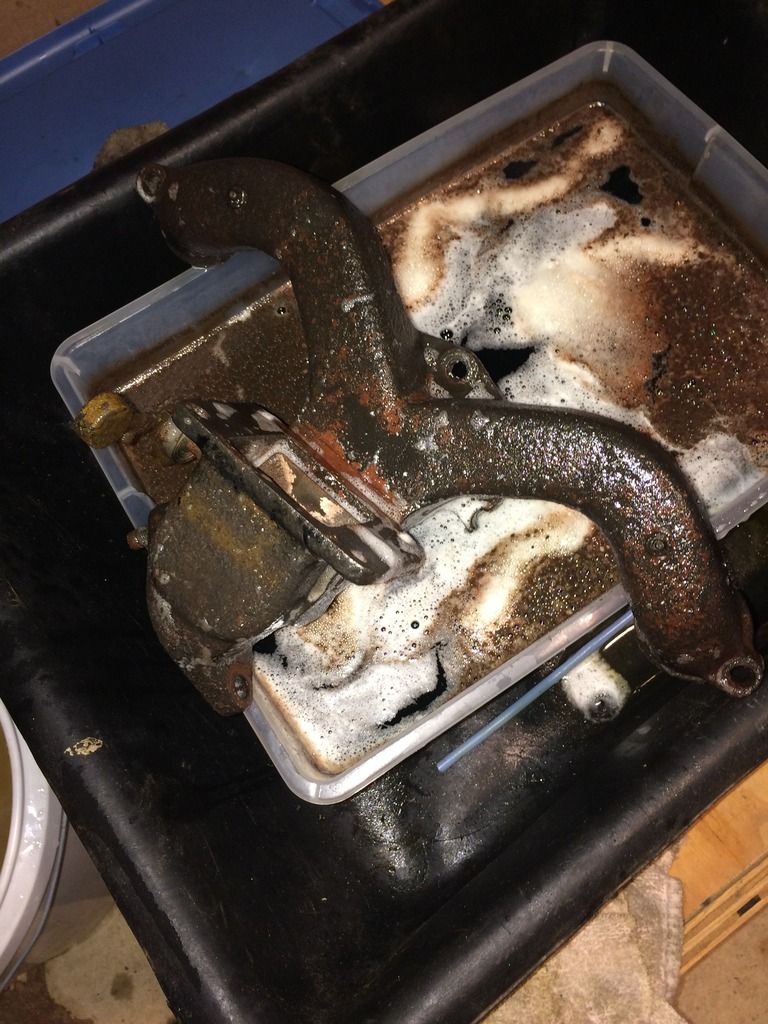 . I had a 5 gal bucket of hot water to rinse, so "after" . http://s1304.photobucket.com/user/mbullism/media/CJ2A%2069750/0D1EBD8B-477D-457D-B093-70778128799F_zpsb5ed4zxn.jpg.html" rel="nofollow"> 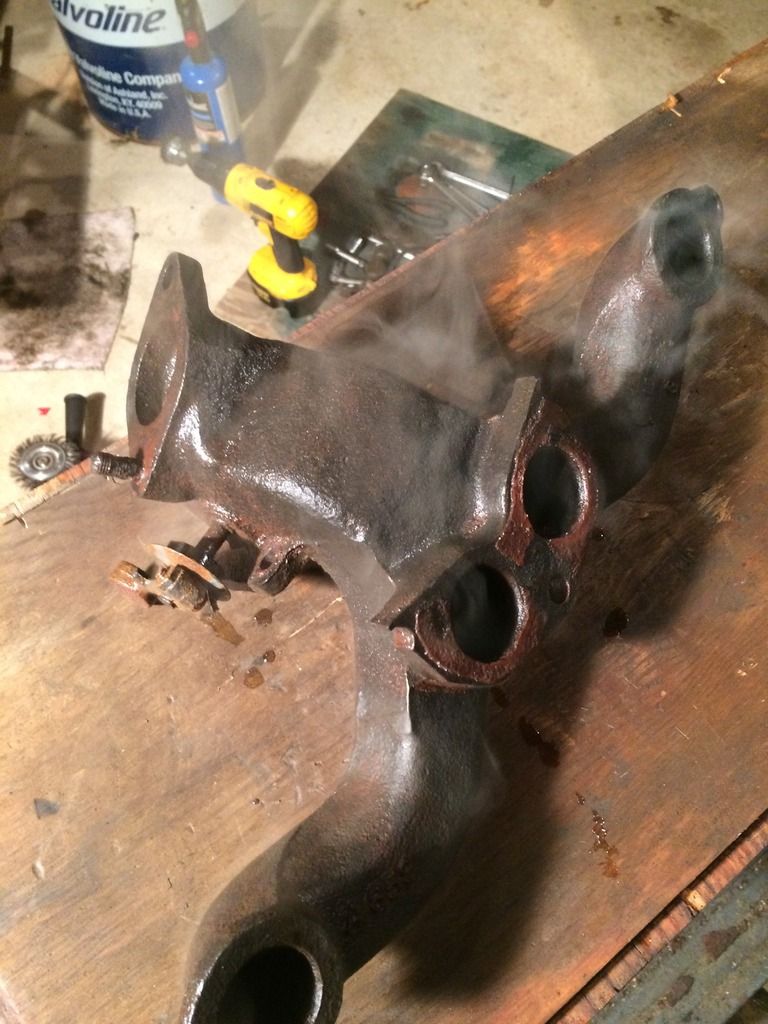 . the remnants that dont come off in the rinse are akin to a soft paste usually, and the wire wheel is overkill to remove it...this took about 3 seconds, lol... . http://s1304.photobucket.com/user/mbullism/media/CJ2A%2069750/921001F7-E6DD-4419-8B25-D0936D3B9396_zpscfqvfr6c.jpg.html" rel="nofollow"> 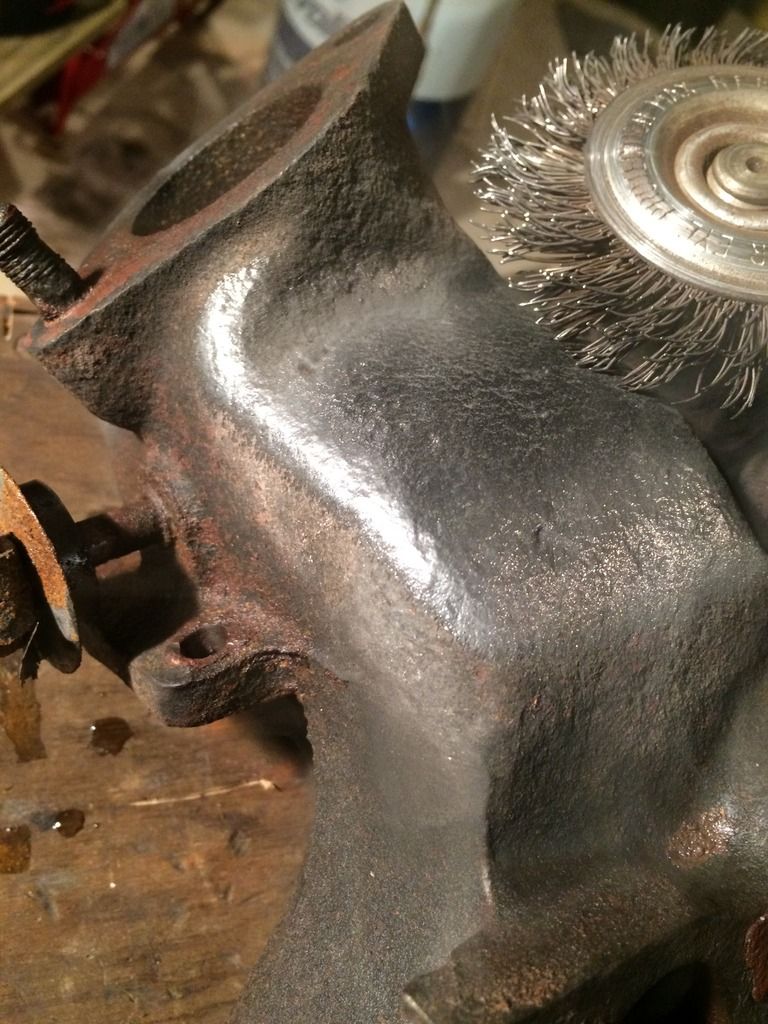 . and literally 3 minutes later (I moved to the downstairs workshop for the pics cuz the lighting is better) (also note what I think are cracks from the casting process from the corners of the riser box at the mating surface...they don't go all the way through, and the corner ears are structurally ok given what it took to separate this from its intake. My concern is more that it's a built in stress riser so i'm contemplating if a repair attempt is in order, or if i run it and see if it breaks...aka if it aint broke...) . http://s1304.photobucket.com/user/mbullism/media/CJ2A%2069750/5D0CC668-08A8-47A7-8783-950E8F85E073_zps6uzett5z.jpg.html" rel="nofollow"> 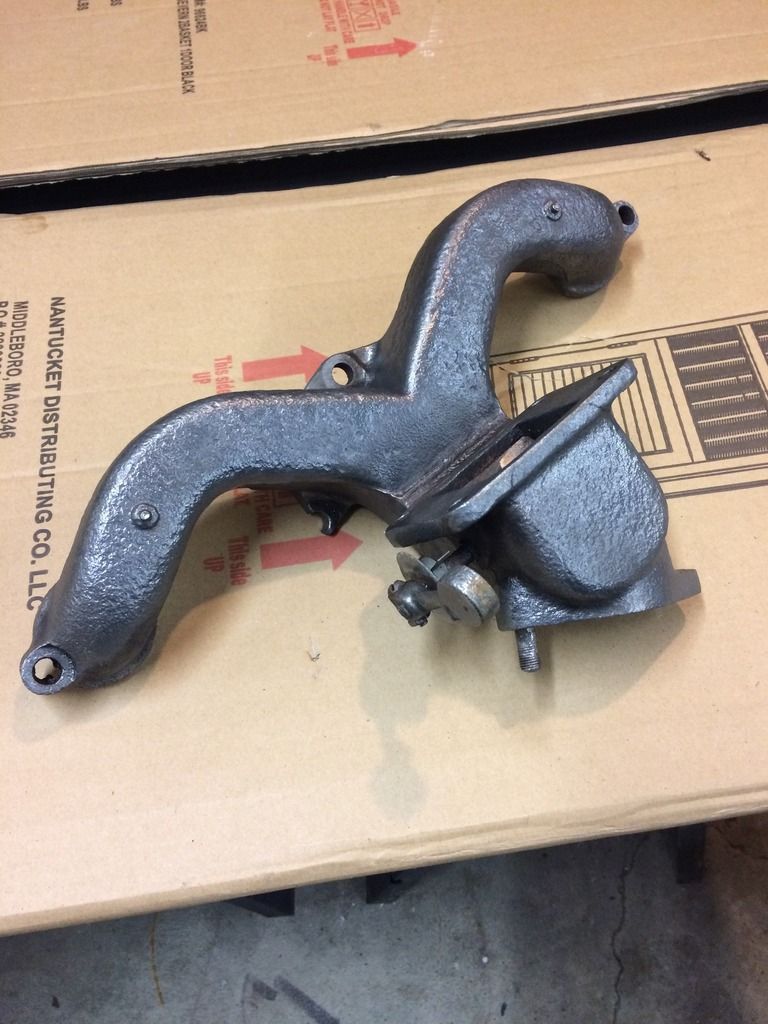 . http://s1304.photobucket.com/user/mbullism/media/CJ2A%2069750/7A8AC90E-63ED-41C1-8570-E71771CC0E7B_zpsxom65pnj.jpg.html" rel="nofollow"> 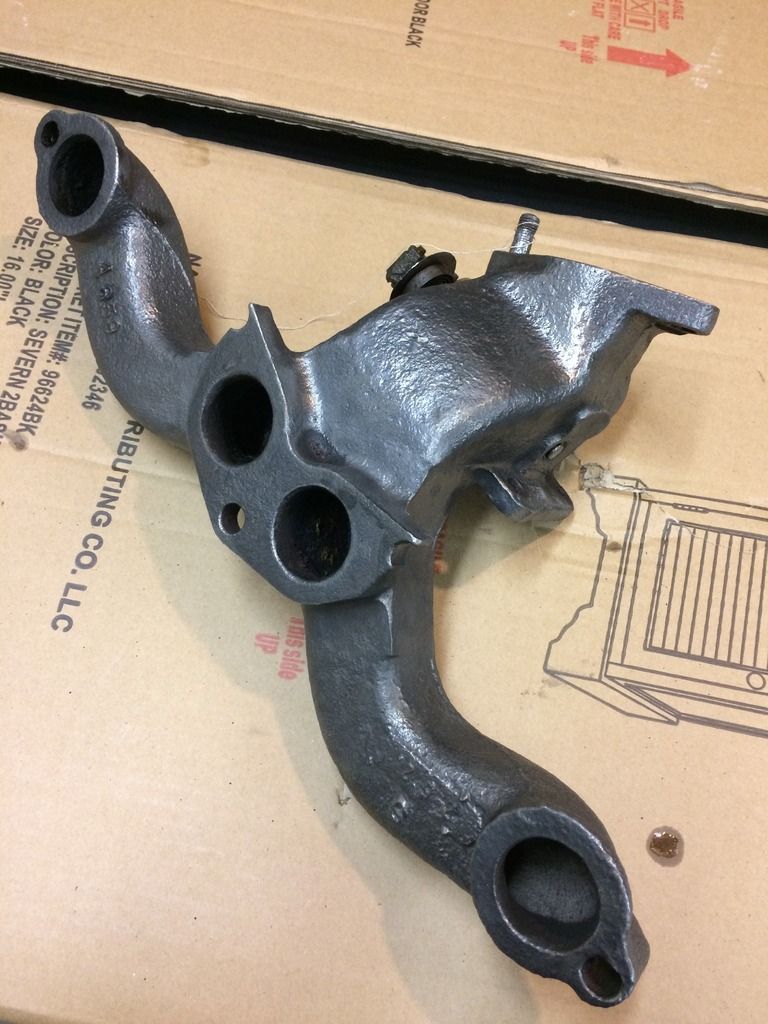 . so i knew this wasn't headed to paint, the riser baffle is stuck so it needs soaking and an attempt this weekend to square away (and possibly the pipe flange stud)...sprayed it down with wd40 to stave off flash rust . http://s1304.photobucket.com/user/mbullism/media/CJ2A%2069750/D1143FEC-9B3F-46C6-BF3F-069761140163_zpsipb0jrap.jpg.html" rel="nofollow"> 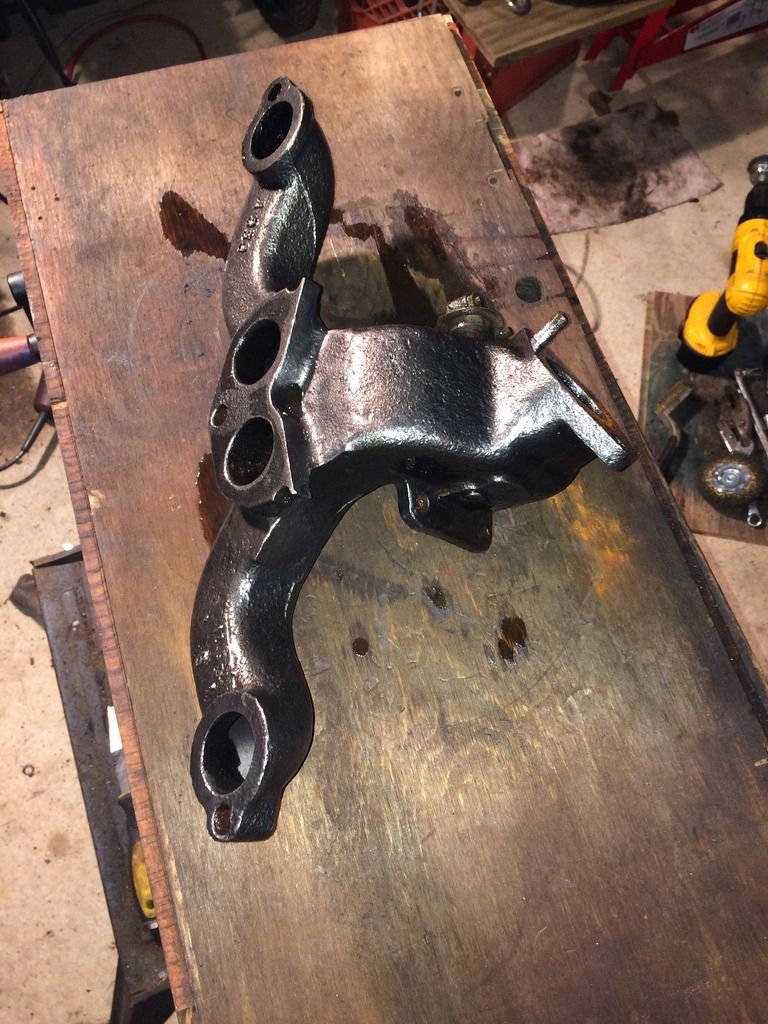 . http://s1304.photobucket.com/user/mbullism/media/CJ2A%2069750/D308560D-7694-49C7-A02B-AEA0FBE53592_zpsgntcr2wi.jpg.html" rel="nofollow"> 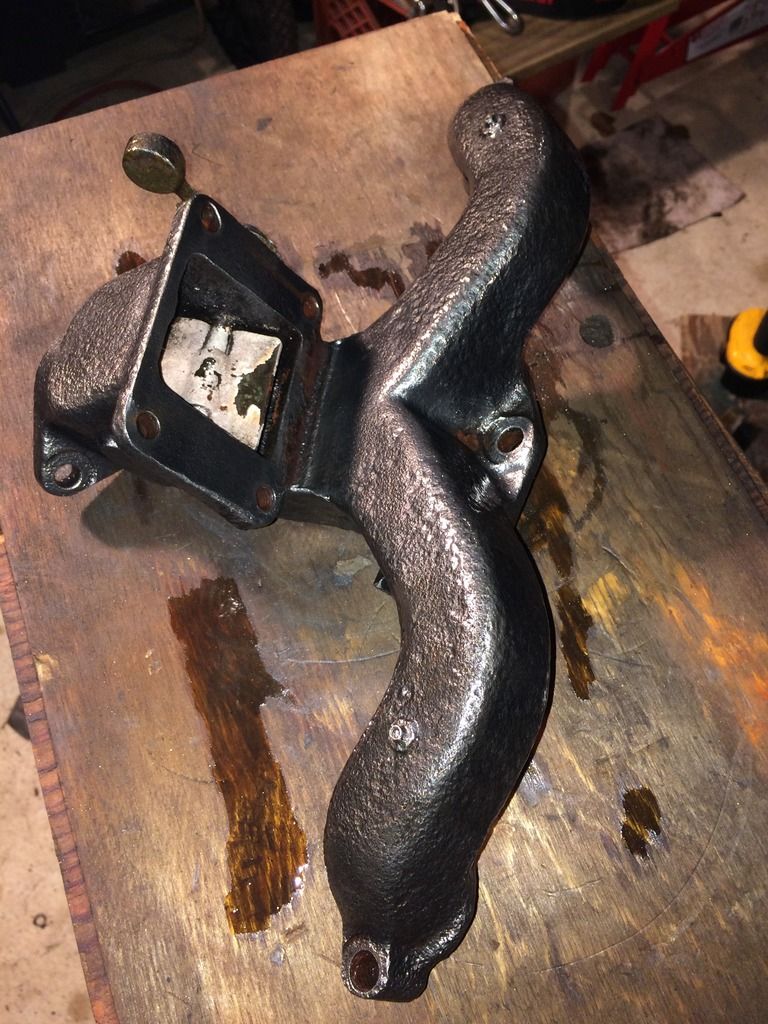 . the whole thing from bath to soaking the baffle shaft was maybe 15 minutes, and if not for the baffle it would have been in paint in 20-25. Easy peasy.... and I f'g hate it, lol
------------- Those who do not learn from history are doomed to repeat it... Welcome to 1930's Germany |
Posted By: JohnB
Date Posted: 20 Jan. 2017 at 7:03pm
| Nice and clean! What do you use for your acid bath solution? |
Posted By: mbullism
Date Posted: 20 Jan. 2017 at 7:38pm
|
The bath is "The Works" toilet bowl cleaner... read up on it here on the page, as well as elsewhere. A search here oughtta turn up several threads. From memory it's 20%+/- strength phosphoric acid, and it eats rust rather well.... think "naval jelly". It's not kind to brass, pot metal, aluminum, hardened or high strength steels, etc. but mild steels and cast do well. I've found it at dollar general, as well as Walmart on occasion. ETA: http://www.thecj2apage.com/forums/the-works_topic27735.html?KW=the+works" rel="nofollow - http://www.thecj2apage.com/forums/the-works_topic27735.html?KW=the+works http://www.thecj2apage.com/forums/the-works_topic22841.html?KW=the+works" rel="nofollow - http://www.thecj2apage.com/forums/the-works_topic22841.html?KW=the+works ------------- Those who do not learn from history are doomed to repeat it... Welcome to 1930's Germany |
Posted By: JohnB
Date Posted: 21 Jan. 2017 at 1:09am
|
Thanks - I'll do the search and get the details and full recipe. Looks like it works too good not to try.
|
Posted By: rocnroll
Date Posted: 21 Jan. 2017 at 2:39am
|
If you have Dollar General Stores out there that's who carries it. ------------- '47 CJ2A PU '48 CJ2A Lefty "Common sense is not that common" |
Posted By: mbullism
Date Posted: 23 Jan. 2017 at 6:42pm
|
A little more time in yesterday afternoon... I've got two exhaust manifolds, one kinda ratty with a good riser baffle, and the clean one above with a frozen baffle. Days in the acid and more with atf/acetone then heat wouldn't touch that foolish shaft, lol... . http://s1304.photobucket.com/user/mbullism/media/CJ2A%2069750/9251E130-24B2-4877-B592-439262FFD227_zpstzfdxjjj.jpg.html" rel="nofollow"> 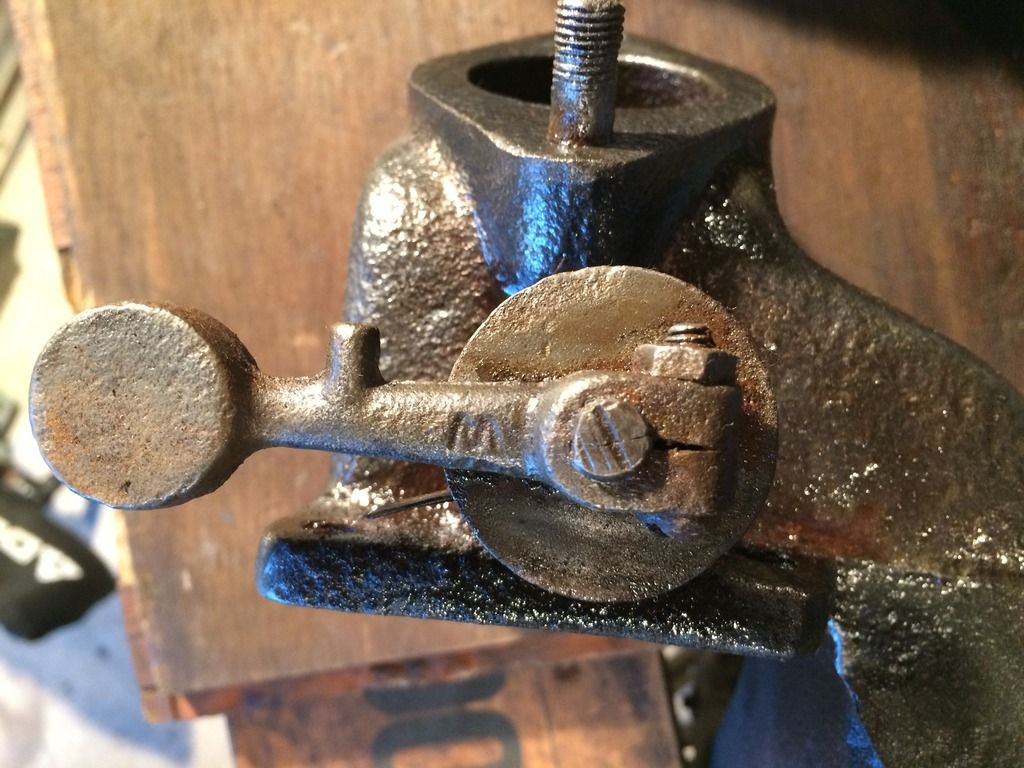 . No way to get a cutoff wheel in there, drilled the shaft off both sides of the flapper, then cut the shaft off the outsides (and eventually centerpunched) . http://s1304.photobucket.com/user/mbullism/media/CJ2A%2069750/C0DA53D3-52BD-4160-B088-69FDB93A7D51_zps8q16cq1m.jpg.html" rel="nofollow"> 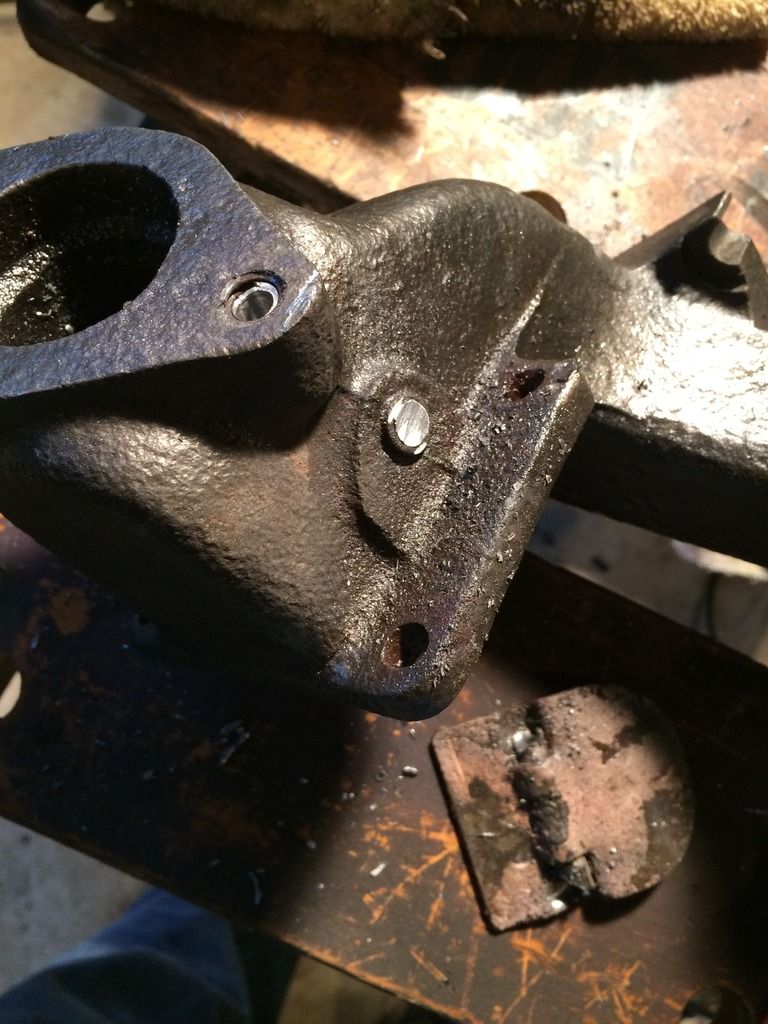 . the shaft drilled clear through, the bushings were having no part of being driven out. Had to resort to relief cuts and driving a piece out with a sharp punch...what a biatch, lol . http://s1304.photobucket.com/user/mbullism/media/CJ2A%2069750/A7B0F1F8-6CF5-424A-9FC1-47BFCC1B25B0_zpstfqji8ld.jpg.html" rel="nofollow"> 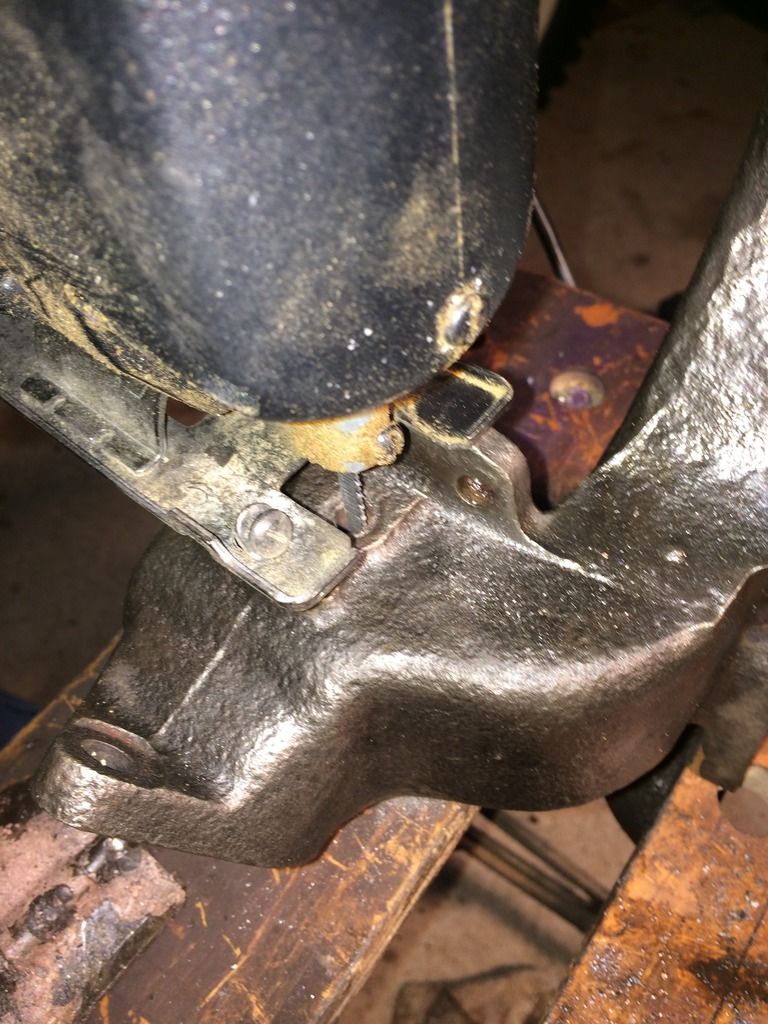 . http://s1304.photobucket.com/user/mbullism/media/CJ2A%2069750/B7B90E08-3C0D-40A6-BD85-FD68B162B12B_zps5exqahyl.jpg.html" rel="nofollow"> 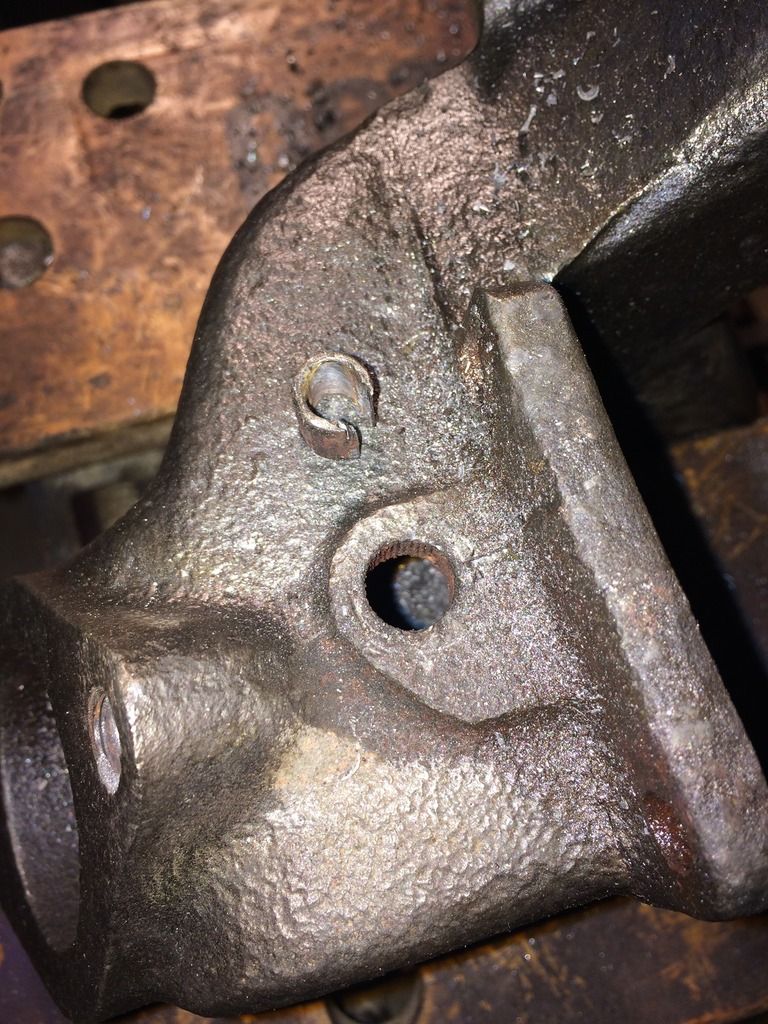 . then cut the weld at the baffle, and drive the piece of shaft out... . http://s1304.photobucket.com/user/mbullism/media/CJ2A%2069750/1397459A-AFAB-460C-B26B-20308BCD2241_zpsrhutmyjt.jpg.html" rel="nofollow"> 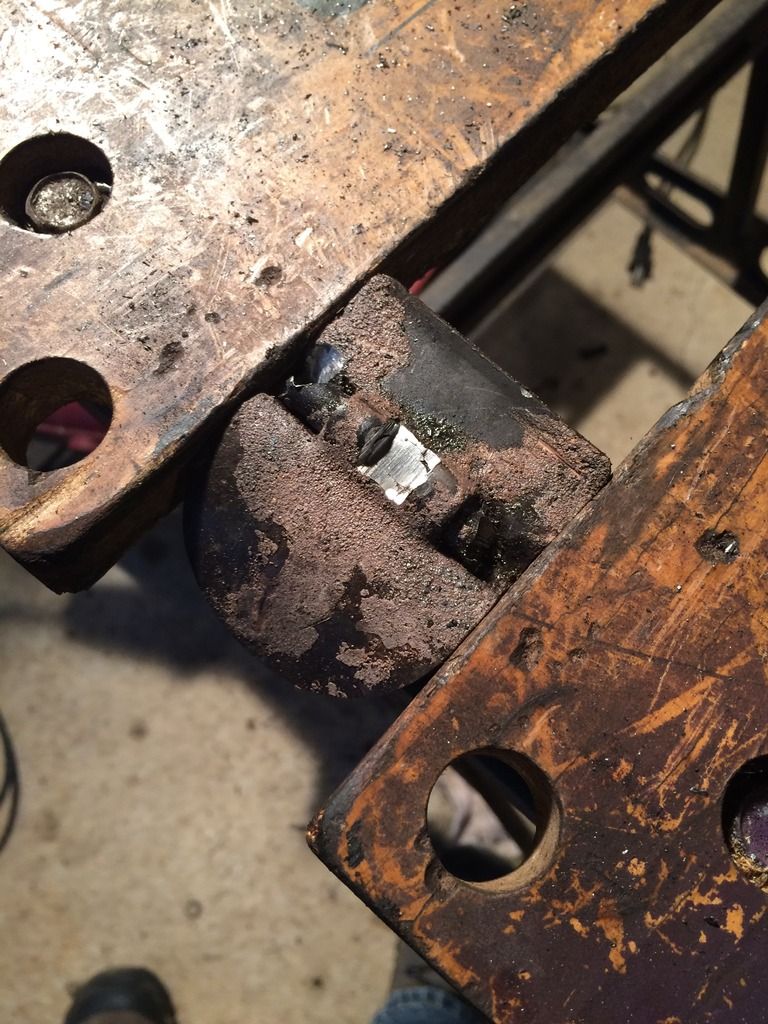 . All set, waiting on a package with the new bits... a couple photos doesnt do this justice... it was a 3 hour fight . http://s1304.photobucket.com/user/mbullism/media/CJ2A%2069750/5A68929D-7B96-4951-A299-04F9DF808453_zpscpe7t4ph.jpg.html" rel="nofollow">
 ------------- Those who do not learn from history are doomed to repeat it... Welcome to 1930's Germany |
Posted By: CmK
Date Posted: 24 Jan. 2017 at 10:17pm
|
Excellent work! Just found your thread, she's looking great! ------------- CJ-2A 43883 [SOLD] CJ-2A 104976 [SOLD] |
Posted By: mbullism
Date Posted: 05 Feb. 2017 at 1:35pm
So playin a little catchup here... more manifold madness, lol. Bushings in the freezer, manifold in front of the heater...not-even-close  Turns out the knurled OD on the bushings make great depth gauges as you remove material, lol. A bolt, a couple flat washers and a nut "pressed" them in, which squashed the ID enough I had to unthread the bolt to get it out... no worries for damage to the bushing, the bolt was smaller than the shaft going in so I knew it was going to require ..."reaming". I have a set of drill bits with cutting flutes, and this isn't exactly a high speed heavy load kinda bushing so I drilled to fit. I did encounter the new shaft sticking a little, but it turned out it was the shaft where it was cut on the unslit end... a little sanding and steel wool solved that- Turns out the knurled OD on the bushings make great depth gauges as you remove material, lol. A bolt, a couple flat washers and a nut "pressed" them in, which squashed the ID enough I had to unthread the bolt to get it out... no worries for damage to the bushing, the bolt was smaller than the shaft going in so I knew it was going to require ..."reaming". I have a set of drill bits with cutting flutes, and this isn't exactly a high speed heavy load kinda bushing so I drilled to fit. I did encounter the new shaft sticking a little, but it turned out it was the shaft where it was cut on the unslit end... a little sanding and steel wool solved that-. http://s1304.photobucket.com/user/mbullism/media/CJ2A%2069750/7D3CB812-4C90-4A81-AAB3-87C06C209E0A_zps2jdv3jj9.jpg.html" rel="nofollow"> 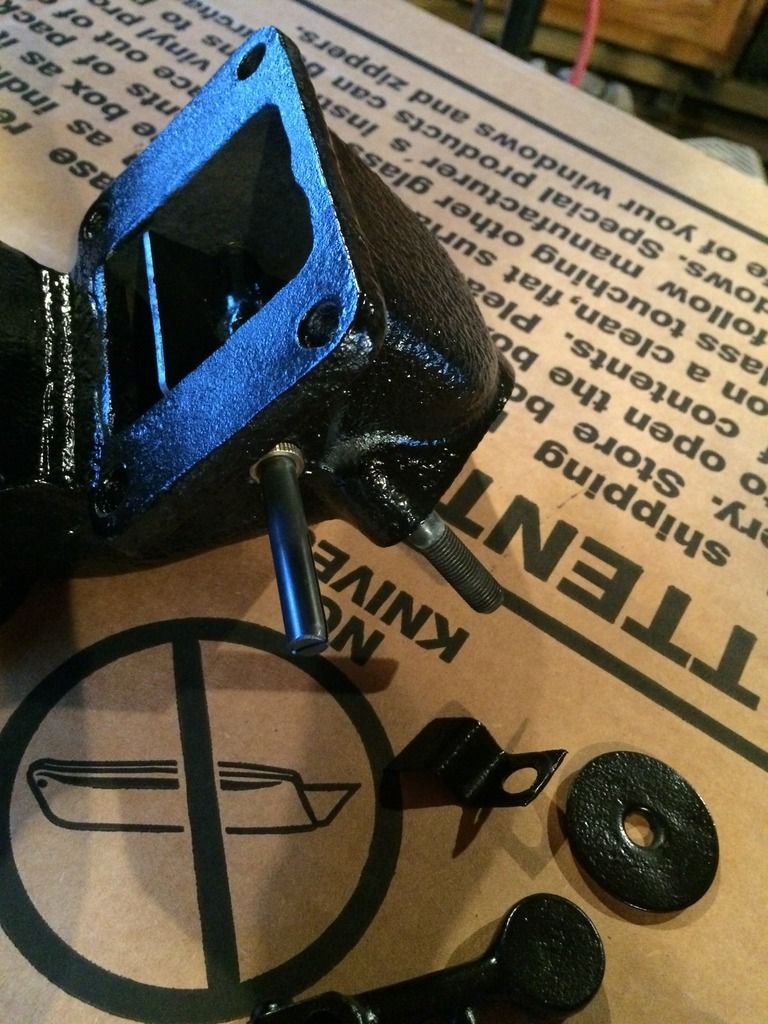 . http://s1304.photobucket.com/user/mbullism/media/CJ2A%2069750/90F291E6-E5EE-463B-9B66-F449FF87F72D_zpse6lbfnhn.jpg.html" rel="nofollow"> 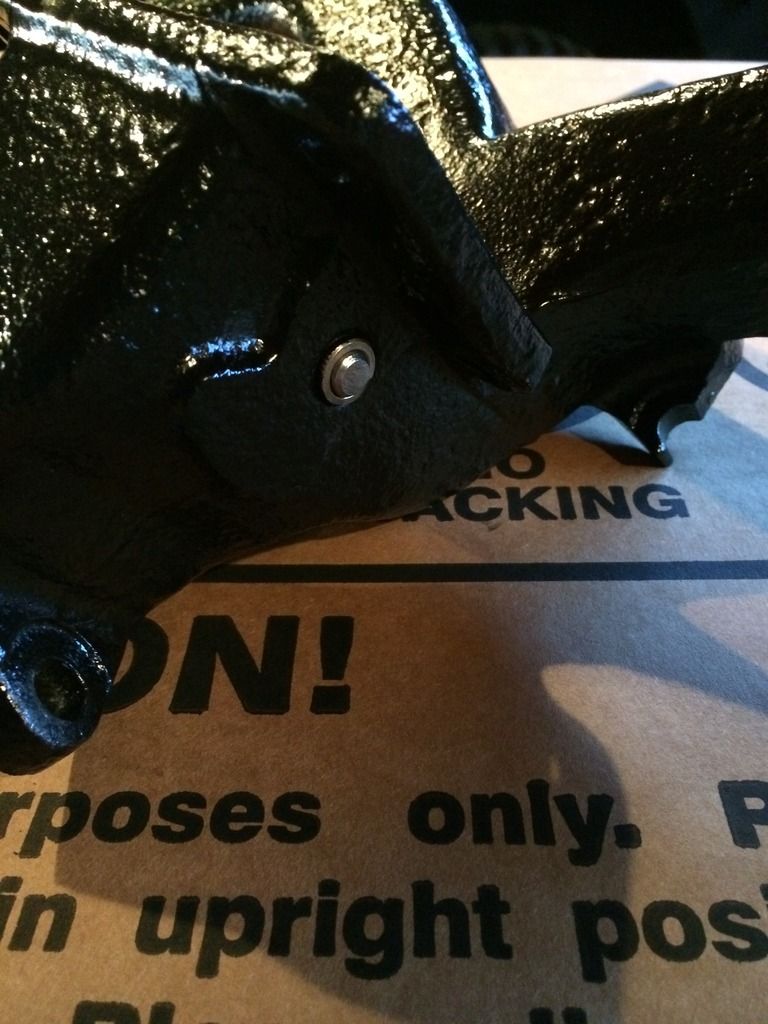 . Dry run to test fit and check plumbing... . http://s1304.photobucket.com/user/mbullism/media/CJ2A%2069750/9D995F70-A08C-4965-BEF5-080C69055AA8_zpskmifaskv.jpg.html" rel="nofollow"> 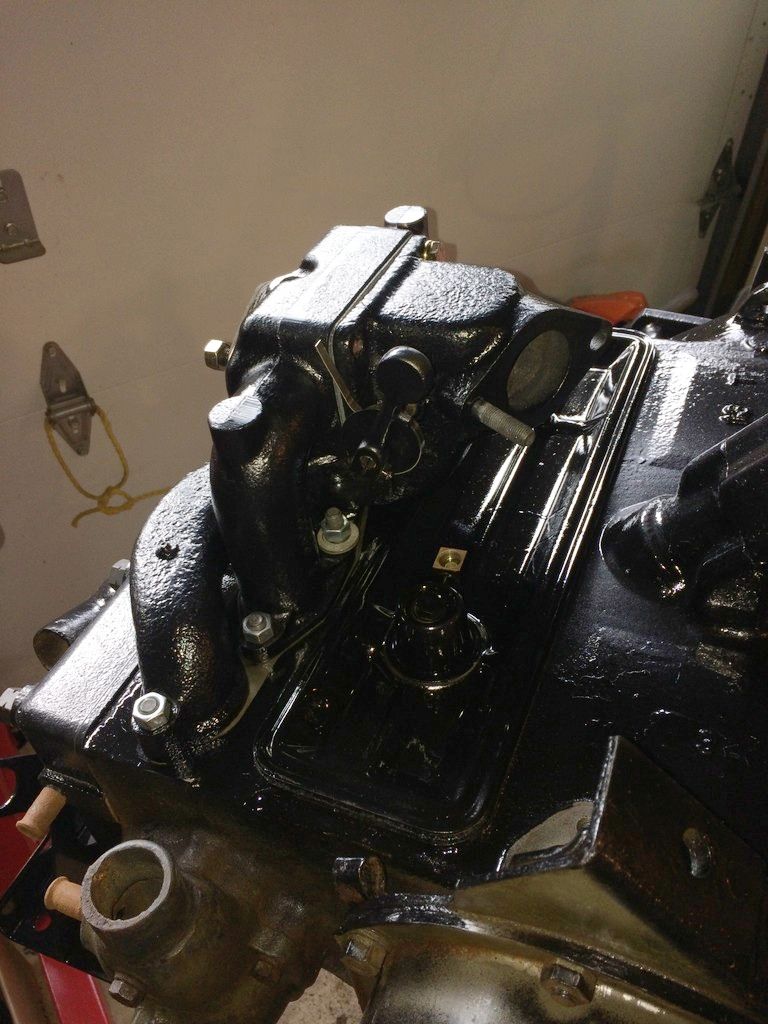 . http://s1304.photobucket.com/user/mbullism/media/CJ2A%2069750/2F2BD949-7318-47FD-B96A-D3E505A9E6CC_zpsfnfutsq8.jpg.html" rel="nofollow"> 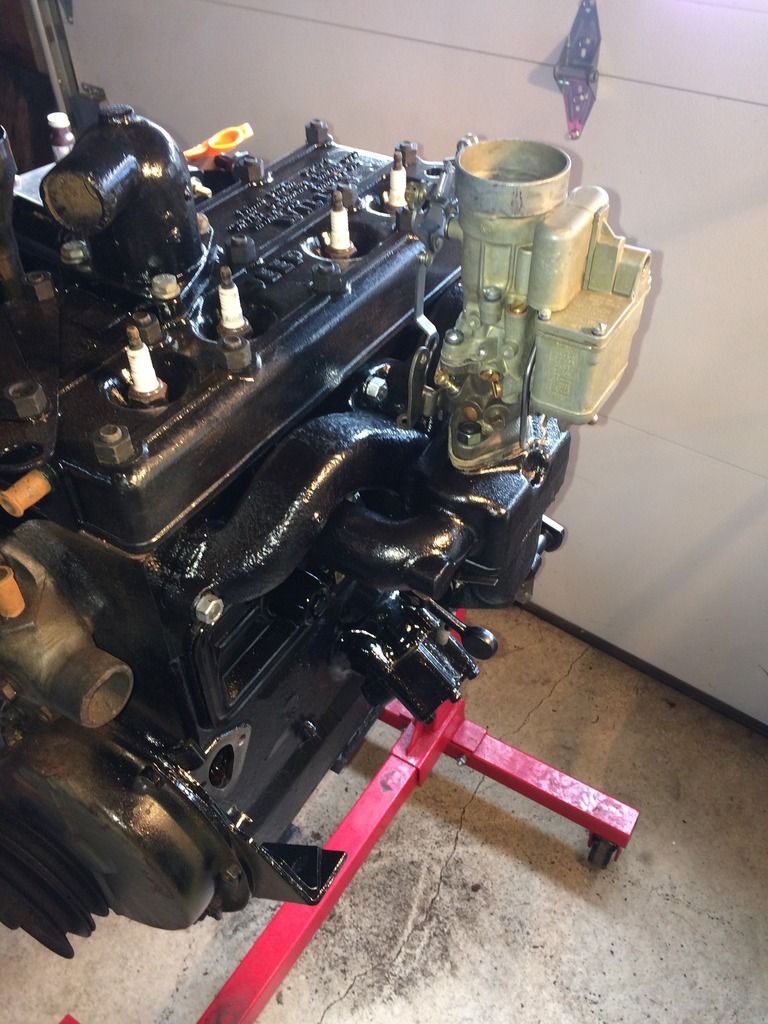 . This weekend was supposed to be pulling the front clip and readying the existing stuff to come on out... yesterday was TWO campus visits, over 100 miles apart and miles from home.... this morning finds my unheated, uninsulated garage hovering around 22-23*F... thinking this is the day I've been waiting for to spend in the downstairs shop next to the woodstove assembling the TC... ------------- Those who do not learn from history are doomed to repeat it... Welcome to 1930's Germany |
Posted By: mbullism
Date Posted: 12 Feb. 2017 at 6:47pm
|
Well... I've been threatening to do it for some time (waiting for the weather to drive me downstairs next to the woodstove, lol) . http://s1304.photobucket.com/user/mbullism/media/CJ2A%2069750/D18%20rebuild/C9193FC1-755F-4BB5-BC6F-F1C114A25866_zpsglzpt2jm.jpg.html" rel="nofollow"> 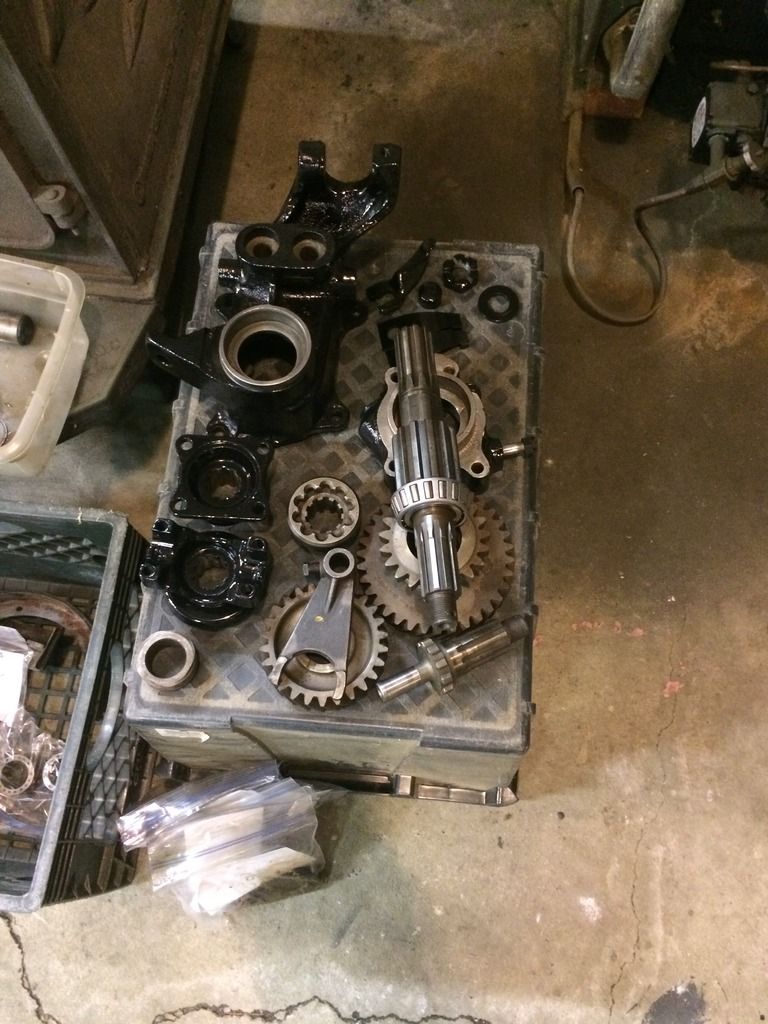 . http://s1304.photobucket.com/user/mbullism/media/CJ2A%2069750/D18%20rebuild/465F09C7-6C9B-4C4B-896F-2B84EB9BA4C1_zpsojqm6tfw.jpg.html" rel="nofollow"> . http://s1304.photobucket.com/user/mbullism/media/CJ2A%2069750/D18%20rebuild/C290974A-0D41-4B03-8518-8F1F8C93009A_zpsdztiw68w.jpg.html" rel="nofollow"> 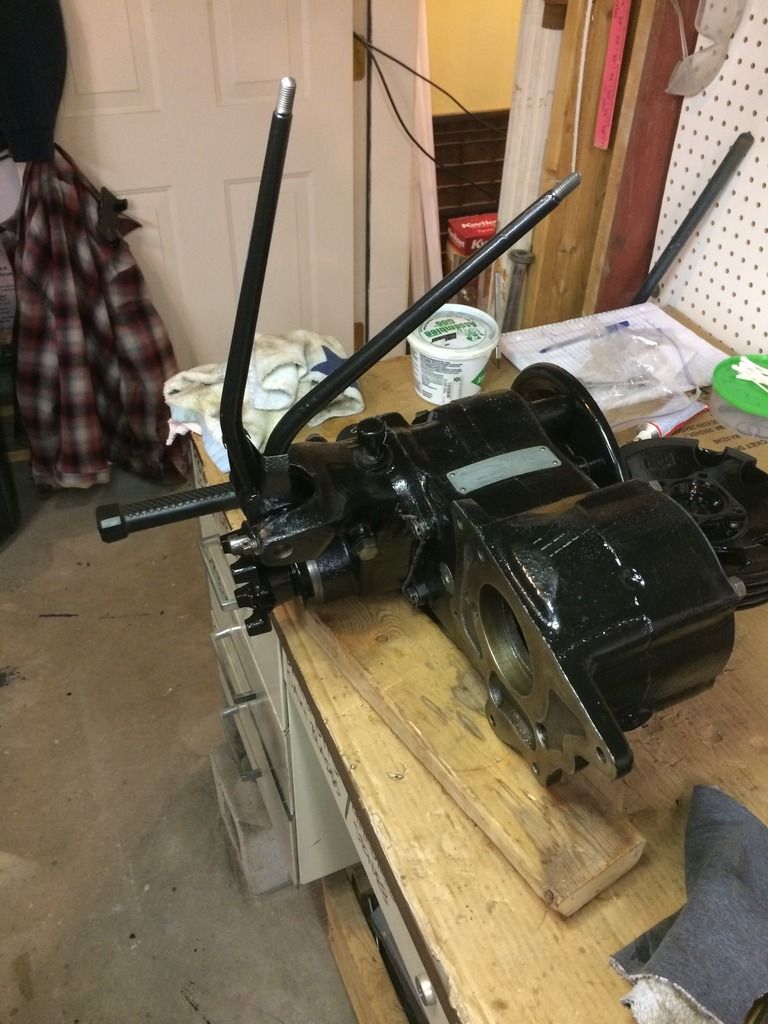 . http://s1304.photobucket.com/user/mbullism/media/CJ2A%2069750/D18%20rebuild/F2FF8E67-C2CC-4B00-9140-39862C619846_zpsnz1clrhx.jpg.html" rel="nofollow"> 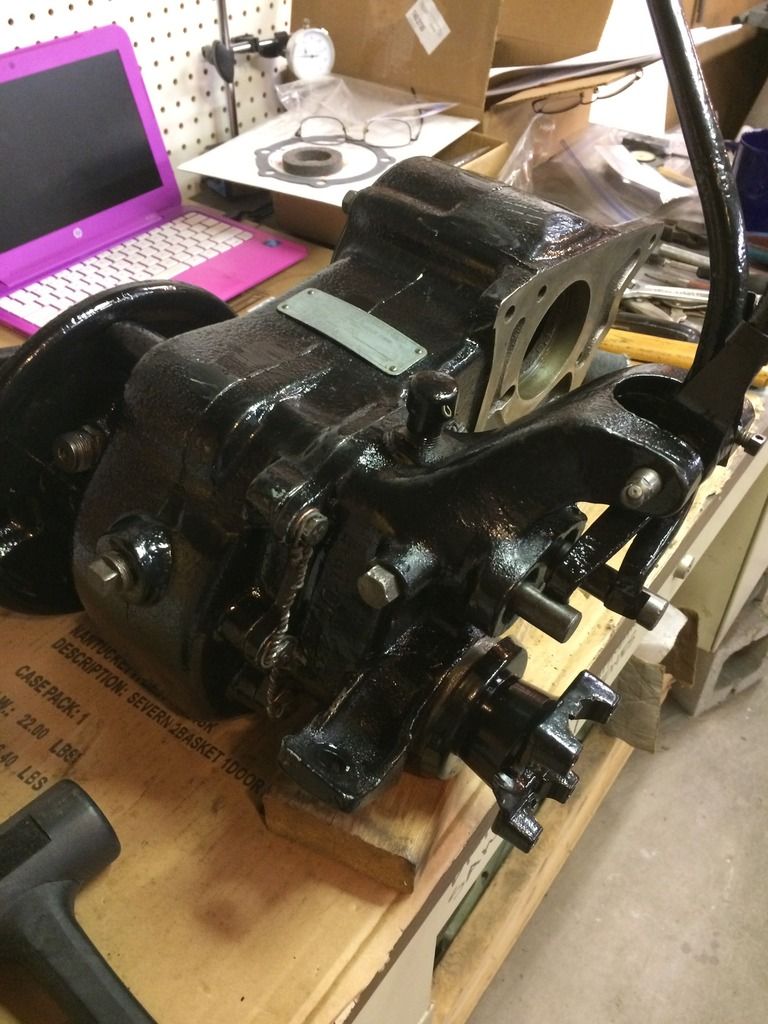 . . a quick masking to touch up the paint, and get the fasteners that weren't yet painted... . http://s1304.photobucket.com/user/mbullism/media/CJ2A%2069750/D18%20rebuild/07901FEA-6658-4F72-924A-A26790F6321B_zps6ootuhua.jpg.html" rel="nofollow"> 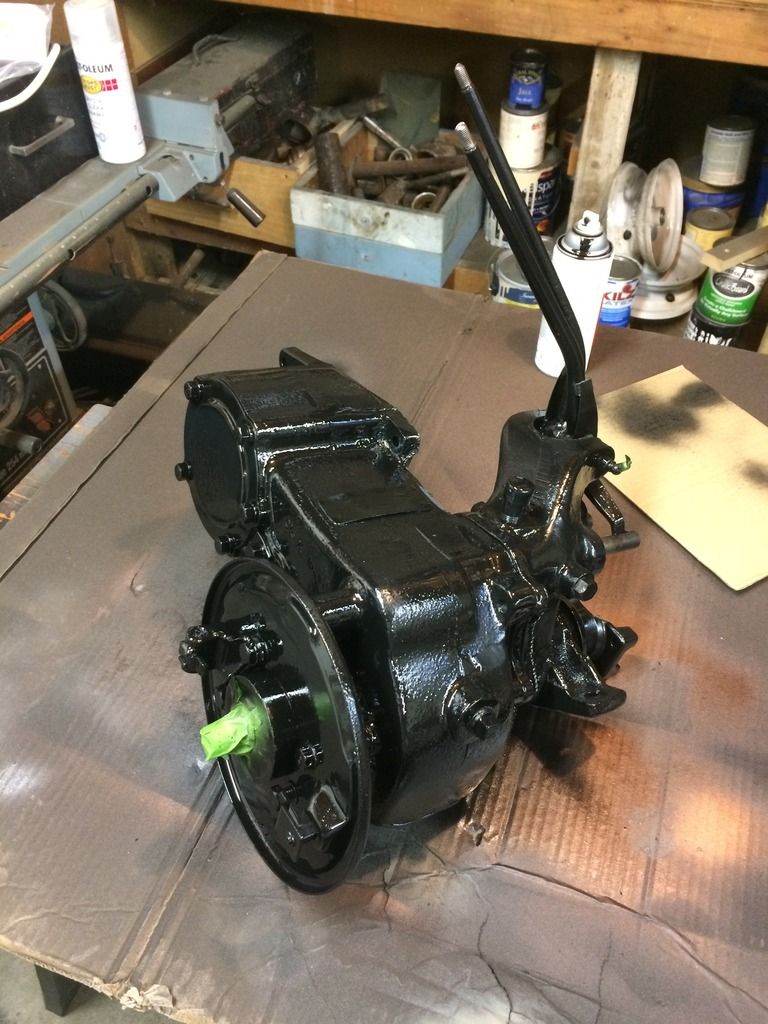 . next stop, hanging it on the T90 currently on the stand... . . ------------- Those who do not learn from history are doomed to repeat it... Welcome to 1930's Germany |
Posted By: pilot195
Date Posted: 13 Feb. 2017 at 12:39am
|
Sweet work! Thanks for the updates and all the pictures ... I'm taking notes. Also doing campus visits and thankfully just one daughter at home ... ------------- Jim '46 Willys Jeep CJ-2A USAF retired |
Posted By: wadoyado
Date Posted: 13 Feb. 2017 at 2:14am
| Nice job, those relief cuts look like "very tricky business". Couldn't help but notice the shift pin on the shift levers seems to be too far to the grease fitting side. Is that so the locking set screw fits the groove in the pin? like the replacement I bought? That's about the point I'm at right now, don't know whether to use or try another pin. Thanks Joe Wadoyado |
Posted By: mbullism
Date Posted: 13 Feb. 2017 at 3:15am
|
thanks, pilot... and enjoy the campus visits, lol... too soon old and all that ;) W- ya, thats where the pin groove lined up. I took this thing apart months ago and dont have a decent pic of "before"... I did think it stuck out a bit, but that's the way it fits... now you got me thinking ------------- Those who do not learn from history are doomed to repeat it... Welcome to 1930's Germany |
Posted By: mbullism
Date Posted: 20 Feb. 2017 at 9:29pm
|
This got "real" today . http://s1304.photobucket.com/user/mbullism/media/CJ2A%2069750/0496B8F2-8CCC-4BCC-B781-F35ED3097BD9_zpsmqjtbwjf.jpg.html" rel="nofollow"> 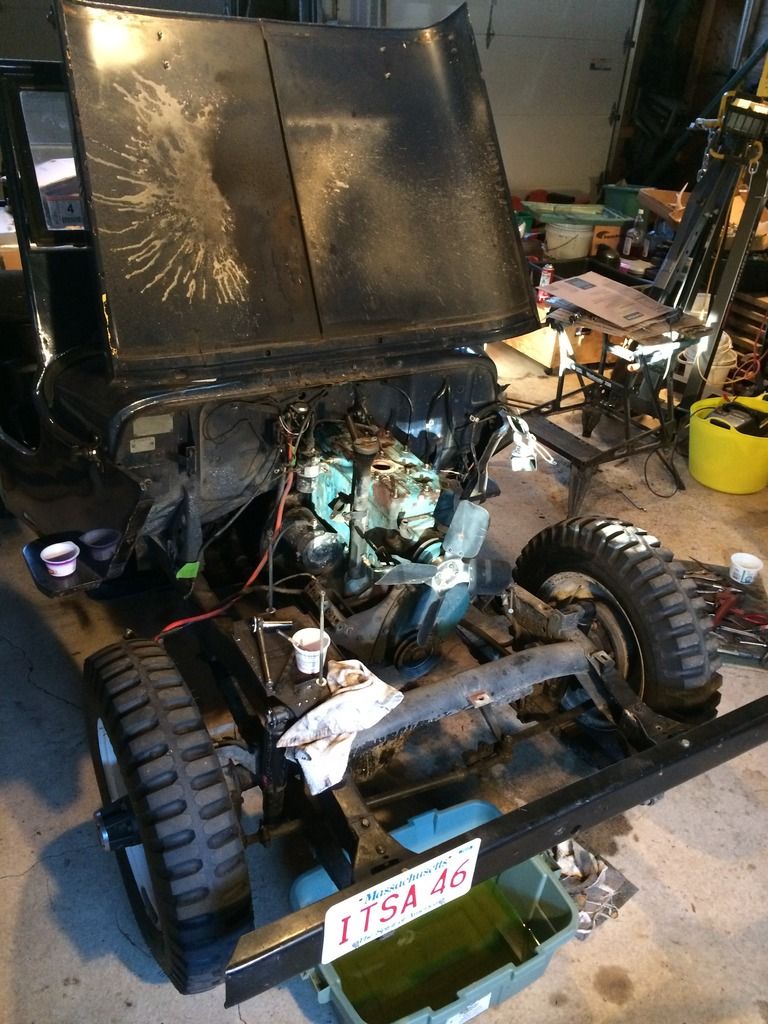 ------------- Those who do not learn from history are doomed to repeat it... Welcome to 1930's Germany |
Posted By: mbullism
Date Posted: 22 Feb. 2017 at 12:00am
|
My inability to remove the sending unit for my period temperature gauge has been haunting me...really didn't want to lose this After almost six weeks off and on, soaking, tapping, mild heat for fear of over heating... tonight I was going to "freeze" spray the brass to see if I could crack it loose. One last try with a pair of open end wrenches before spraying... and . http://s1304.photobucket.com/user/mbullism/media/CJ2A%2069750/38745003-506D-446F-BEFA-C6DFF55E6485_zpsrn40gslq.jpg.html" rel="nofollow"> 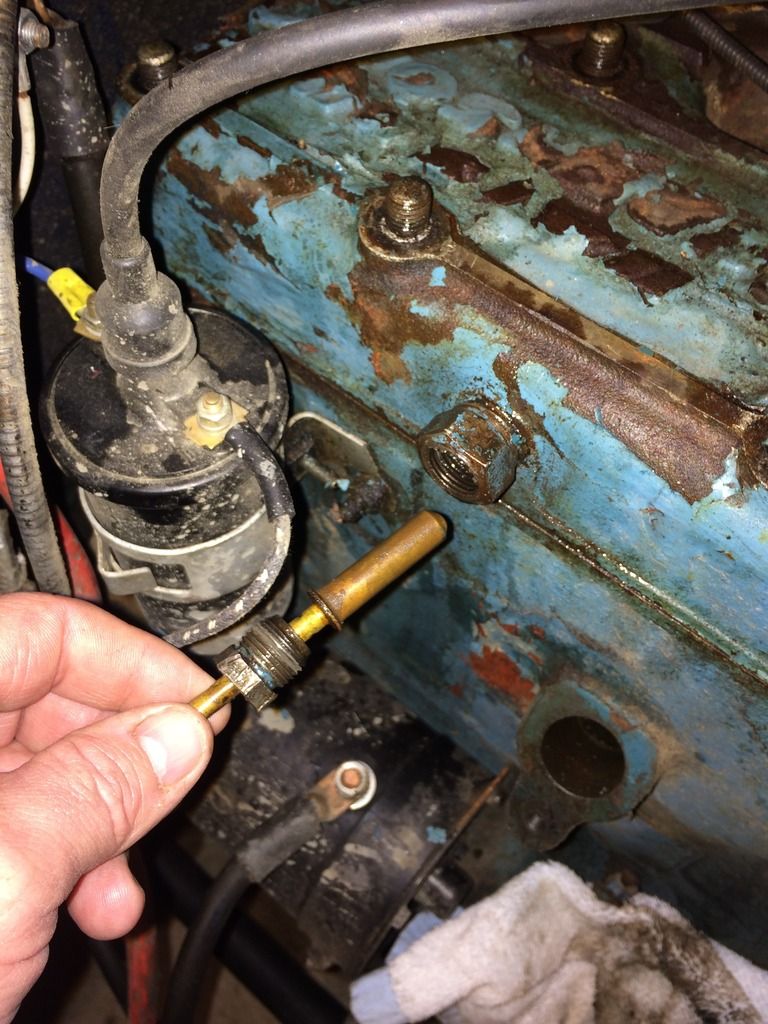 . . .
------------- Those who do not learn from history are doomed to repeat it... Welcome to 1930's Germany |
Posted By: Gil
Date Posted: 22 Feb. 2017 at 1:09am
|
Good for you. Keep up the work. Giles |
Posted By: leecarr
Date Posted: 22 Feb. 2017 at 1:15am
| I have 3 sons and they never even left the 3 pieces. |
Posted By: Bruce W
Date Posted: 22 Feb. 2017 at 1:28am
|
Time and patience, sometimes that's what it takes, time and patience..... BW ------------- It is NOT a Jeep Willys! It is a Willys jeep. Happy Trails! Good-bye, Good Luck, and May the Good Lord Take a Likin' to You! We Have Miles to Jeep, Before We Sleep. |
Posted By: mbullism
Date Posted: 22 Feb. 2017 at 1:37am
HA!..."bright side" ------------- Those who do not learn from history are doomed to repeat it... Welcome to 1930's Germany |
Posted By: mbullism
Date Posted: 22 Feb. 2017 at 1:47am
6 weeks of walking by, daubing 50/50 on it, tapping with a small ball peen... on and on. Several times feeling like I was right to the edge of breaking the fitting. It was all good until pulling the engine was on the schedule for this coming weekend.. SO relieved ------------- Those who do not learn from history are doomed to repeat it... Welcome to 1930's Germany |
Posted By: timcj2a
Date Posted: 27 Feb. 2017 at 2:12am
|
A lot of hard work is going into that gem. Keep it up Mike, everything you're doing is putting you that much closer to a finish. Looks great! Tim ------------- 1946 CJ2A #69376 Chula Vista, CA http://www.youtube.com/watch?v=HpmMKPFdmsc&t=157s" rel="nofollow - #69376 |
Posted By: pilot195
Date Posted: 27 Feb. 2017 at 2:18pm
Good for you!!------------- Jim '46 Willys Jeep CJ-2A USAF retired |
Posted By: mbullism
Date Posted: 27 Feb. 2017 at 3:05pm
|
Thanks, guys... So last weekend the front clip came off, this weekend got some more work in and the Kaiser SS engine/T90/D18 are "out"...well, still "in", but out ... about 4pm yesterday afternoon it came time to put the hook to it, and that involved moving stuff around in the garage, putting the mower out in the cold, making more space I didn't have to put the tooth after I pulled it, yada, yada. That, and the plan is to split things and get the block on a stand, etc., and I just didn't have the gas late on a sunday Decided the best place to store it for the work week was right where it was, lol... sitting on the engine mounts at the front plate, and a jackstand at the T90. It's out. But in.
------------- Those who do not learn from history are doomed to repeat it... Welcome to 1930's Germany |
Posted By: mbullism
Date Posted: 04 Mar. 2017 at 10:35pm
|
when I was a pup, there were only a couple rules regarding lifting heavy things... -don't get in a hurry, -don't get under it, and -don't (fug) up.... It still works . http://s1304.photobucket.com/user/mbullism/media/CJ2A%2069750/F6DAF015-F5BB-4C25-91AB-29703FDED557_zpsj6woubt2.jpg.html" rel="nofollow"> 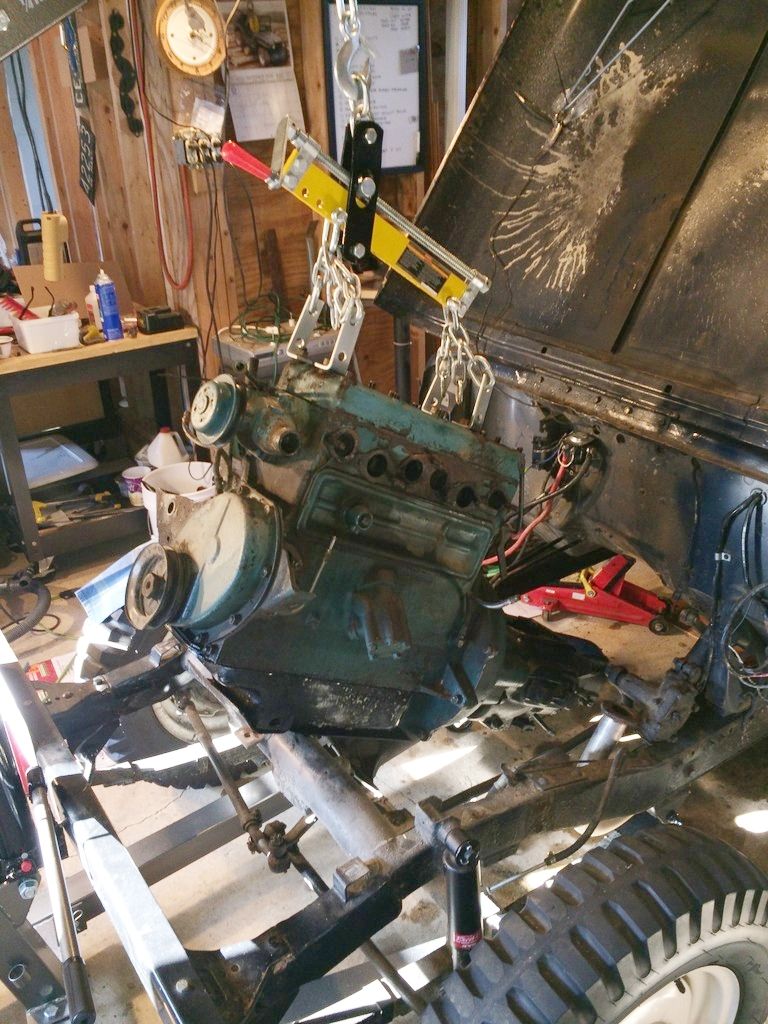 . http://s1304.photobucket.com/user/mbullism/media/CJ2A%2069750/72508D09-CEC9-4334-A66C-A72ED46B73BA_zps7xdlfb1x.jpg.html" rel="nofollow"> 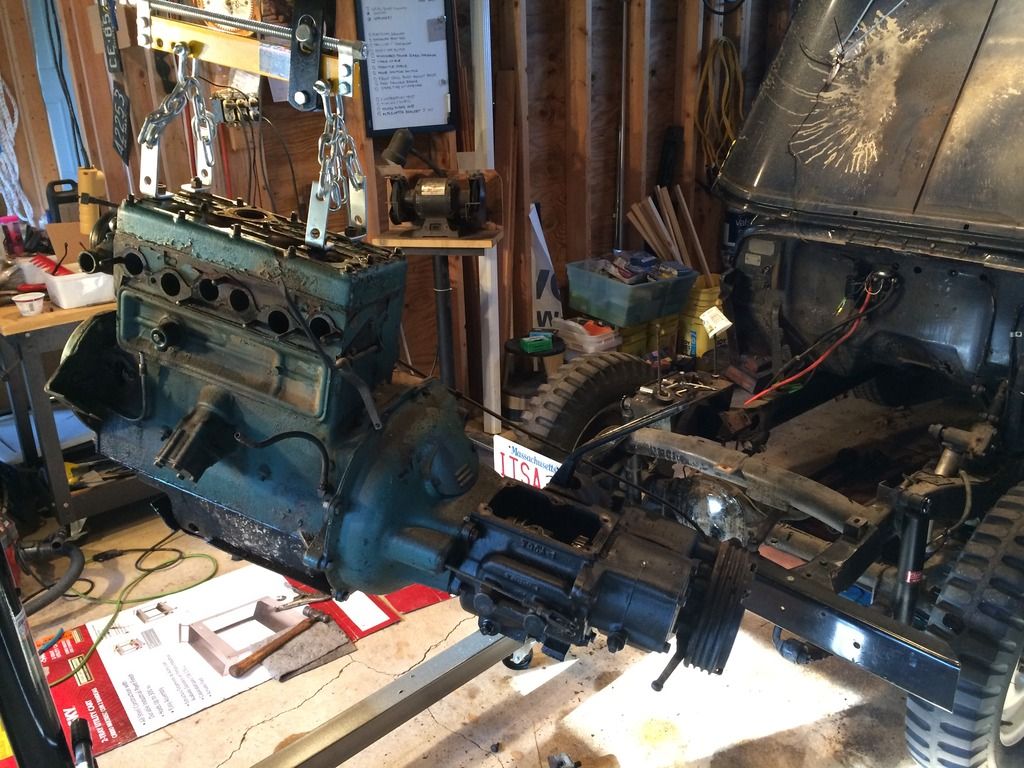 . http://s1304.photobucket.com/user/mbullism/media/CJ2A%2069750/C3DA2D2D-7E15-4E5B-B6AC-2C62CF1AD84A_zps0jp6lp4z.jpg.html" rel="nofollow"> 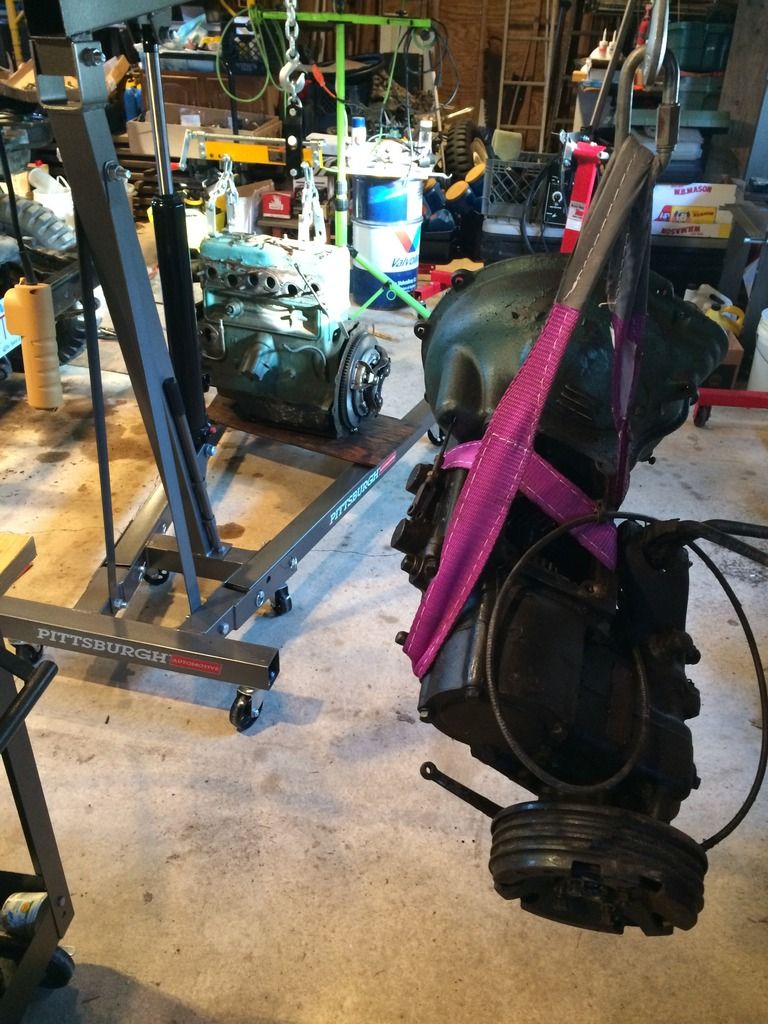 ------------- Those who do not learn from history are doomed to repeat it... Welcome to 1930's Germany |
Posted By: SE Kansas 46 CJ-2A
Date Posted: 05 Mar. 2017 at 12:10am
Nice looking equipment for heavy lifting...apparently it worked as advertised...at least on the out phase of the out and in...  Stay safe... Stay safe...I can see why you put the mower out in the weather...the shop looks a little crowded...kind of like mine. ------------- 46 CJ-2A #64462 "Ol' Red" (bought April 1969)(second owner)(12 V, 11" brakes, M-38 frame, MD Juan tub) U.S. Coast Guard Chief Petty Officer(ret.) U.S. Army Vietnam veteran and damned proud of it. |