


|
|
|
48 CJ2A |
Post Reply 
|
Page <1234 7> |
| Author | |
zooke581 
Member 
Joined: 18 Feb. 2013 Location: Pilot, VA Status: Offline Points: 871 |
 Post Options Post Options
") Thanks(0) Thanks(0)
 Quote Reply Quote Reply
 Posted: 08 Apr. 2013 at 1:46am Posted: 08 Apr. 2013 at 1:46am |
|
My Wife helped me push my jeep in the garage and stated..."It took a Jeep for you to clean out the garage?"
Looking forward to your progress. I have quite a bit of work to do on my 42 GPW tub going on my frame.
|
|
|
General William C. Lee Chapter of the 101st Airborne Division Association. B Btry 1/321 FA 76-78
http://va101stairborne.com http://sundialmotosports.com http://kalamals.com |
|
 |
|
|
F Bill
Member
Sponsor Member x 2 Joined: 05 Dec. 2005 Location: central Texas Status: Offline Points: 7752 |
Post Options
Thanks(0)
Quote Reply
Posted: 08 Apr. 2013 at 1:57am |
|
Gotta remove at least one layer to fix any double layer swelling.. Check out how a guy on the 3A page did it.
Page 9 he does some rot repair around the body side brace. |
|
|
If you haven't checked out the tech FAQ section, go to:
http://www.thecj2apage.com/forums/tech-faq_forum57.html for a lot of great stuff you need to know!! |
|
|
|
|
Ryan_289
Member
Joined: 17 Mar. 2013 Location: Russellville AR Status: Offline Points: 1299 |
Post Options
Thanks(0)
Quote Reply
Posted: 08 Apr. 2013 at 2:53pm |
|
F Bill that thread was exactly what I wanted to see! So maybe I can patch my outer panels and replace the bracing. Then do the floors. Would it be better to have the tub blasted before I attempt patch work? Is there a way to shrink warped metal? If I could get the area smooth above the wheel houses that is wavy from the rails being welded in I can def. salvage my rear panels.
|
|
|
|
|
F Bill
Member
Sponsor Member x 2 Joined: 05 Dec. 2005 Location: central Texas Status: Offline Points: 7752 |
Post Options
Thanks(0)
Quote Reply
Posted: 08 Apr. 2013 at 3:34pm |
|
Google heat shrinking, shrinking discs, shrinking with a spot welder...
Most bodymen prefer to blast when everything is done as blasting sometimes work hardens the metal and makes repairs more difficult. Just make sure you go far enough into the good metal to have good welds, and explore any suspect areas with a pointy tool to make sure you get all the rust. That said, you won't miss any rust spots if you have it blasted first, but make sure the blaster has done automotive stuff before, and won't warp the sheet metal panels. Key is to use lower pressure and a keep the tip at an angle to the metal, not dead straight on at high pressure like a bridge would be blasted.
|
|
|
If you haven't checked out the tech FAQ section, go to:
http://www.thecj2apage.com/forums/tech-faq_forum57.html for a lot of great stuff you need to know!! |
|
|
|
|
Ryan_289
Member
Joined: 17 Mar. 2013 Location: Russellville AR Status: Offline Points: 1299 |
Post Options
Thanks(0)
Quote Reply
Posted: 05 May 2013 at 11:35pm |
|
Scored a good frame and some other goodies this weekend! I bought a 47 2a with a bad tub but a good frame.  It also had a good grill on it too.  I also got a front clip from a 46 im guessing from the grill marker lights. Im going to use the hood and fenders.   I also found an F script mark on the passenger fender.   Most of the fender is bad but the flat top with the script on it is good and straight. Im not sure if the GPW guys buy stuff this bad or not? |
|
|
|
|
Ryan_289
Member
Joined: 17 Mar. 2013 Location: Russellville AR Status: Offline Points: 1299 |
Post Options
Thanks(0)
Quote Reply
Posted: 03 June 2013 at 12:33am |
|
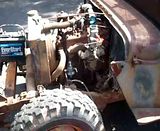
Well I ended up getting the whole works from Scoutpilot. Carb rebuild, fuel filter, and fuel pump. Of course they all look GREAT! I have to say im surprised at how well this engine sounds. It blew a little smoke at first but that has cleared up. My original oil pressure gauge appears to be working. Im getting around 30-40 psi. The temp guage is working but im not sure if its right. It only goes as far down as 140. Ill run it for a little while but it gets up to around 200 or so and ill shut it down. Im not sure if thats right or not. Ill probably get a cheapie at the parts store just to see what it really is.
 |
|
|
|
|
Ryan_289
Member
Joined: 17 Mar. 2013 Location: Russellville AR Status: Offline Points: 1299 |
Post Options
Thanks(0)
Quote Reply
Posted: 30 June 2013 at 3:52am |
|
Had a buddy come over and help me lift the tub off of the frame today. We loaded the running gear onto my trailer so that I can run it up to work where we have a steam pressure washer. That will help get all of the grease and gunk off everything.
  The trasmission and transfer case have a LOT of caked on grease and dirt.
 Here is my frame im going to use. How is the best way to get the front horns straighted? The one on the left is bent over and the one on the right seems to have a slight twist.
  |
|
|
|
|
Ryan_289
Member
Joined: 17 Mar. 2013 Location: Russellville AR Status: Offline Points: 1299 |
Post Options
Thanks(0)
Quote Reply
Posted: 30 June 2013 at 10:57pm |
|
Much better!
  Since the steam cleaner had all the oil and grease off I went ahead and put a coat of paint on it. Im sure ill have to paint it again when I put it all back together but it sure looks better!
 |
|
|
|
|
F Bill
Member
Sponsor Member x 2 Joined: 05 Dec. 2005 Location: central Texas Status: Offline Points: 7752 |
Post Options
Thanks(0)
Quote Reply
Posted: 01 July 2013 at 12:37am |
|
Looks pretty good.....as far as frame repairs, we have discussed how to before...Basically use jacks, timbers, chains, etc. to apply force opposite of the bends, and use a bit of acetylene torch heat to allow the heavily bent stuff to stretch or shrink, whichever it needs.
The twist will be pretty easy, just bolt up a piece of channel or tubing or even a 2x4 to the bumper mount, and twist away by hand. It should not take much. You may have to over twist it to get it to stay where you need it. Looking at your pic I would say you have more of a sidesway condition than twist, however. The top and bottom of the rail are stretched, and will need to be heat shrunk to bring it back to straight. Apply sideways force, heat up, hammer smooth and let cool. then release your tension against the rail. The sidesway in the left rail can probably also be pulled out manually but you may have to add some heat and hammer work on the top and bottom of the frame rail where you see the buckling going on. If you use a large lever of some sort against the kink and chained to the front of the frame it should do it. I'd consider making a piece to bolt where the bumper bolts to pull from, instead of just wrapping a chain around the end and possibly creating more damage. Spread the load at the kink with a piece of plate against the frame. If you can't figure out how to do the frame work it should be very easy for an old time body shop who is used to body on frame repairs to fix. I would bet a couple hundred bucks would do it.
Edited by F Bill - 01 July 2013 at 12:41am |
|
|
If you haven't checked out the tech FAQ section, go to:
http://www.thecj2apage.com/forums/tech-faq_forum57.html for a lot of great stuff you need to know!! |
|
|
|
|
Ryan_289
Member
Joined: 17 Mar. 2013 Location: Russellville AR Status: Offline Points: 1299 |
Post Options
Thanks(0)
Quote Reply
Posted: 01 July 2013 at 4:07am |
|
I dont think I will have to farm out the frame work. Am I safe in assuming that the frames will be straight on the sides all the way back? I figure Ill use a long straight edge to check the frame as I bend it. Ive got torches and I figured I may need them. There are a couple of cracks around the tube that need welded. Should I weld them before or after the frame repair?
|
|
|
|
|
Bob W
Member 
Sponsor Member x 4 Joined: 08 Aug. 2005 Location: Monticello, NY Status: Offline Points: 1691 |
Post Options
Thanks(0)
Quote Reply
Posted: 02 July 2013 at 12:30am |
|
What is the casting date on the side of your transmission? Is it 3-10-48?
Thanks!
|
|
|
|
|
Ryan_289
Member
Joined: 17 Mar. 2013 Location: Russellville AR Status: Offline Points: 1299 |
Post Options
Thanks(0)
Quote Reply
Posted: 02 July 2013 at 1:59am |
|
Good eye Bob! I went out to the shop to double check and yep its 3-10-48.
|
|
|
|
|
Bob W
Member
Sponsor Member x 4 Joined: 08 Aug. 2005 Location: Monticello, NY Status: Offline Points: 1691 |
Post Options
Thanks(0)
Quote Reply
Posted: 02 July 2013 at 2:03am |
|
Thanks!
|
|
|
|
|
Ryan_289
Member
Joined: 17 Mar. 2013 Location: Russellville AR Status: Offline Points: 1299 |
Post Options
Thanks(0)
Quote Reply
Posted: 07 July 2013 at 10:55pm |
|
Stripped my frame down this weekend. It doesnt look like much was done but grinding rivets takes more time than I thought. Ive welded a couple of cracks back up and am ready to get my frame horns straightend up before I start bolting gussets and shackle brackets back on.
    There was a bolt welded to the bottom of my bellcrank bracket. I cant decide if I should cut the bracket off and weld another one from my other frame on or try to grind the surface down flat enough for the bell crank to seat flush.
 |
|
|
|
|
otto
Member

Joined: 26 Feb. 2012 Location: Orygun Status: Offline Points: 2265 |
Post Options
Thanks(0)
Quote Reply
Posted: 07 July 2013 at 11:12pm |
|
I would recommend measuring with a tape measure in an "X" fashion to verify if your frame is straight or not. You could start in the center if you can find symmetrical holes or points to measure from. If your X measurements are close, you could assume that section is square or straight. This is much better that using a straight edge.
This works for side sway or diamond damage. Up/down damage (mash or sag) usually requires the use of self-centering gauges to detect.
|
|
|
47 CJ2A w/fuel injected boat engine
48 CJ2A 64 Ford Econoline Travelwagon If you can't get there in a Jeep, get a motorcycle! |
|
|
|
|
Ryan_289
Member
Joined: 17 Mar. 2013 Location: Russellville AR Status: Offline Points: 1299 |
Post Options
Thanks(0)
Quote Reply
Posted: 08 July 2013 at 12:20am |
|
otto I plan on doing that. Ive got to get in into my shop and get it on a level surface to measure. Im pretty sure that the center portion of my frame is good but ill find out for sure. Mostly just the front frame horns. My rear horns are slightly off. When I put my new rear crossmember up im about a half hole off.
|
|
|
|
|
Ryan_289
Member
Joined: 17 Mar. 2013 Location: Russellville AR Status: Offline Points: 1299 |
Post Options
Thanks(0)
Quote Reply
Posted: 08 July 2013 at 2:12am |
|
I just went out and put the 4 middle pivot brackets on and brought it into the garage to take a couple of measurments. About the only x measurment I can take right now is the x between the four brackets. B and C on the Fig 136 service manual page. Those both measure 48 1/4" center to center. One thing I did find is the back right bracket is just slightly off of the floor. The bracket itself is not straight, Im actually wondering if when the factory welded in the brace right there it pulled the inner part of the frame up slightly. I took the best pictures I could to show this.   This measurment is .128, the other side is .05
 There may be a very slight twist there but if the bracket was straight it would be a very small gap.
|
|
|
|
|
otto
Member
Joined: 26 Feb. 2012 Location: Orygun Status: Offline Points: 2265 |
Post Options
Thanks(0)
Quote Reply
Posted: 08 July 2013 at 3:35am |
|
If your concrete finisher is like my concrete finisher, I do not recommend using the floor as a datum reference for height measurement
 . .A method to check the frame for twist or to see if a rail is higher than others without the aid of self-centering gauges might be to lay straight pieces of steel (square tubing or angle) across the frame at 90 degrees from the centerline and sight across them to see if they are parallel. You should use at least three pieces with two of them in the center section of the frame working towards either end. This would assume supporting the frame in a level fashion. Jeep frames are fairly simple and symmetrical for the most part, you shouldn't have problems performing repairs.
|
|
|
47 CJ2A w/fuel injected boat engine
48 CJ2A 64 Ford Econoline Travelwagon If you can't get there in a Jeep, get a motorcycle! |
|
|
|
|
Post Reply
|
Page <1234 7> |
| Tweet |
| Forum Jump | Forum Permissions You cannot post new topics in this forum You cannot reply to topics in this forum You cannot delete your posts in this forum You cannot edit your posts in this forum You cannot create polls in this forum You cannot vote in polls in this forum |


 Topic Options
 Ryan_289 wrote: