


|
|
|
.060 Over Piston |
Post Reply 
|
Page 12> |
| Author | |
athawk11 
Member 

Joined: 18 Jan. 2012 Location: Arvada,Colorado Status: Offline Points: 4151 |
 Post Options Post Options
") Thanks(0) Thanks(0)
 Quote Reply Quote Reply
 Topic: .060 Over Piston Topic: .060 Over PistonPosted: 16 Jan. 2014 at 3:38pm |
|
A few questions about new piston rings.
My engine is on a stand. Everything a machine shop would do, appears to have recently been done to this engine, but I have an issue. I did a leak down test and found I have equally poor air loss into the oil jacket on all four cylinders. The reading is between 60 to 80 percent loss on all.
1. With a piston at .060 over, what should the ring gap be for the new rings on the L-134?
2. Is there an after market ring set that is better than others?
3. Once I pulled the piston, I was surprised at how loose the rings are when not compressed in the cylinder. With very little effort, and with my fingers, I can spread the rings and slip them right off. Is this normal? The oil ring is substantially tigher in the groove than the compression rings, but it looks nothing like the new versions I am seeing available.
4. Other than the machine shop having no choice, is there a good reason to bore the cylinder to .060 over?
Any thoughts would be apreciated.
Thanks,
Tim
|
|
 |
|
|
BillF
Member
Joined: 02 Oct. 2005 Location: Hillsborough NH Status: Offline Points: 1133 |
Post Options
Thanks(0)
Quote Reply
Posted: 16 Jan. 2014 at 4:22pm |
|
If it is a brand new rebuild and the engine has not been run yet I would expect the rings not to seal that well. They need some time to break in before they seal. My engine is bored 60 over as well.
|
|
|
1952 m38
|
|
|
|
|
WeeWilly
Member

Sponsor Member x 2 Joined: 07 May 2009 Location: Clayton IN Status: Offline Points: 3423 |
Post Options
Thanks(0)
Quote Reply
Posted: 16 Jan. 2014 at 4:47pm |
|
You should be referring to a CJ2A mechanics manual for all the info on the specs. Its' not to important on how easy the rings go on the pistons more important is how they compress in the cylinder with proper end clearance (.008 - .013) and the clearance of a bare piston in the cylinder (.003) on new parts and rebuild.
The machine shop most likely needed to go .060 to clean and straighten up the cylinders. Like Bill said it takes run time to seat the rings. Jim |
|
|
47 CJ2A (Ranch Hand) 48 CJ2A, 48 Willys truck, T3C 3782, M274 (Military Mule)
|
|
|
|
|
Mike S
Member
Joined: 20 May 2006 Location: West Coast Status: Offline Points: 2318 |
Post Options
Thanks(0)
Quote Reply
Posted: 16 Jan. 2014 at 5:13pm |
|
I have an engine that is bored .060" over. The only problem that I could imagine is that .060" over is about max on these engines, though pistons for an .080" overbore are available from at least one source.
Perhaps you should run the engine before you do anything to it?
|
|
|
'47 CJ2A -- #114542
Warn FF D41 rear Lock-Right locker 11" drum brakes Dual master cylinder T90C Transmission 16 X 6 Jeep truck wheels Cooper STT Pro tires |
|
|
|
|
Joe Friday
Moderator Group 
Sponsor Member x 2 Joined: 26 Dec. 2010 Location: Jeep Central Status: Offline Points: 3654 |
Post Options
Thanks(0)
Quote Reply
Posted: 16 Jan. 2014 at 5:33pm |
|
In addition to bore clearance and ring gap there may a few other things to consider.
The manual also talks about the amount of pull required to drag the piston up through the bore with the ring installed. I don't have the manual here but wasn't it 10 pounds per piston?
The proper cross hatch of the hone will affect this greatly.
There is also a big difference between Solid Chromium rings, Chrome Moly Rings, and Cast Iron Rings.
Solid chrome takes longest to break in, and will actually wear the bores. Chrome Moly seals the best, and Cast Iron breaks in the fastest.
Are you sure the correct side of the rings is installed UP ?
I agree on the break in comments and the .060 being the max advisable bore.
Edited by Joe Friday - 17 Jan. 2014 at 2:41am |
|
|
|
|
lowenuf
Member

Sponsor Member x 2 Joined: 29 Aug. 2006 Location: Ohio Status: Offline Points: 9122 |
Post Options
Thanks(0)
Quote Reply
Posted: 16 Jan. 2014 at 5:55pm |
Rut Row..... lol
Mine is at .080"..... lol sleeving will definately be due if i start loosing compression..lol
|
|
|
45 #10012
45 #10033 ACM #47 45 #10163 ACM #188 57 CJ5 Dauntless V6, T-18 4-speed, D-44 rear/D-30 front, D-20 twin stick |
|
|
|
|
smfulle
Member

Sponsor Member Joined: 16 Sep. 2010 Location: Ogden, Utah Status: Offline Points: 6141 |
Post Options
Thanks(0)
Quote Reply
Posted: 16 Jan. 2014 at 7:02pm |
|
Machine shop told me I needed .80 over and this it how it looked after they punched it out. Be careful out there!
 |
|
|
|
|
BillF
Member
Joined: 02 Oct. 2005 Location: Hillsborough NH Status: Offline Points: 1133 |
Post Options
Thanks(0)
Quote Reply
Posted: 16 Jan. 2014 at 7:05pm |
|
.80 over is to much anyways. It should have been sleeved at that point.
|
|
|
1952 m38
|
|
|
|
|
Joe Friday
Moderator Group
Sponsor Member x 2 Joined: 26 Dec. 2010 Location: Jeep Central Status: Offline Points: 3654 |
Post Options
Thanks(0)
Quote Reply
Posted: 16 Jan. 2014 at 7:37pm |
|
Low,
The .060 limit is for the 'mainstream' builder.
As you can see from smfulle's picture, if they don't get the sand cores straight in the casting mold, then the wall thickness is compromised.
For 11978 I had the walls tested with ultrasound to determine thickness. I could have bores all to 080 over to match #4 which was the worst, sleeved #4 and bored all to .060, or sleeved all back to stock.
based on past experiences of a boring bar slipping and ruining a block, I opted to do the least and sleeved only #4. I'm glad I did, because the machinist never noticed #3 had already been sleeved!
|
|
|
|
|
Carlsjeep
Member

Joined: 15 Jan. 2011 Location: Taylorsville Ky Status: Offline Points: 2642 |
Post Options
Thanks(0)
Quote Reply
Posted: 16 Jan. 2014 at 8:09pm |
|
Joe Friday, there is no spec for pulling a piston through the bore with the rings on it. There is a spec for pulling the feeler gauge between the piston and bore without rings and the recommendation is a .003" feeler gauge with a 5 lb pull. I personally think that is too tight and prefer a lighter pull.
|
|
|
Life is only as good as you make it.
|
|
|
|
|
Joe Friday
Moderator Group
Sponsor Member x 2 Joined: 26 Dec. 2010 Location: Jeep Central Status: Offline Points: 3654 |
Post Options
Thanks(0)
Quote Reply
Posted: 16 Jan. 2014 at 8:53pm |
|
Thanks Carl. I obviously remembered that wrong.
|
|
|
|
|
athawk11
Member
Joined: 18 Jan. 2012 Location: Arvada,Colorado Status: Offline Points: 4151 |
Post Options
Thanks(0)
Quote Reply
Posted: 17 Jan. 2014 at 12:48am |
|
Thank you to all for your imput. It is very helpful.
I should have mentioned that I don't know the history of this engine.
When I first got the Willys, (January of 2013) I changed the fuel pump, replaced the gas tank and fuel lines, and it fired right up. I drove it a bit, but it felt under powered compared to my other Willys Jeeps. The tire size is absurd (31" tall) for an L-134, so I convinced myself that this was the source of the lack in power, but I wanted to make sure. I'm sure the timing needed to be addressed also, as the oil pump needed to be re-index to get #1 to the compression stroke and TDC.
I also needed to adjust the valves. They ranged anywhere from .010 to .018. But my final test before cleaning and painting was the leak down test. I had no leaks from the intake or exhaust valves. I had no leak into the water jacket. I was losing all the air through the oil jacket, so I figured it was time to pull the head so I could do my first ring job ever.
After reading many posts here, I was surprised that the head came off with zero struggle. Literally had the nuts off and the head pulled in 10 minutes. The head gasket looks so new, I could use it again, but I did get a new Felpro head gasket and intend to replace it. There was no gasket failure.
I did examine the compression rings. The chamfer is at the top on both rings.
Here is a photo of #4 piston showing the rings...
 The engine, overall, looks pretty good, other than the leaky rings, so I was hoping to find mismatched, or broken rings as the final answer to my lack of power. I know it may be hard to tell from this photo, but the oil ring looks completely different than the replacements I'm seeing offered.
Joe Friday, if you were going to replace your rings, which of the three choices you listed, would you choose? My lack of compression tells me to go with Chrome Moly rings.
Tim
|
|
|
|
|
Lee MN
Member

Joined: 13 Aug. 2008 Location: Harris, MN Status: Offline Points: 4949 |
Post Options
Thanks(0)
Quote Reply
Posted: 17 Jan. 2014 at 2:28am |
|
Tim,,,,,,looking at your piston photo, I would say your engine has next to Zero running time on it, the piston skirt has no scuffing and appears to still have the machine marks on it, I would also agree the rings were most likely not yet seated, and would result in a very poor leakage test. I would remove the compression rings and install them in the bore and see what the end gaps are. The machine shop I use has told me in the last few years engine kits are shipped with wrong size rings/pistons/bearings and one needs to closely check all items out and verify they are correct. Good luck with it!
Lee 
|
|
|
LEE
44 GPW-The Perfected Willys 49 2A “If you wait, you only get older” 67 M715 American Made Rolling History |
|
|
|
|
Joe Friday
Moderator Group
Sponsor Member x 2 Joined: 26 Dec. 2010 Location: Jeep Central Status: Offline Points: 3654 |
Post Options
Thanks(0)
Quote Reply
Posted: 17 Jan. 2014 at 2:45am |
|
Any chance of a photo showing the cross hatch of the bore?
If the cross hatch looks right I'd go with moly filled rings also. I've never been able to install rings by appearance. There should be dimples on the top or bottom of the ring. Each manufacturer had their own markings. Are there any marks? |
|
|
|
|
scoutpilot
Member

Joined: 30 Dec. 2008 Location: Asheboro, NC Status: Offline Points: 4373 |
Post Options
Thanks(0)
Quote Reply
Posted: 17 Jan. 2014 at 10:15am |
|
This was a useful exercise for me too! Here ya go Joe.
 And from the folks who make them:them: http://www.hastingsmfg.com/ServiceTips/compression_ring_installation.htm And from the folks who make them:them: http://www.hastingsmfg.com/ServiceTips/compression_ring_installation.htm |
|
|
|
|
gmcjr
Member

Joined: 20 Nov. 2005 Location: N.Texas Status: Offline Points: 495 |
Post Options
Thanks(0)
Quote Reply
Posted: 17 Jan. 2014 at 1:58pm |
|
Hey Tim! It looks like you have a freshly rebuilt engine, Lucky Dog! FWIT, oil ring design varies by manufacturer. |
|
|
Gary
51 CJ-3A |
|
|
|
|
Joe Friday
Moderator Group
Sponsor Member x 2 Joined: 26 Dec. 2010 Location: Jeep Central Status: Offline Points: 3654 |
Post Options
Thanks(0)
Quote Reply
Posted: 17 Jan. 2014 at 2:03pm |
|
So does this suggest that Tim's compression rings are in upside down?
Scoutpilot - Is that a picture of your engine bore or Tims?
Looks like the right angle but the picture makes it look very slightly course, almost like it has never been run?
What is your opinion?
|
|
|
|
|
athawk11
Member
Joined: 18 Jan. 2012 Location: Arvada,Colorado Status: Offline Points: 4151 |
Post Options
Thanks(0)
Quote Reply
Posted: 17 Jan. 2014 at 3:09pm |
|
I wanted to post a few more photos. Hopefully, one of the experts will be able to spot the brand of rings that are installed so I can look for the manufacture instructions to make sure the orientation is correct. The rings do not have a dit or dot on either side. The outside edge is not beveled at all. The photo shows the rings standing on edge with no support. There is a chamfer on the inside edge, and it was installed toward the top of the piston on both compression rings. The chamfer looks to be black, and the rest of the ring is polished silver.
The oil ring is a tighter fit, and is unique in design…at least compared to the rings I am seeing. Look how clean the compression grooves are. The other side (toward the valves) has a little bit of carbon build up, but not much.
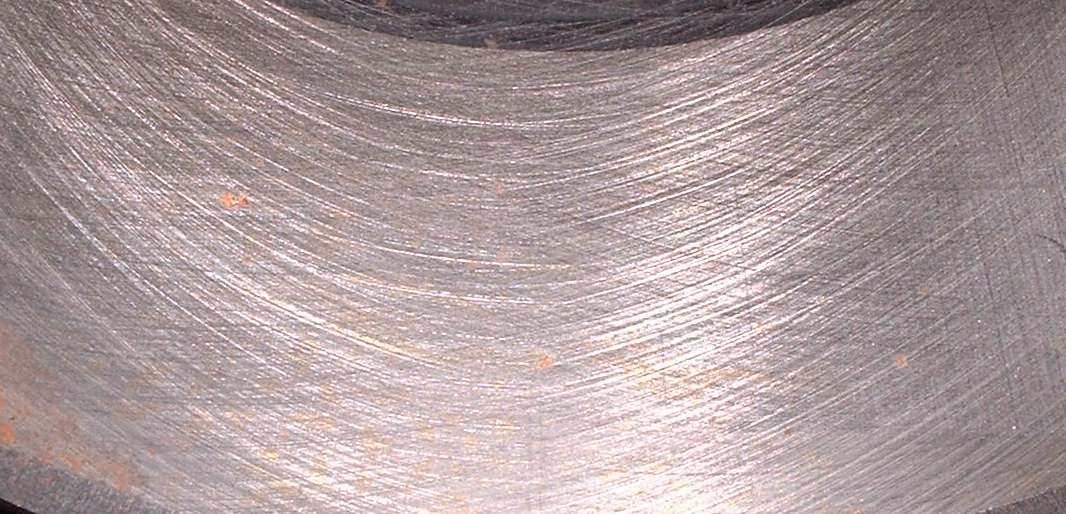
Joe…I had a hard time holding a light and a camera to show this, but the cylinder is very clean, polished and smooth from top to bottom. I see no indication of any honed cross hatching at all. Could this be my problem?
Lee…I think you may be right. I just don’t know enough to compare a well run engine to a fairly fresh rebuild. The fresh look of the crank journals, bearings, the cam lobes, the ease of head removal, the piston condition, all give me hope that the engine is in decent condition, but possibly, the rings were not properly set, or broken in by honing in a cross hatch. I did what you suggested. I put the top ring in the cylinder to check the gap.
It looks huge. Is this another problem? Did the re-builder remove too much material? If so, my search for the ring manufacture just ended and I’m back to finding a nice new set. From Scout Pilots information, I am likely able to eliminate this manufacture from my search. None of the versions shown have the characteristics of the rings on my pistons. Any other suggestions? Thank you again to all that have chimed in. I’m learning a lot. |
|
|
|
|
Post Reply
|
Page 12> |
| Tweet |
| Forum Jump | Forum Permissions You cannot post new topics in this forum You cannot reply to topics in this forum You cannot delete your posts in this forum You cannot edit your posts in this forum You cannot create polls in this forum You cannot vote in polls in this forum |


 Topic Options
 Joe Friday wrote:


