


|
|
|
Rear main seal help... |
Post Reply 
|
Page 12> |
| Author | |
clayvt 
Member 

Joined: 25 July 2012 Location: New Mexico Status: Offline Points: 176 |
 Post Options Post Options
") Thanks(0) Thanks(0)
 Quote Reply Quote Reply
 Topic: Rear main seal help... Topic: Rear main seal help...Posted: 12 Aug. 2016 at 4:34am |
|
So I was leaking oil out the rear of the motor, it was coming out the bottom of the bell housing. And I knew I screwed up putting the rubber plugs in (cut them flush when rebuilding the motor) and had to replace them.
I was thinking the rear main was leaking to account for the oil. So this afternoon I finanny got around to dropping the pan and pulling the rear cap. What I found was a bit disconerning... 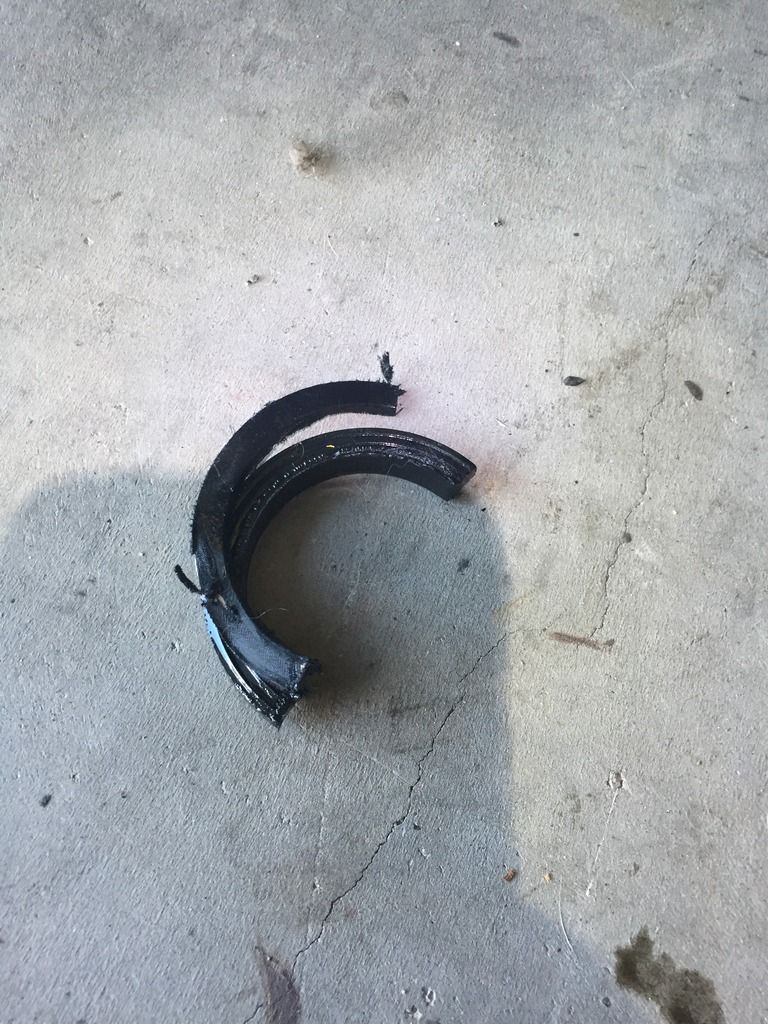 The reinforced metal flange was sheared off the cap side and it looked like the rubber had melted a bit inside the cap. I thought maybe the flywheel flange was rubbing on the outside of the seal. I followed a rebuild guide and installed the seal the same way as the guide. This way: 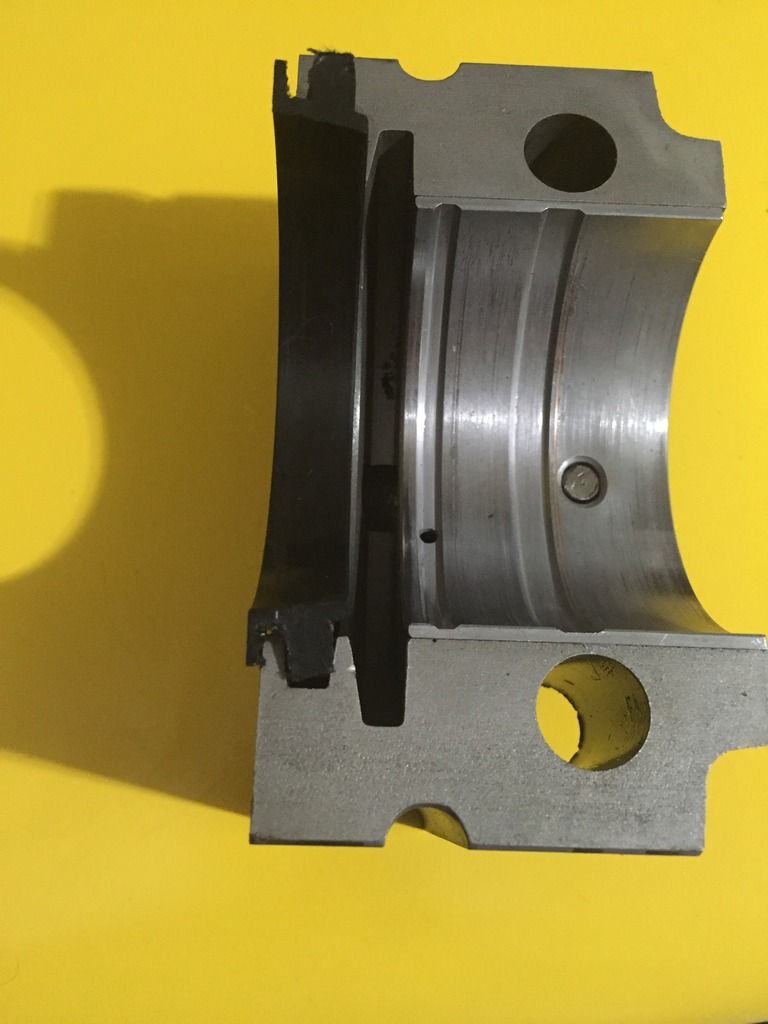 Speaking to my father who has had a '53 3A since HS said there should be no rubber outside the cap and it should be installed this way: 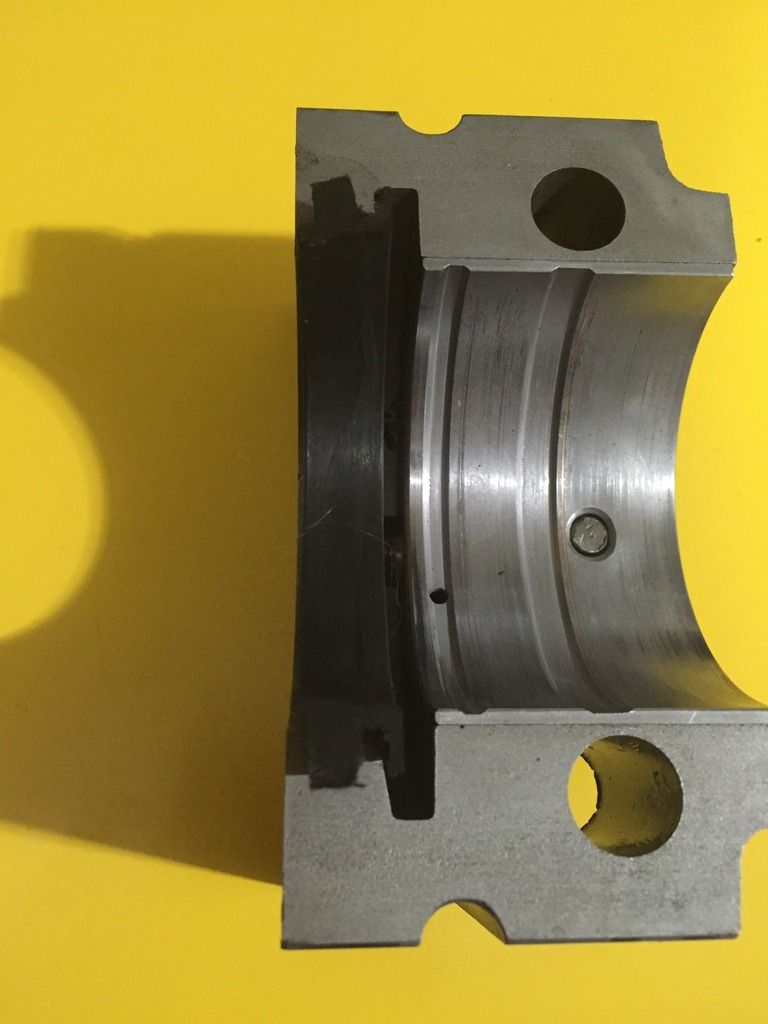 Which way is the proper way?! I'm going to have to pull the motor anyways to clean out the top half of the seal... |
|
 |
|
|
cdn2a
Member
Joined: 03 Nov. 2010 Location: Canada (North) Status: Offline Points: 234 |
Post Options
Thanks(0)
Quote Reply
Posted: 12 Aug. 2016 at 4:25pm |
|
So... there are a bunch of threads on here re:rear main seals.
There are lots of bad 2 piece style. What your father may notice is when you attempt to put the cap on with the seal that way it will run into the oil slinger on the crank. The seal "can" be replaced without pulling the engine. The device your looking for is called a "sneaky pete". Get a rope style seal, install it properly. like here... https://www.youtube.com/watch?v=kSQWlnvAIbI ; |
|
|
|
|
autolite
Member

Joined: 15 Apr. 2006 Location: San Mateo, Cali Status: Offline Points: 788 |
Post Options
Thanks(0)
Quote Reply
Posted: 12 Aug. 2016 at 8:36pm |
|
In my opinion, forget the rope seal and install the "Best" seal that DeBella, Midwest Military, and Ron Fitzpatrick Jeep Parts sell. Two part seal. Wiper type. Just make sure your seal surface on your crank where the seal rides is smooth. No need to use a "sneaky pete" tool to install and it will not heat up and destroy your crank like the bad Victor type.
|
|
|
willys jeep
|
|
|
|
|
autolite
Member
Joined: 15 Apr. 2006 Location: San Mateo, Cali Status: Offline Points: 788 |
Post Options
Thanks(0)
Quote Reply
Posted: 13 Aug. 2016 at 1:22am |
|
My mistake. It is a LIP type seal, not a WIPER type as the original victor seal. Same principal as the seals for the tranny/transfer, drive axles.

|
|
|
willys jeep
|
|
|
|
|
clayvt
Member
Joined: 25 July 2012 Location: New Mexico Status: Offline Points: 176 |
Post Options
Thanks(0)
Quote Reply
Posted: 14 Aug. 2016 at 12:00am |
|
I have a new seal from Kaiser, which according to the description said it should be trouble free...
The seal that failed came from a complete gasket kit I'm assuming is an Omix kit. The motor is on a fresh rebuild and only has 60 miles on it. Just to be on the safe side I just ordered a rubber seal com Ron Fitzpatrick. I will compare the Kaiser and Ron one when it comes In. I tried to push the upper part of the seal out without any luck, I'm sure it's like the cap side and has melted rubber goo in the channel, so as much as I don't want to I'm pretty sure I have to pull the crank. |
|
|
|
|
BrianJ
Member

Joined: 06 Oct. 2014 Location: Hagerstown, MD Status: Offline Points: 564 |
Post Options
Thanks(0)
Quote Reply
Posted: 14 Aug. 2016 at 12:28am |
|
I put a rope seal in (FelPro). Hasn't leaked a drop since. I did the upper by removing the bottom bearing cap and using a 'Sneaky Pete' so I didn't have to mess with the crankshaft. Trimming the ends on the upper took the longest, but overall I'm happy I did it.
|
|
|
Brian Jenkins
1946 CJ2A - SN: 12275 |
|
|
|
|
autolite
Member
Joined: 15 Apr. 2006 Location: San Mateo, Cali Status: Offline Points: 788 |
Post Options
Thanks(0)
Quote Reply
Posted: 14 Aug. 2016 at 3:08am |
|
Checked Kaiser-Willys part list and found the rear seal you ordered. The seal has the number of the "problem" seal 800093. Be careful. May be the same seal that Omix sold you. You will see the difference between this seal and the one from Ron Fitzpatrick jeep parts. My GPW with the "best" type seal and has not leaked so far going on 2 years. Good luck and take your time.
|
|
|
willys jeep
|
|
|
|
|
clayvt
Member
Joined: 25 July 2012 Location: New Mexico Status: Offline Points: 176 |
Post Options
Thanks(0)
Quote Reply
Posted: 14 Aug. 2016 at 10:32am |
|
Thanks guys. A silver lining to all of this is once the motor is out I can re-do some of the brake lines that have been leaking a little bit at my flanges. This will give me a little more room to work with.
My hoist I made up earlier today to yank the motor, there are 2 2x6's bolted together spanning 3 rafters and a harbor freight chan fall....harbor freight don't let me down now...lol 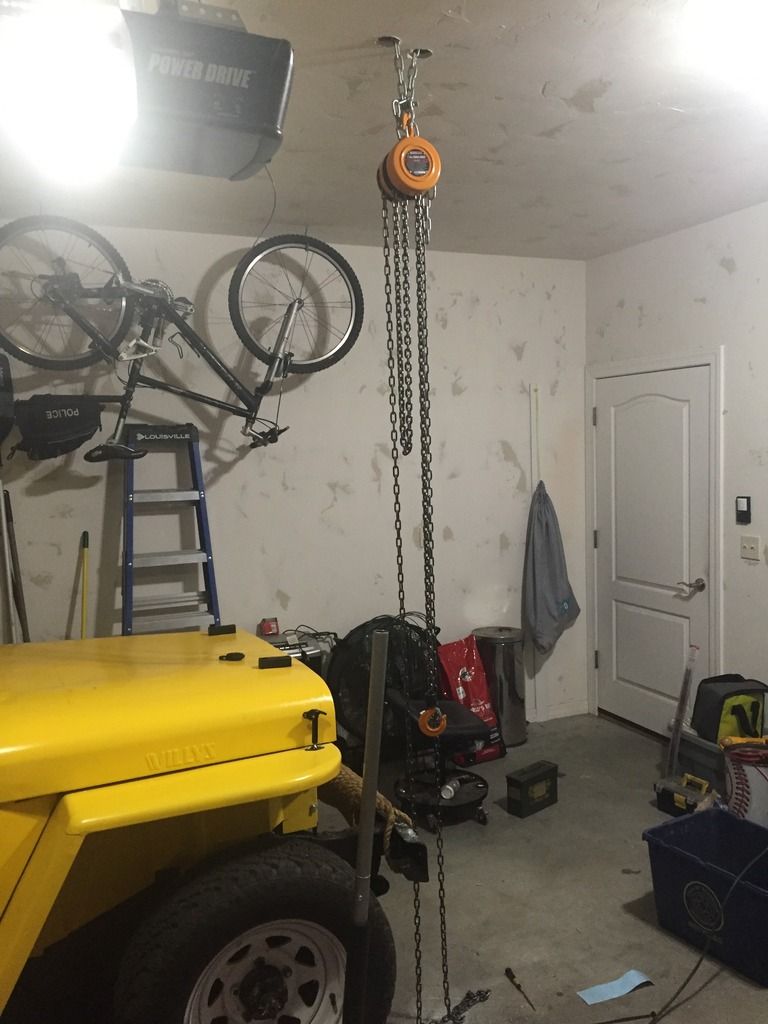
|
|
|
|
|
autolite
Member
Joined: 15 Apr. 2006 Location: San Mateo, Cali Status: Offline Points: 788 |
Post Options
Thanks(0)
Quote Reply
Posted: 14 Aug. 2016 at 5:23pm |
|
My father-in-law had the very same set-up in his garage, Worked well for him in pulling engines from pick-up trucks and cars. Very nice.

|
|
|
willys jeep
|
|
|
|
|
tamnalan
Member
Joined: 08 Oct. 2013 Location: Port Orford, OR Status: Offline Points: 991 |
Post Options
Thanks(0)
Quote Reply
Posted: 15 Aug. 2016 at 9:53pm |
|
Here's a thread on the rear main seal on the g503 site that may be useful: http://g503.com/forums/viewtopic.php?f=4&t=219390
I think your dad isn't right on this one. A seal's lip side normally faces the fluid. I believe your top picture is the correct installation way. I have a wiper-type seal in my MB and it works fine. The key is to make sure the crank's seal surface is smooth and doesn't exceed the 2.312" diameter. The newer lip type seals that Midwest Military sells are probably a good bet too.
|
|
|
Alan Johnson
1942 MB - "TBD" 1943 MB - "Lt Bob" 1950 cj3a M-100 x2 teardrop camper: https://forums.g503.com/viewtopic.php?f=141&t=201740 |
|
|
|
|
tamnalan
Member
Joined: 08 Oct. 2013 Location: Port Orford, OR Status: Offline Points: 991 |
Post Options
Thanks(0)
Quote Reply
Posted: 16 Aug. 2016 at 1:38am |
|
More thoughts on this. The crankshaft's sharp edge is an oil slinger, I think. I don't think it's intended to contact the seal.
 |
|
|
Alan Johnson
1942 MB - "TBD" 1943 MB - "Lt Bob" 1950 cj3a M-100 x2 teardrop camper: https://forums.g503.com/viewtopic.php?f=141&t=201740 |
|
|
|
|
clayvt
Member
Joined: 25 July 2012 Location: New Mexico Status: Offline Points: 176 |
Post Options
Thanks(0)
Quote Reply
Posted: 16 Aug. 2016 at 3:43am |
|
I knew the oil slinger rode in that channel, just thinkin.
Still have no clue how the last seal got sheared off. If the flywheel flange somehow did it what's to stop it from doing it over and over again? |
|
|
|
|
tamnalan
Member
Joined: 08 Oct. 2013 Location: Port Orford, OR Status: Offline Points: 991 |
Post Options
Thanks(0)
Quote Reply
Posted: 16 Aug. 2016 at 12:23pm |
|
It might be one of two things - perhaps the crankshaft has excessive end play http://g503.com/forums/viewtopic.php?f=4&t=275807&hilit=crankshaft+end+play or perhaps the old seal was too tight. I would start by checking the end play.
|
|
|
Alan Johnson
1942 MB - "TBD" 1943 MB - "Lt Bob" 1950 cj3a M-100 x2 teardrop camper: https://forums.g503.com/viewtopic.php?f=141&t=201740 |
|
|
|
|
clayvt
Member
Joined: 25 July 2012 Location: New Mexico Status: Offline Points: 176 |
Post Options
Thanks(0)
Quote Reply
Posted: 19 Aug. 2016 at 5:50pm |
|
I believe I have discovered the problem!
Got the motor yanked yesterday and racking my brain about what could have happened. All the searches I've found have had a different problem with these seals, that they melt and overheat the bearing. But on mine the lip that sits outside the block was sheared off. Checked end play and it's good, there would not be enough rearward movement anyways because the oil slinger would hit its groove. So I laid the crank in and started slowly turning it with the Kaiser seal I already had on hand. The flywheel bolts were in. One of the bolt heads was veeery close to hitting the seal. And I noticed it wasn't sitting flush on the flywheel flange. One of the corners of the bolt head was on top of the raised ridge on the flange. Checked the other bolts and some had evidence that they were torqued with a corner on the lip. When the bolt is turned to sit flush it appears to have much more clearance! The lip I'm talking about:  Clearance with the bolt head on the "lip" 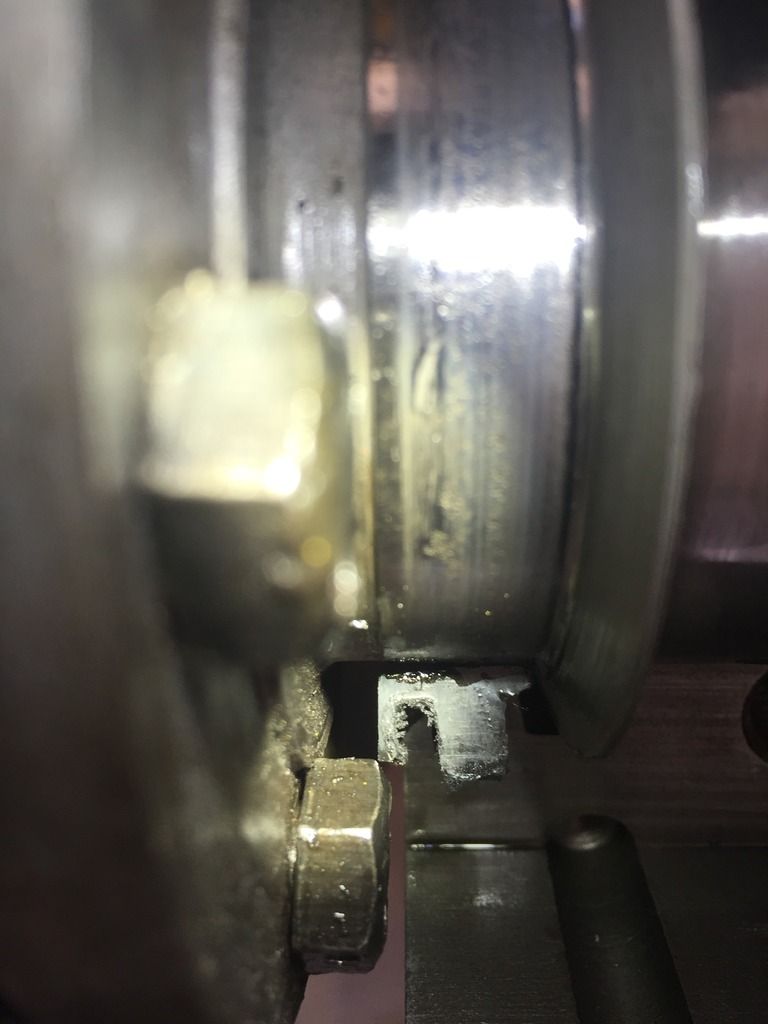 Clearance with it sitting properly: 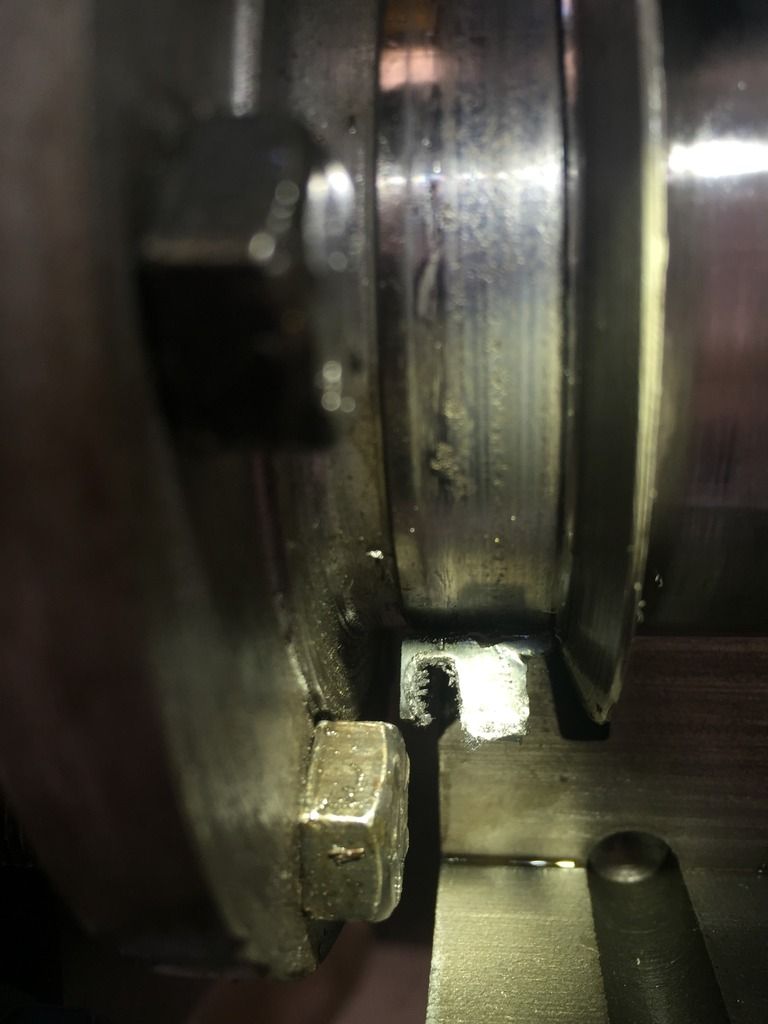 Now I just got to sit around and wait for my Ron Fitzpatrick seal to show up and a new oil pick up gasket to arrive. Then button it all back up! Note for future folks!! Edited by clayvt - 19 Aug. 2016 at 5:52pm |
|
|
|
|
TERRY
Member

Sponsor Member Joined: 22 May 2007 Location: BOULDER COLORADO Status: Offline Points: 3401 |
Post Options
Thanks(0)
Quote Reply
Posted: 19 Aug. 2016 at 10:06pm |
|
Crankshaft surfaces look petty rough.
|
|
|
BOULDER 48 2A
|
|
|
|
|
Gristle
Member
Joined: 16 Aug. 2015 Location: Solon,Ia. Status: Offline Points: 110 |
Post Options
Thanks(0)
Quote Reply
Posted: 13 Feb. 2017 at 2:09pm |
|
I agree with Terry on your crankshaft condition. How did your new seal work out?
|
|
|
|
|
clayvt
Member
Joined: 25 July 2012 Location: New Mexico Status: Offline Points: 176 |
Post Options
Thanks(0)
Quote Reply
Posted: 14 Feb. 2017 at 2:25am |
|
The crank surface was dirty from the old seal melting slightly. I got it cleaned up and installed the Ron Fitzpatrick seal. It has been leak free for almost 400 miles now. The only thing is, i thought it was leaking again as i was getting oil at the rear of the pan and dripping from the backing plate. So i pulled the motor again to investigate and i saw no evidence of any oil around the rear main seal. So that is holding. Discovered my problem was with the oil pan itself...several of the bolt holes were warped not letting it get a good seal.
So while my motor was out i decided to go ahead and rebuild the tranny and transfer case as i hadnt done the, yet. That was a whole 'nother can of worms. But the transmission has been rebuilt and im just waiting on a machine shop to ream out the main shaft bushing on the transfercase for the front output clutch shaft. its been 3 weeks and i havent heard anything. I'm getting quite annoyed as i want to get this back on the road soon!
|
|
|
|
|
Unkamonkey
Member
Joined: 23 Mar. 2016 Location: Greeley CO Status: Offline Points: 2093 |
Post Options
Thanks(0)
Quote Reply
Posted: 14 Feb. 2017 at 3:03am |
|
I have been around a lot of teenage boys that want to repair their grand fathers old Buicks or whatever and just they think they just need to throw on a new set of rocker arm cover gaskets to fix the leaks.
I sigh and get a straight edge out and show them the warps in the covers. They are never going to seal if the metal is that bent up because somebody over tightened them. I show them how to flatten out the bends. Much the same thing for a transfer case inspection cover. |
|
|
uncamonkey
|
|
|
|
|
Post Reply
|
Page 12> |
| Tweet |
| Forum Jump | Forum Permissions You cannot post new topics in this forum You cannot reply to topics in this forum You cannot delete your posts in this forum You cannot edit your posts in this forum You cannot create polls in this forum You cannot vote in polls in this forum |


 Topic Options