


|
|
|
Willys Jeep Disk Conversion for $250 |
Post Reply 
|
Page <12345 17> |
| Author | |
67charger 
Member 

Joined: 27 Sep. 2011 Location: Kentucky Status: Offline Points: 1272 |
 Post Options Post Options
") Thanks(0) Thanks(0)
 Quote Reply Quote Reply
 Posted: 02 Apr. 2017 at 1:08pm Posted: 02 Apr. 2017 at 1:08pm |
|
Napa has a fitting that goes from 10 mms to 3/16 flare for the conversion. It's only a couple of bucks and maybe 1/2" long. I don't have the part number but the fitting is common. I'm also using the stock passenger side flex lines off a geo tracker, they are 20 inches long.
I thinks it's 10 mm to 1/8th inch adapter! Edited by 67charger - 02 Apr. 2017 at 1:16pm |
|
 |
|
|
mickeykelley
Member

Joined: 26 May 2016 Location: Republic of Texas Status: Offline Points: 450 |
Post Options
Thanks(0)
Quote Reply
Posted: 02 Apr. 2017 at 4:06pm |
|
I'm still trying to get understanding of the back plate for the Geo Tracker conversion.
|
|
|
|
|
LesBerg
Member

Joined: 09 Apr. 2014 Location: Athol, ID Status: Offline Points: 1554 |
Post Options
Thanks(0)
Quote Reply
Posted: 02 Apr. 2017 at 5:20pm |
|
These are images from Metcalf's jeep. He designed this system.
Ignore the round spacer inboard of the plate in this picture. It has nothing to do with the brake conversion. instead, check out the adapter plate and the hub. The plate is bolted where the drum backing plate used to be: Rear: 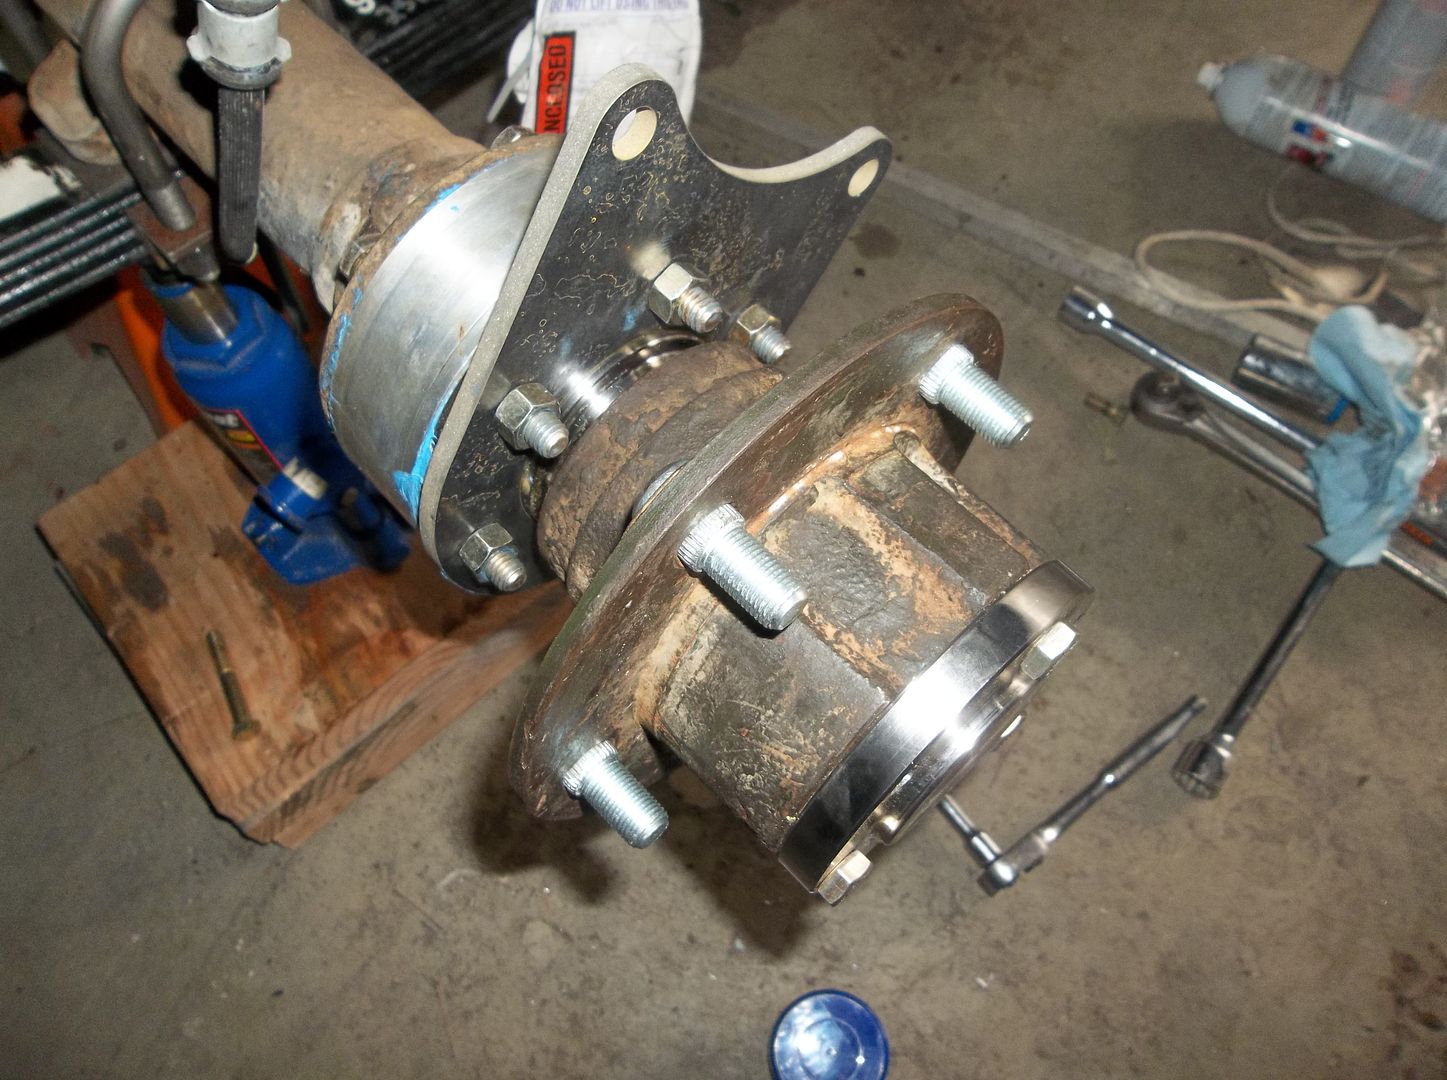 Front: 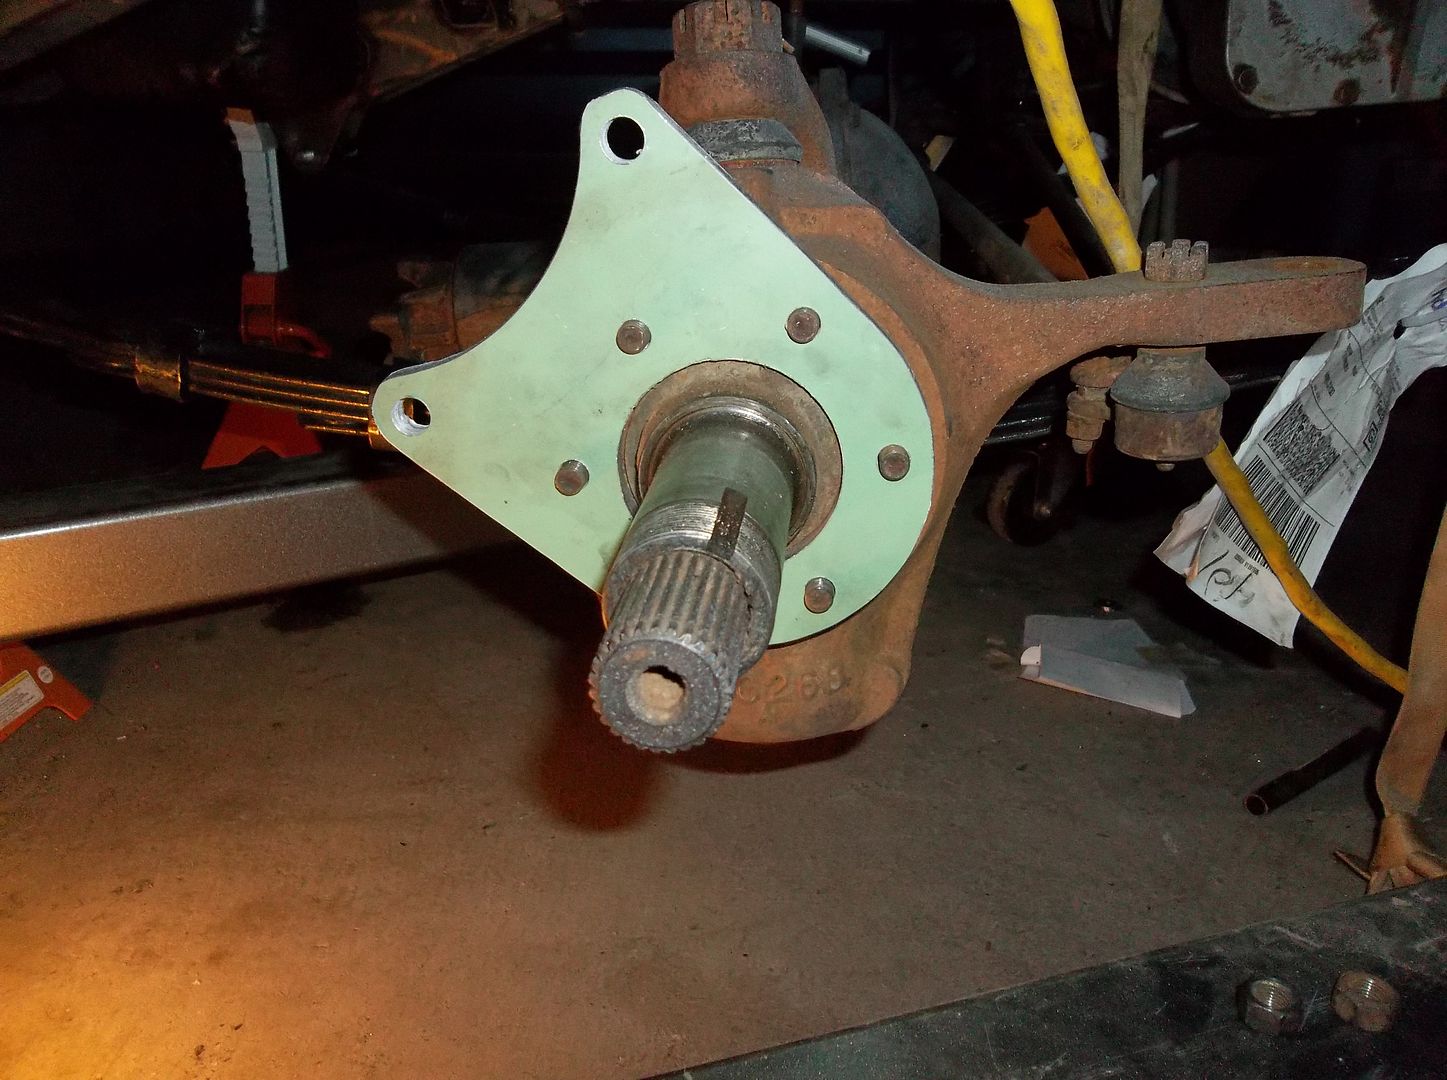 Rear assembled - the caliper bracket bolts directly to the outer two holes you see in the above pictures. The rotor slips over the wheel studs: 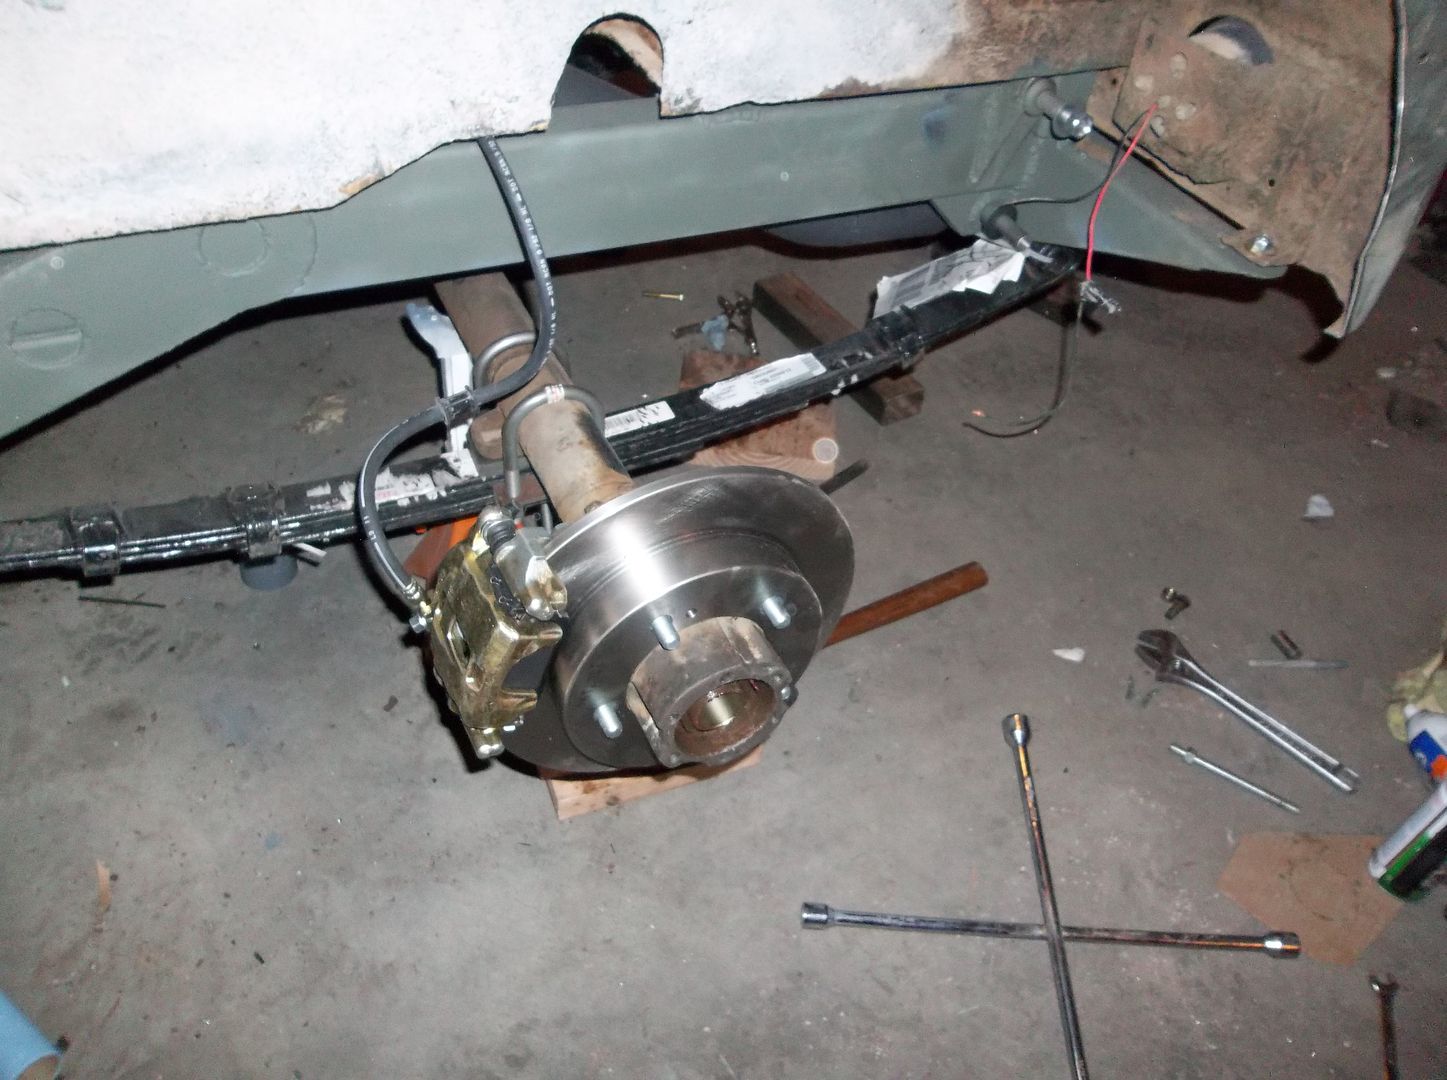 Does that help? |
|
|
1948 CJ2A 157713 24" Stretch "Old Ironsides"
1st Armored Div 6th Infantry Reg 3rd Infantry Bn Headquarters Company #161 rubigo in quo speramus - "In Rust we Trust" |
|
|
|
|
67charger
Member
Joined: 27 Sep. 2011 Location: Kentucky Status: Offline Points: 1272 |
Post Options
Thanks(0)
Quote Reply
Posted: 03 Apr. 2017 at 3:17am |
 Here is the brake line adapter.   Edited by 67charger - 03 Apr. 2017 at 3:24am |
|
|
|
|
Stev
Member
Sponsor Member Joined: 27 July 2016 Location: Cincinnati Status: Offline Points: 2384 |
Post Options
Thanks(0)
Quote Reply
Posted: 03 Apr. 2017 at 3:30am |
|
67Charger - you painted the black power-coated plates green. Nice! Is the photo of your CJ or is this on the MB?
Edited by Stev - 03 Apr. 2017 at 3:32am |
|
|
Stev
1946 CJ2A Trail Jeep (The Saint), 1948 CJ2A Lefty Restored |
|
|
|
|
67charger
Member
Joined: 27 Sep. 2011 Location: Kentucky Status: Offline Points: 1272 |
Post Options
Thanks(0)
Quote Reply
Posted: 03 Apr. 2017 at 4:11am |
|
It's the cj/mb. The axle is green so I had to paint them haha.
|
|
|
|
|
mickeykelley
Member
Joined: 26 May 2016 Location: Republic of Texas Status: Offline Points: 450 |
Post Options
Thanks(0)
Quote Reply
Posted: 03 Apr. 2017 at 4:57am |
|
Yes this helps in understanding, but how do you get a plate?
|
|
|
|
|
LesBerg
Member
Joined: 09 Apr. 2014 Location: Athol, ID Status: Offline Points: 1554 |
Post Options
Thanks(0)
Quote Reply
Posted: 03 Apr. 2017 at 6:03am |
|
PM Stev. He had a batch made and I picked up a pair of them from him. Hopefully he'll still have a couple down the road when I'm ready to do the rear axle.
Thanks 67charger. I'll look into the brake lines too. Maybe we can work with Stev to put a complete parts list. I picked up the bolts from the list on page 1 for a local shop for under $9, though I still need the wheel studs. I'm planning on retaining left hand thread on the driver's side, so I'll need to do a bit of research to get a LH thread part number. I'll post here when I have it. Nick_, my apologies for the hijacking of your thread. Does your parts list cover all the stuff needed for the 'big disk' conversion, or are there other small parts that are needed? What do you think of posting complete parts lists for both conversions here? That would cover two very effective 'all bolts' disk brake conversions, each with it's strong points: One is a bit less expensive, but the other is stout as hell. Edited by LesBerg - 03 Apr. 2017 at 6:09am |
|
|
1948 CJ2A 157713 24" Stretch "Old Ironsides"
1st Armored Div 6th Infantry Reg 3rd Infantry Bn Headquarters Company #161 rubigo in quo speramus - "In Rust we Trust" |
|
|
|
|
Nick_
Member
Sponsor Member Joined: 05 May 2014 Location: Indiana Status: Offline Points: 1132 |
Post Options
Thanks(0)
Quote Reply
Posted: 03 Apr. 2017 at 6:16am |
|
Hey no problem! I'm all for helping the community with a few detailed choices on brake systems. I think a master page is good for showing each setup, along with a description of additional pieces such as a proportioning valve if necessary. I can update the first post.
As for my conversion list: it is complete minus longer studs and the rubber brake lines to the caliper. These replace the metal "S" lines on the knuckles. Checking out the junkyard is great for parts. However on the caliper, I would suggest using that as a core while buying a reman. Better safe than sorry going this far. |
|
|
|
|
rocnroll
Member
Sponsor Member Joined: 20 July 2005 Location: Tuscumbia, AL Status: Offline Points: 13584 |
Post Options
Thanks(0)
Quote Reply
Posted: 03 Apr. 2017 at 2:56pm |
|
If going that far a posted template of the caliper bracket would complete the package.
 |
|
|
'47 CJ2A PU
'48 CJ2A Lefty "Common sense is not that common" |
|
|
|
|
LesBerg
Member
Joined: 09 Apr. 2014 Location: Athol, ID Status: Offline Points: 1554 |
Post Options
Thanks(0)
Quote Reply
Posted: 03 Apr. 2017 at 10:11pm |
|
True, but that would be metcalf's call. He has a standing ban on making it on a commercial level, which I agree with, so I wouldn't be surprised if he said no to posting it.
Maybe if we had a 'members only' download section where you have to agree that you won't use any posted part designs 'for profit', or however our model works with people making top bows, canvas tops, and brake adapters. |
|
|
1948 CJ2A 157713 24" Stretch "Old Ironsides"
1st Armored Div 6th Infantry Reg 3rd Infantry Bn Headquarters Company #161 rubigo in quo speramus - "In Rust we Trust" |
|
|
|
|
Stev
Member
Sponsor Member Joined: 27 July 2016 Location: Cincinnati Status: Offline Points: 2384 |
Post Options
Thanks(0)
Quote Reply
Posted: 04 Apr. 2017 at 1:53am |
|
Les,
I listed all this on page one of the post, Here it is again - Disk Brake Conversion for a Dana 25 using Geo Tracker parts:
Willys Stock CJ2A Wheel Disk Brake Conversion (combat rims would require a spacer to deal with the bolts in the combat rim). This conversion is for a DANA 25 front axle. It was done in conjunction with a dual master cylinder conversion. The rear brakes remain as stock 9 inch drum brakes with 1 inch wheel cylinders. A proportioning valve was used on this conversion. Parts required are from a Geo Tracker (1989 to 1998) L4 1.6L 1588cc two Door: · Calipers 2 each with mounting brackets · Rotors 2 each – solid non vented · Brake pads Tire bolts / studs (these are longer that the stock studs by 3/8 of an inch to accommodate the thickness of the brake disk): · Napa Part Number 641-1112 Metric bolts to mount the caliper mounting brackets to the backing plates: · Menards - HXCAP SW12MM-1.25X30MM M 2026862 · Menards- HEX NUT 12mm 2026846 · Menards- 3/8 “ Lock Washer 2326024 Spinal to steering knuckle bolts – These bolts are longer than stock because they have to capture the spindle and flat bracket that the caliper mounting brackets attach too. · Menards- HEX-CAP 3/8-24X1-1/4 GR 2028008 12each Custom brake lines: Ohio Hydraulics (2 each brake line assemblies) with these components: · 1/8 SST Brake Hose Clear HFB09 (17” front and 12” Rear) · Banjo 10 x 10MM HFIF01 · Female 3/8 x 24 19MM BQ251-SV · Braided Hoes Insert/Silver Brake Line bolts: · Ohio Hydraulics (2 each) BQ1016 Banjo Bolt 10 x 1.0 x22mm · Ohio Hydraulics (2 each) BQ1016 H/D Copper washer 10mm Bracket Conversion: · 3/8 inch steel plate (2 each) flat stock to mount the calipers (I have a drawing and several sets of laser cut plates if you are serious about doing this conversion. I can also send you a drawing if you need a pattern). |
|
|
Stev
1946 CJ2A Trail Jeep (The Saint), 1948 CJ2A Lefty Restored |
|
|
|
|
LesBerg
Member
Joined: 09 Apr. 2014 Location: Athol, ID Status: Offline Points: 1554 |
Post Options
Thanks(0)
Quote Reply
Posted: 04 Apr. 2017 at 2:48am |
|
I saw. For some reason I was thinking that there were a few small pieces missing. looking it over again I can see I'm wrong.
 |
|
|
1948 CJ2A 157713 24" Stretch "Old Ironsides"
1st Armored Div 6th Infantry Reg 3rd Infantry Bn Headquarters Company #161 rubigo in quo speramus - "In Rust we Trust" |
|
|
|
|
Stev
Member
Sponsor Member Joined: 27 July 2016 Location: Cincinnati Status: Offline Points: 2384 |
Post Options
Thanks(0)
Quote Reply
Posted: 04 Apr. 2017 at 3:10am |
|
Actually there are a few 3/8" flat washers that are needed. I put a washer between the backing plate and the caliper mount.
Edited by Stev - 04 Apr. 2017 at 3:18am |
|
|
Stev
1946 CJ2A Trail Jeep (The Saint), 1948 CJ2A Lefty Restored |
|
|
|
|
LesBerg
Member
Joined: 09 Apr. 2014 Location: Athol, ID Status: Offline Points: 1554 |
Post Options
Thanks(0)
Quote Reply
Posted: 05 Apr. 2017 at 5:54am |
|
noted. I'll verify if I need it
|
|
|
1948 CJ2A 157713 24" Stretch "Old Ironsides"
1st Armored Div 6th Infantry Reg 3rd Infantry Bn Headquarters Company #161 rubigo in quo speramus - "In Rust we Trust" |
|
|
|
|
67charger
Member
Joined: 27 Sep. 2011 Location: Kentucky Status: Offline Points: 1272 |
Post Options
Thanks(0)
Quote Reply
Posted: 07 Apr. 2017 at 9:27pm |
|
Swaged lug on left and press in on right.
  The way I removed my swaged lugs was by grindingthe backs off in the drum then knocking them through with a punch. You can also hole saw the shoulder off and punch back down. If you buy the Geo tracker lines you can route them this way.  Edited by 67charger - 08 Apr. 2017 at 5:41pm |
|
|
|
|
67charger
Member
Joined: 27 Sep. 2011 Location: Kentucky Status: Offline Points: 1272 |
Post Options
Thanks(0)
Quote Reply
Posted: 08 Apr. 2017 at 11:21pm |
|
Conversion done.

|
|
|
|
|
Stev
Member
Sponsor Member Joined: 27 July 2016 Location: Cincinnati Status: Offline Points: 2384 |
Post Options
Thanks(0)
Quote Reply
Posted: 09 Apr. 2017 at 1:25am |
|
How much does the Geo Tracker break line cost? Might be the way to go over having them made up from scratch.
|
|
|
Stev
1946 CJ2A Trail Jeep (The Saint), 1948 CJ2A Lefty Restored |
|
|
|
|
Post Reply
|
Page <12345 17> |
| Tweet |
| Forum Jump | Forum Permissions You cannot post new topics in this forum You cannot reply to topics in this forum You cannot delete your posts in this forum You cannot edit your posts in this forum You cannot create polls in this forum You cannot vote in polls in this forum |


 Topic Options
 LesBerg wrote: