


|
|
|
How to upholster seats |
Post Reply 
|
Page 12> |
| Author | |
christophe Chevalet 
Member 

Joined: 08 May 2011 Location: France Status: Offline Points: 188 |
 Post Options Post Options
") Thanks(0) Thanks(0)
 Quote Reply Quote Reply
 Topic: How to upholster seats Topic: How to upholster seatsPosted: 05 July 2020 at 7:16pm |
|
Thanks for this interesting tutoriel.
I have a questions where did you found your upholstery? He is look like very closer than the original? Thanks and tale care Christophe
|
|
|
Willys CJ2A VEC VIN 12121 1946
Willys MB "Slat Grill"VIN 105879 1941 Willys Jeepster 673VJ VIN 10403 1950 Willys Pick-up 4WD 6-226 1960 |
|
 |
|
|
GloucesterBoy
Member

Joined: 11 July 2010 Location: Southern NJ Status: Offline Points: 280 |
Post Options
Thanks(0)
Quote Reply
Posted: 01 July 2020 at 2:19am |
|
Its been over a year nd you are still helping a brother! Thank you Unclemoak for the seat upholstering help. It was very helpful to me!! Regards    |
|
|
Jerry
'47 CJ2A #96661 |
|
|
|
|
GloucesterBoy
Member
Joined: 11 July 2010 Location: Southern NJ Status: Offline Points: 280 |
Post Options
Thanks(0)
Quote Reply
Posted: 01 July 2020 at 2:17am |
|
Its been over a year nd you are still helping a brother! Thank you Unclemoak for the seat upholstering help. It was very helpful to me!! Regards   
|
|
|
Jerry
'47 CJ2A #96661 |
|
|
|
|
unclemoak
Member
Joined: 06 Oct. 2018 Location: Englewood, CO Status: Offline Points: 352 |
Post Options
Thanks(0)
Quote Reply
Posted: 10 Jan. 2020 at 10:11pm |
I suppose you could use that. I think cardboard is used because it will flex a lot more than plywood. It’s really just meant to act as a barrier between the springs and foam so the foam doesn’t get cut by the springs.
|
|
|
|
|
ndnchf
Member

Sponsor Member x 2 Joined: 22 Sep. 2017 Location: Virginia Status: Offline Points: 2177 |
Post Options
Thanks(0)
Quote Reply
Posted: 19 Sep. 2019 at 2:30pm |
|
Great tutorial - thanks.
|
|
|
1948 CJ2A - It goes nowhere fast, but anywhere slow.
|
|
|
|
|
LuzonRed47
Member

Joined: 11 Apr. 2007 Location: Plymouth, MI Status: Offline Points: 842 |
Post Options
Thanks(0)
Quote Reply
Posted: 19 Sep. 2019 at 2:19pm |
|
How about using a thin sheet of plywood (sealed to protect against moisture) in place of the cardboard?
|
|
|
CJ2A #140275 "Ziggie" (purchased new by my dad in 1947)
ACM #124334 CJ3A windshield, Warn Overdrive 1953 Strick M100 trailer Serial #18253 |
|
|
|
|
Scratch
Member

Joined: 30 July 2019 Location: Hudson, WI Status: Offline Points: 1457 |
Post Options
Thanks(0)
Quote Reply
Posted: 19 Sep. 2019 at 1:52pm |
|
Did you sew the covers yourself, or did you purchase them somewhere?
Is cardboard really what they used? I'd think that moisture would be an issue and they'd use something else. Maybe not back in the 40's...?
|
|
|
43 GPW 93487 Blk
44 GPW 230283 OD 46 CJ2A 50100 Tan 46 CJ2A 77632 Wht 47 CJ2A 141681 Grn 48 CJ2A 156240 Red/Yel 48 CJ2A "Lefty" 181341 Red 61 CJ5 123120 Tan 03 TJ Inca Gld |
|
|
|
|
Willysaurio
Member

Joined: 21 Aug. 2019 Location: Colombiano Status: Offline Points: 51 |
Post Options
Thanks(0)
Quote Reply
Posted: 19 Sep. 2019 at 3:37am |
|
De que color es la tapiceria para un willys de color harvest tan?
|
|
|
|
|
mictat2214
Member
Joined: 12 July 2014 Location: long island Status: Offline Points: 93 |
Post Options
Thanks(0)
Quote Reply
Posted: 14 Feb. 2019 at 10:55pm |
|
Beauty job!! TU for explicit, easy to understand instructions.
|
|
|
|
|
drm101
Member

Joined: 12 Dec. 2012 Location: Clarkston, MI Status: Offline Points: 1471 |
Post Options
Thanks(0)
Quote Reply
Posted: 14 Feb. 2019 at 7:44pm |
|
Very nice, Thanks!
|
|
|
|
|
LuzonRed47
Member
Joined: 11 Apr. 2007 Location: Plymouth, MI Status: Offline Points: 842 |
Post Options
Thanks(0)
Quote Reply
Posted: 14 Feb. 2019 at 6:27pm |
|
Unclemoak, you are now the official SRG (seat restoration guru) of the 2Apage.com. Excellent step-by-step instructions, thanks!
|
|
|
CJ2A #140275 "Ziggie" (purchased new by my dad in 1947)
ACM #124334 CJ3A windshield, Warn Overdrive 1953 Strick M100 trailer Serial #18253 |
|
|
|
|
JeepFever
Member

Sponsor Member Joined: 07 Aug. 2012 Location: VA Status: Offline Points: 2753 |
Post Options
Thanks(0)
Quote Reply
Posted: 14 Feb. 2019 at 4:47pm |
|
WOW! That is an excellent write-up !!
Hope to do seats for my '3A one day . . this will help a lot. THANKS!!
|
|
|
|
|
Gil
Member

Joined: 29 July 2016 Location: N.B.Canada. Status: Offline Points: 975 |
Post Options
Thanks(0)
Quote Reply
Posted: 14 Feb. 2019 at 1:41pm |
|
Well done Dave.Thanks for posting.

|
|
|
1946 cj2a 59108
1998 Jeep Cherokee 2 doors 2016 Jeep Cherokee TrailHawk |
|
|
|
|
mbullism
Member
Sponsor Member x 4 Joined: 29 May 2015 Location: MA Status: Offline Points: 4785 |
Post Options
Thanks(0)
Quote Reply
Posted: 14 Feb. 2019 at 11:05am |
|
This is on my to do list so your efforts are appreciated and timely

|
|
|
Those who do not learn from history are doomed to repeat it... Welcome to 1930's Germany
|
|
|
|
|
berettajeep
Member

Sponsor Member Joined: 03 Feb. 2009 Location: Astoria OR Status: Offline Points: 4304 |
Post Options
Thanks(0)
Quote Reply
Posted: 14 Feb. 2019 at 5:33am |
|
Fantastic write up!
 Thank you for doing this. Thank you for doing this. |
|
|
|
|
TateC
Member

Joined: 23 Feb. 2018 Location: SLC, Utah Status: Offline Points: 510 |
Post Options
Thanks(0)
Quote Reply
Posted: 14 Feb. 2019 at 4:59am |
|
Thank you for making the effort to put all this information together. I imagine this will be great help to many jeepers.
|
|
|
Tate Christensen
1941 Ford GP #9687 1943 Willys MB #263100 1944 Ford GPW #234613 1945 Willys CJ2A #10226 |
|
|
|
|
unclemoak
Member
Joined: 06 Oct. 2018 Location: Englewood, CO Status: Offline Points: 352 |
Post Options
Thanks(0)
Quote Reply
Posted: 14 Feb. 2019 at 4:47am |
|
Final Product
The seats ended up coming out great. I was pretty pleased with the results. They were firm, but comfortable, didn't have any wrinkles or lumps, and looked great. 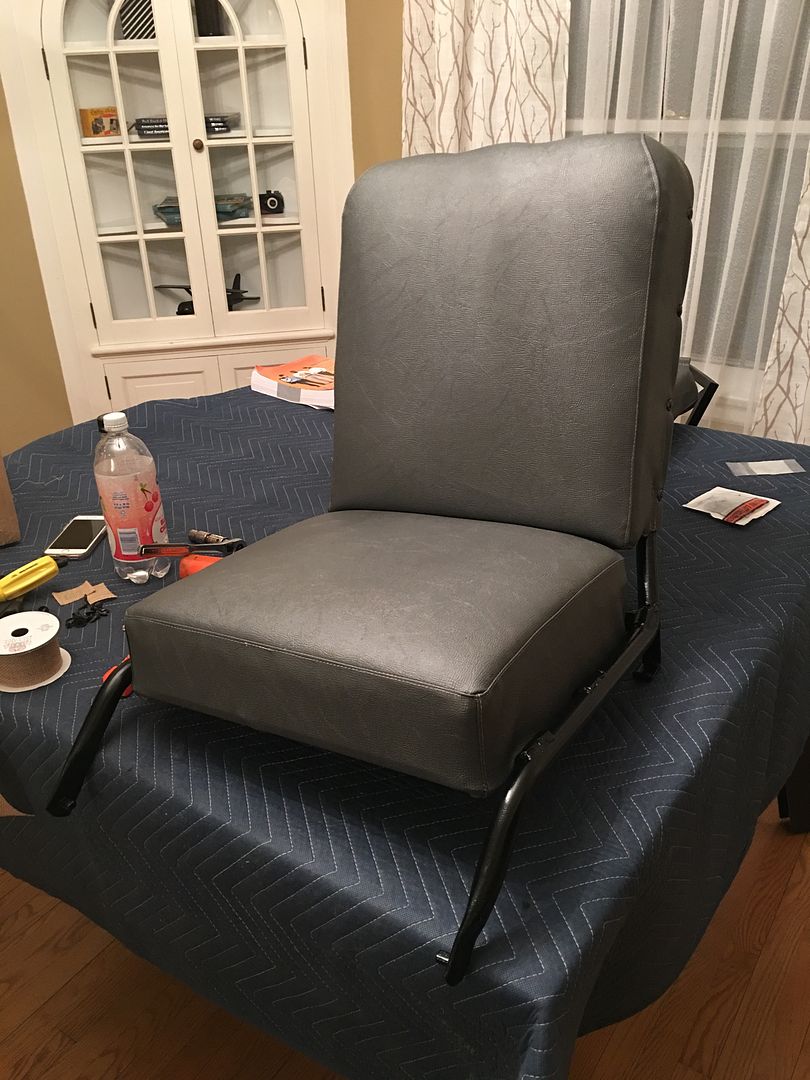 Of course I couldn't wait to get them back in the jeep as I had been driving around sitting on the gas tank for the last few days.  Edited by unclemoak - 14 Feb. 2019 at 4:49am |
|
|
|
|
unclemoak
Member
Joined: 06 Oct. 2018 Location: Englewood, CO Status: Offline Points: 352 |
Post Options
Thanks(0)
Quote Reply
Posted: 14 Feb. 2019 at 3:40am |
|
How to install the Back Rests
The back rests were a little more challenging than the seat pans. I quickly learned that I might have used foam that was a little too thick because my seats were somewhat over stuffed and I have to compress everything to get the screws in. 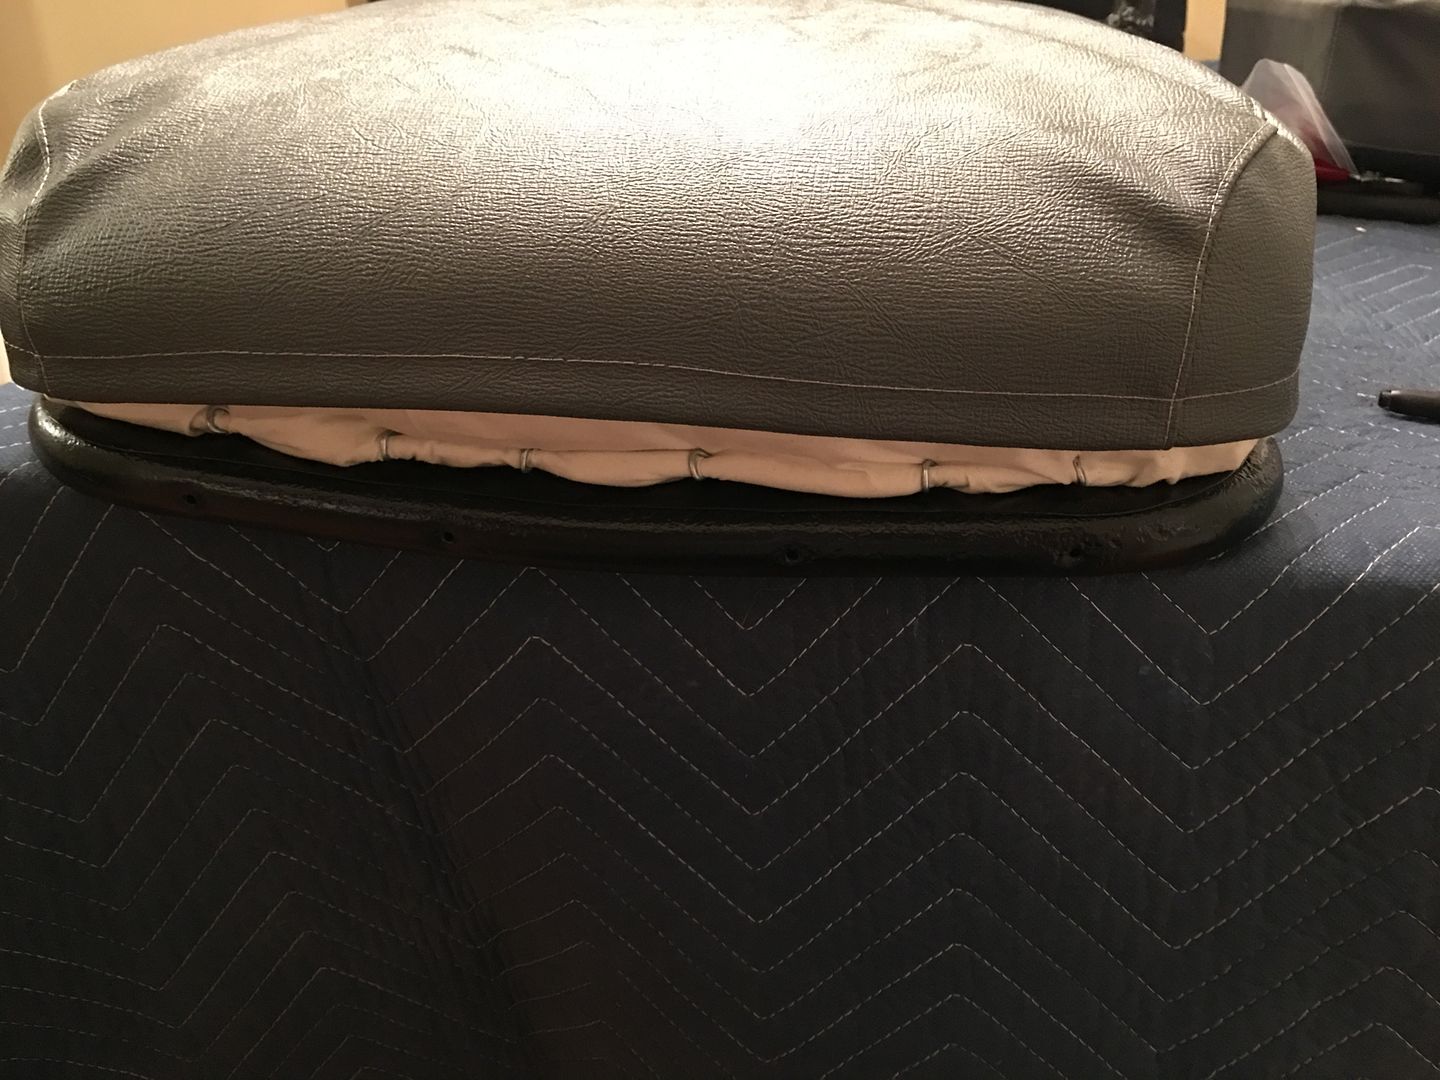 This first step was marking the two center hole locations at the top of the back rest. This helped figure out about where to start the screw. I made sure to put the screws equal distant from the edge of the cover and the stitching. 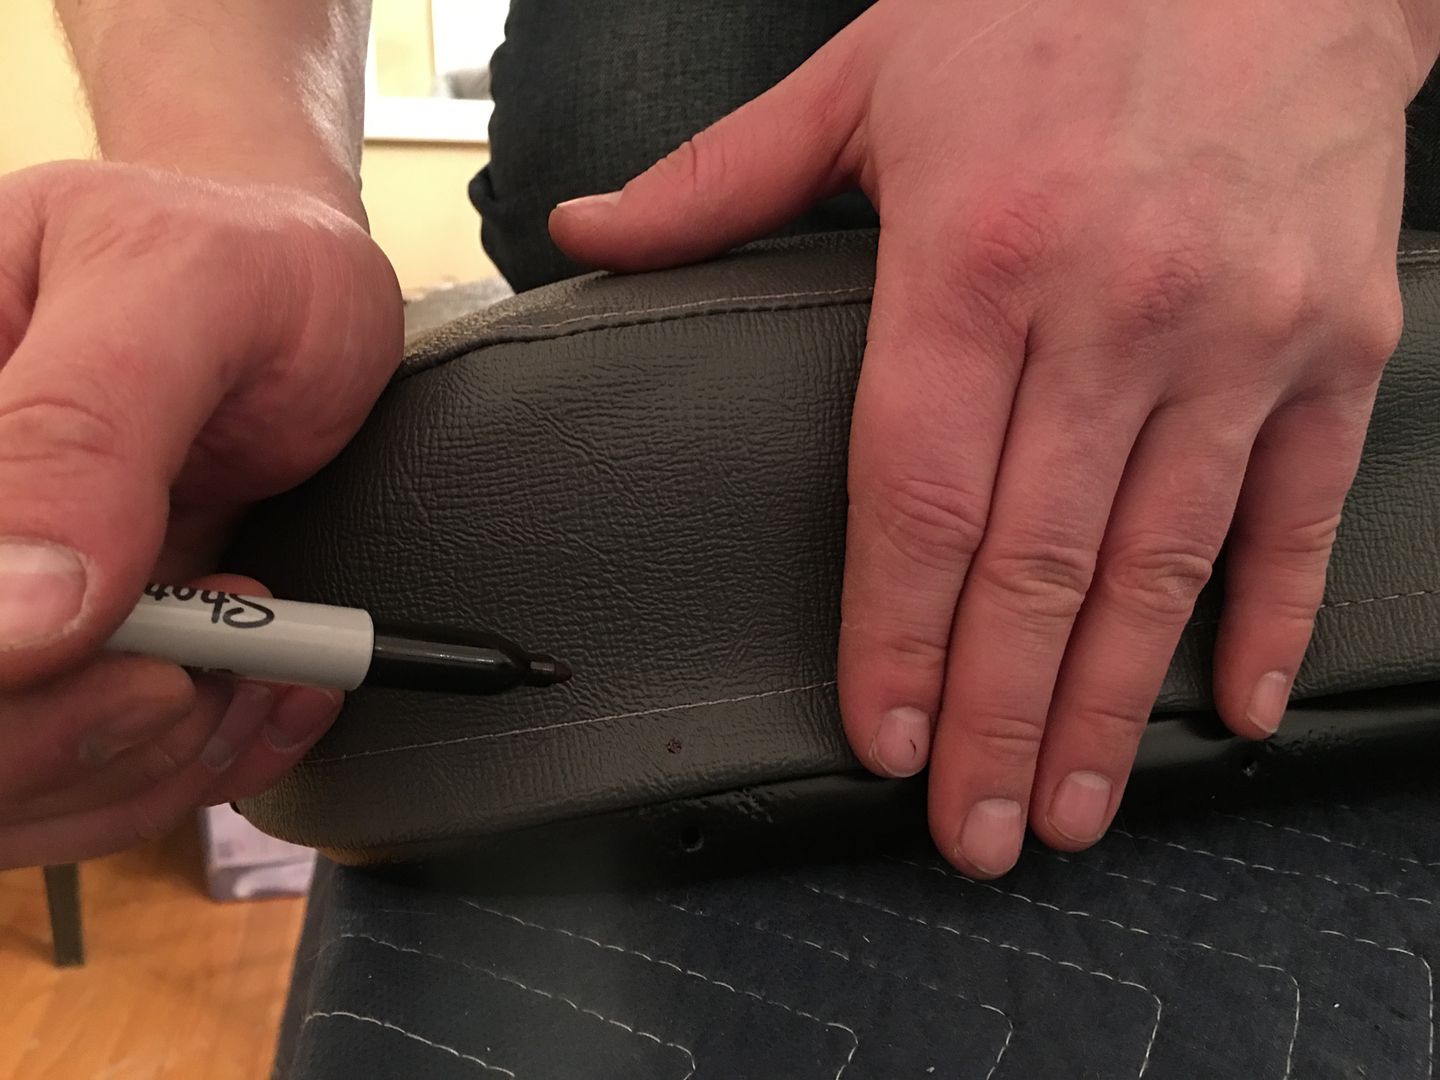 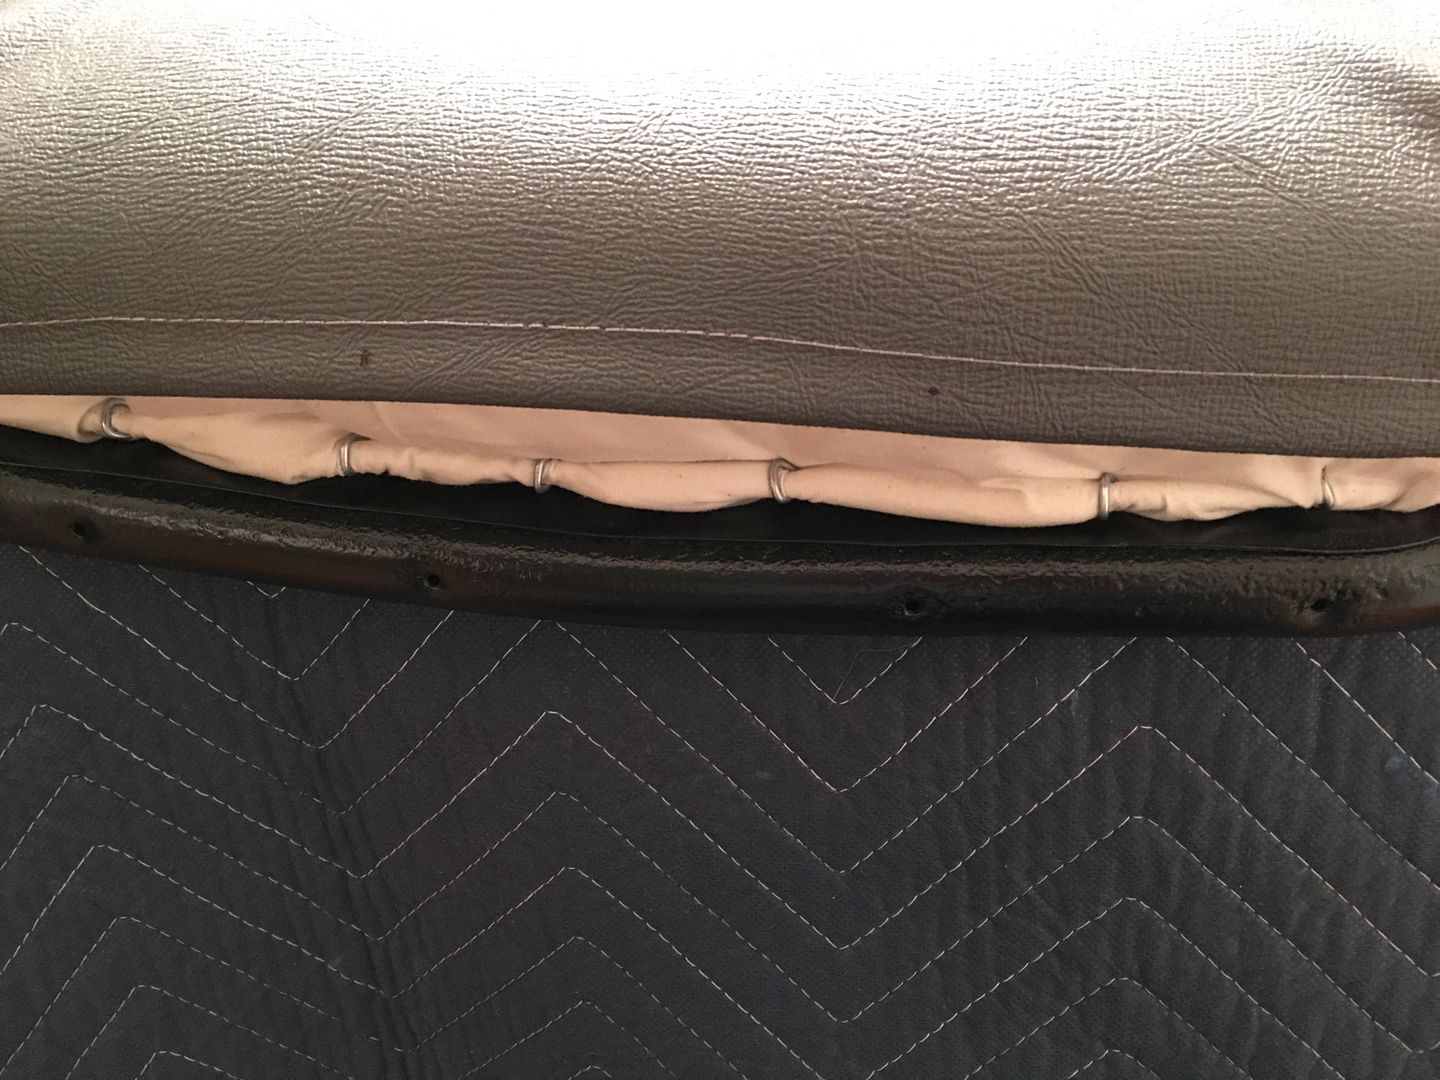 Next was starting the screws back hand through the cover. 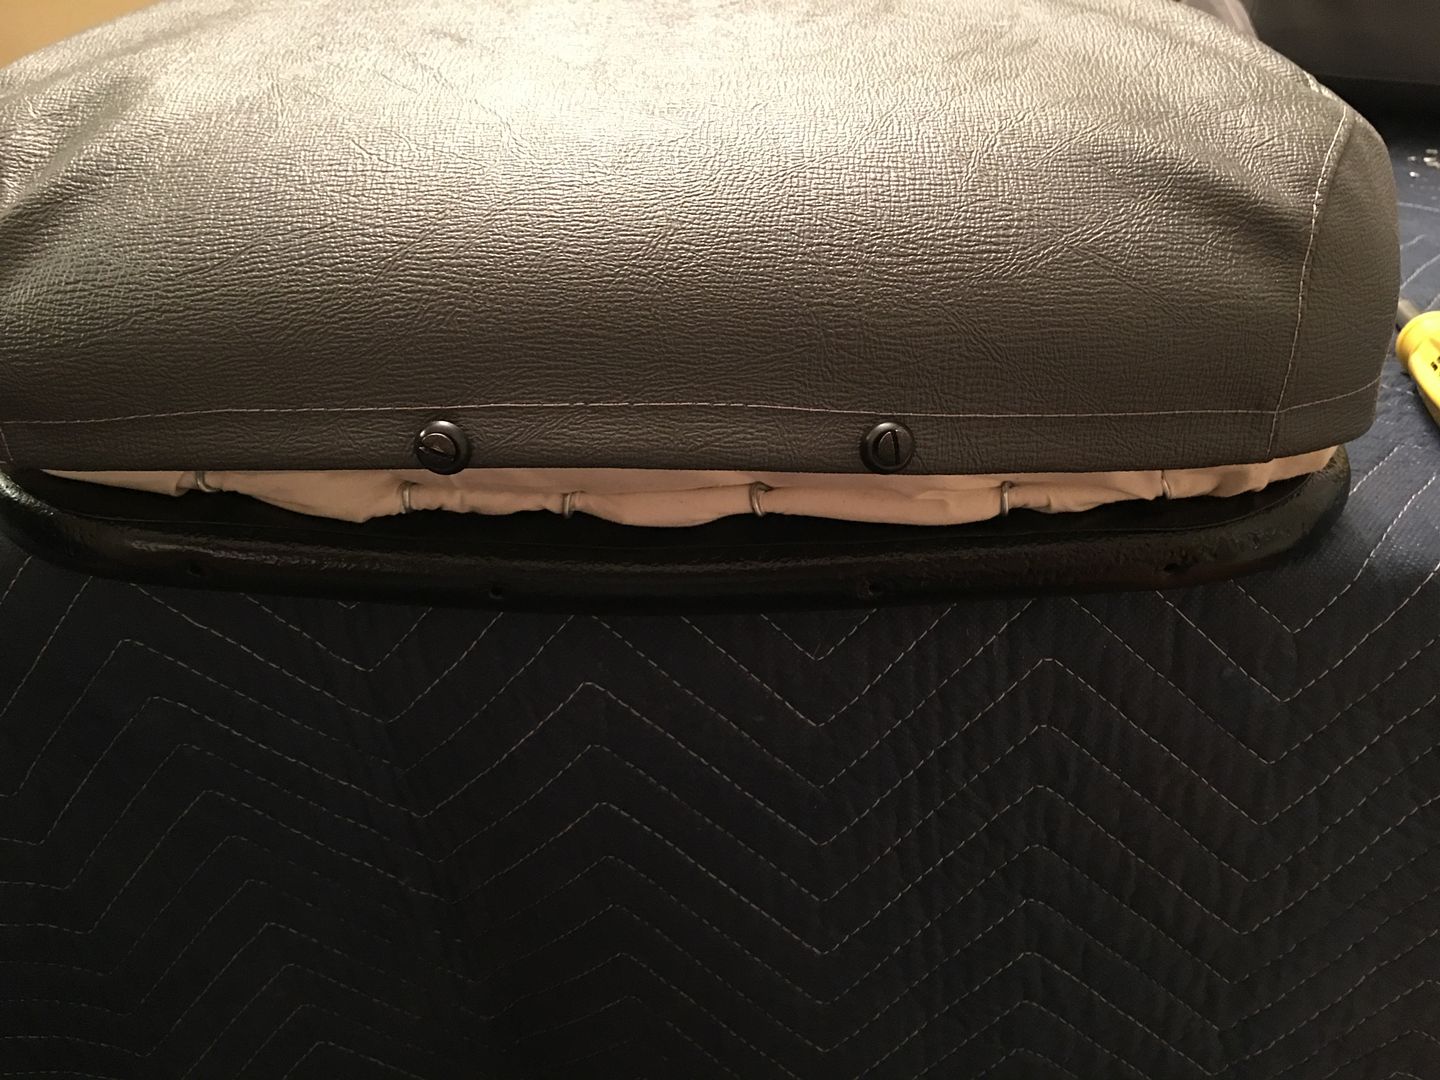 Followed by compressing the foam, while my helper turned in the screw 90% of the way.  I used this same pull taunt, mark, and screw technique all the way down the side being sure to pull the cover snug as I went so there were no ripples and any excess fabric was at the bottom. 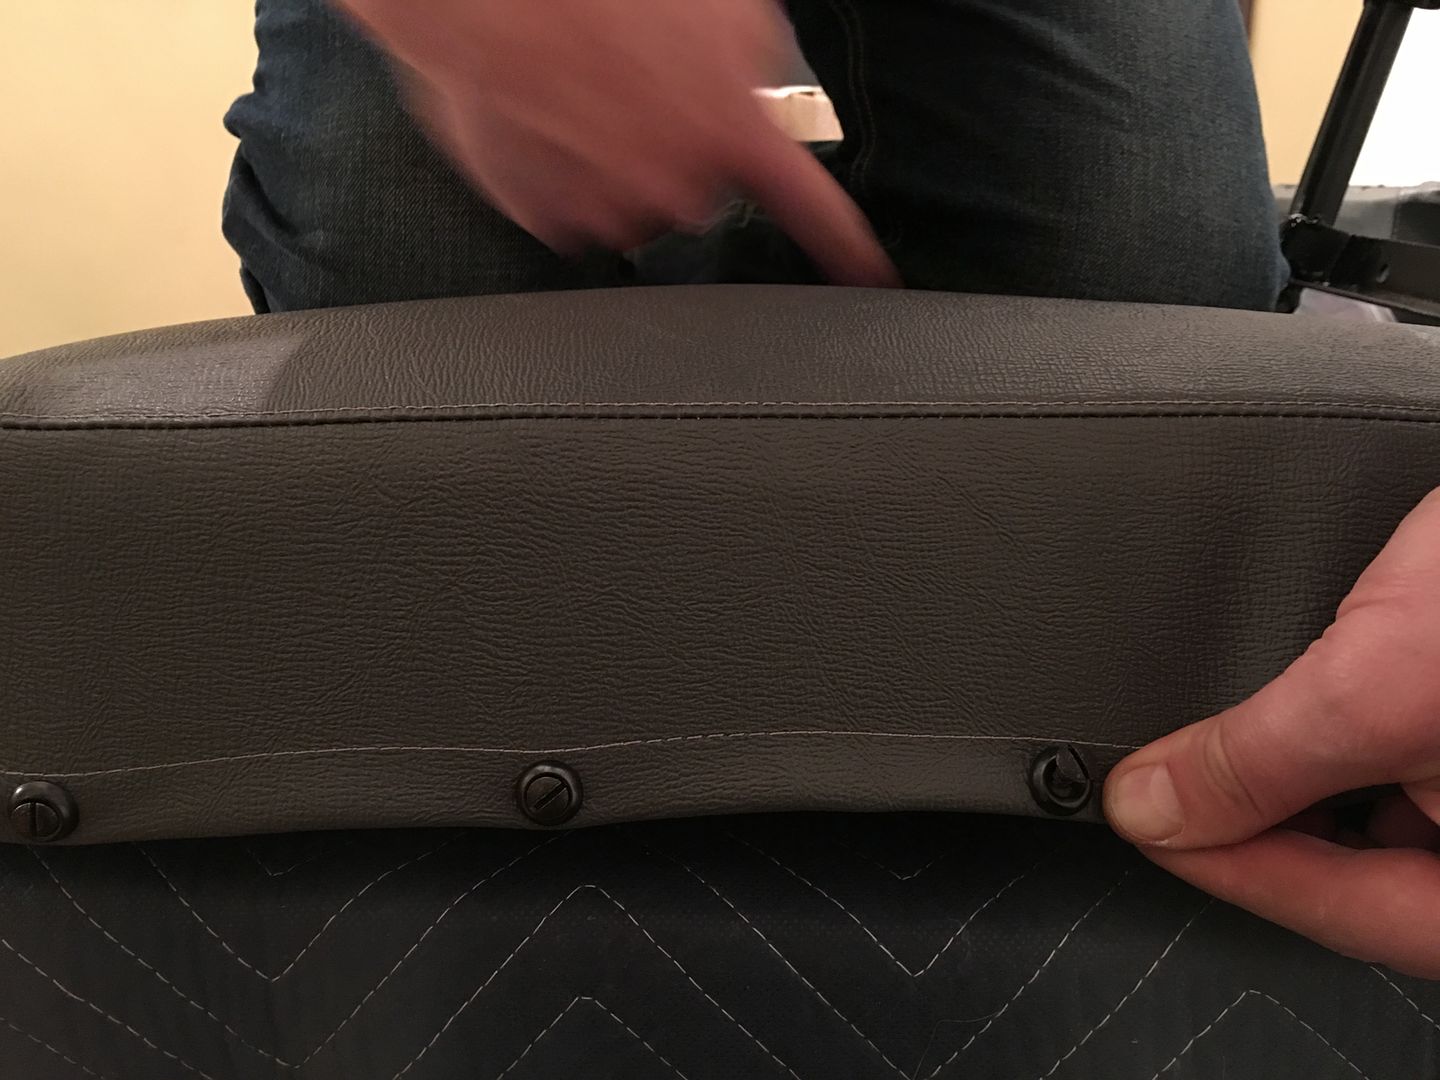 To take some of the tension off the cover, I would compress the foam as my helper tightened the screw. 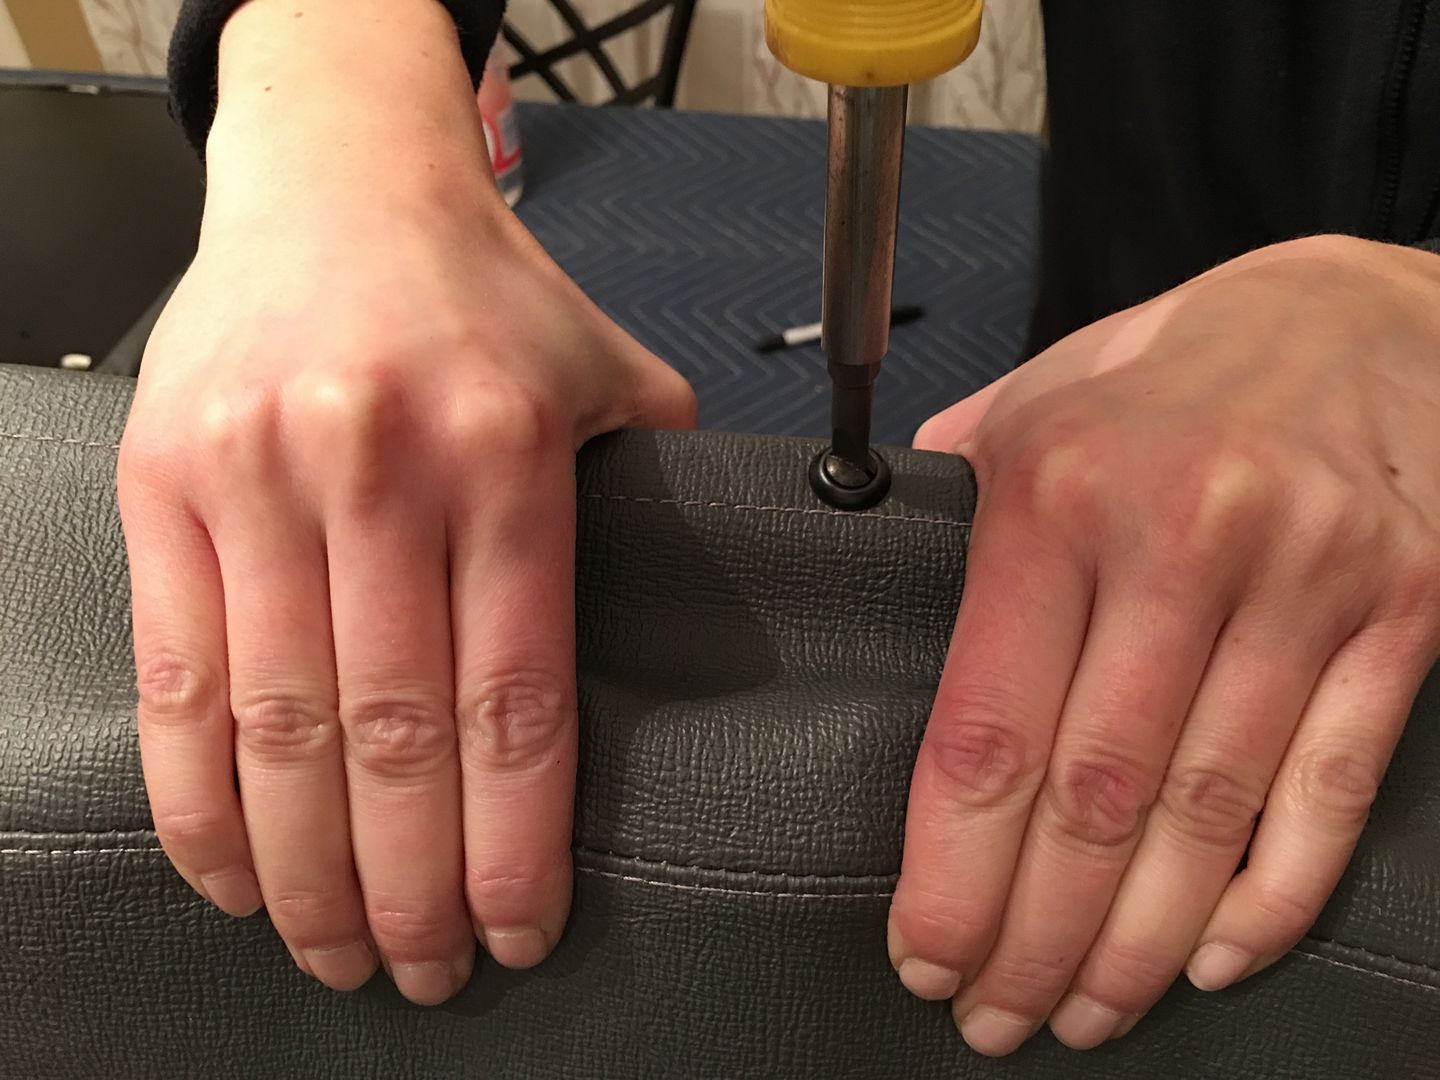 Once all the screws were in, I went back and tightened all the screws. Edited by unclemoak - 14 Feb. 2019 at 4:47am |
|
|
|
|
Post Reply
|
Page 12> |
| Tweet |
| Forum Jump | Forum Permissions You cannot post new topics in this forum You cannot reply to topics in this forum You cannot delete your posts in this forum You cannot edit your posts in this forum You cannot create polls in this forum You cannot vote in polls in this forum |


 Topic Options
 LuzonRed47 wrote: