|
|
|
1990 Willys MB Jeep - Mahindra based |
Post Reply 
|
Page <12 |
| Author | ||
DAAN 
Member 

Joined: 02 Jan. 2019 Location: UK Status: Offline Points: 43 |
 Post Options Post Options
") Thanks(0) Thanks(0)
 Quote Reply Quote Reply
 Posted: 22 Mar. 2021 at 9:09pm Posted: 22 Mar. 2021 at 9:09pm |
|
|
Hi all, getting
back on this project again. I have started with to me the most interesting
part of this project; the chassis modifications. Starting with the springs. I
want to stay with leafs in the interest of keeping it real, but the original
spring packs were in a bad state. New ones are available as you all know, but that would be too
easy; I wanted something a bit more 21st century, basically. Parabolic
springs are all the rage over here, giving a much softer ride due to reduced friction, having fewer leaves, so
that was what I was looking for. To my knowledge, these are not available for the willys jeep,
so I am into adapting something. Land rover aftermarket para’s were an obvious
choice, and it turns out the front springs of a landy are identical in length
compared to A willys jeep spring. That was too hard to miss obviously, but the
rear spings were harder; I have been looking at just about every parabolic
spring available, but nothing was quite right. Then A car set of rocky mountain
springs appeared on the bay, which I snapped up, mainly for the front springs. I
did offer up the rears as well, and with some measuring, I decided, they are
going on too. The rear springs were original 3 leafs, but I removed 1 leaf out
of them, turning them into 2 leaf springs. Parabolics
vs. the rustbuckets:
Mounting
them was not straight forward; I made use of the existing (rivet) mounting holes
on the chassis. Although the front springs are the right length, they are not
the same width, 2.5” as opposed to 1.75” of the Jeep, so still won’t fit. For the
fixed points, I designed a bracket in CAD, that I got made by a local offroad prep shop called blackbird industries;
Mike Brown did a great job turning my drawing into reality, Cheers Mike:
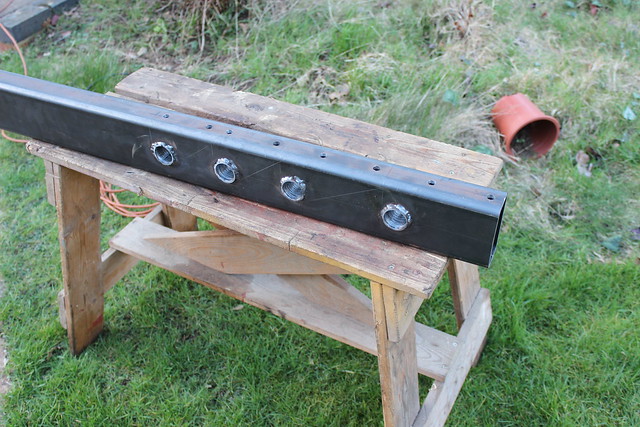
The shackle
ends I made myself. I drilled a load of holes in a 100 x 50 x 5 box section, then
welded the tubes in:
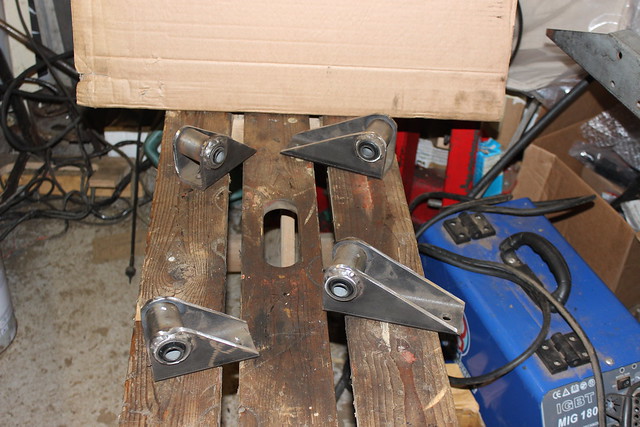
A few
grinding discs later, I had 4 shackle hangers:
Mounting the front was easy, the brackets being bolted to the original holes on the chassis. The rear was more interesting, the springs being about 5” longer:
The front
hanger for the rear spring uses one original hole, effectively move the bracket up to the next
hole. and one new drilled hole, using the bracket as a drill jig:
The rear
hanger uses the 2 original holes, as well as the hole used to bolt the rear crossmember
in place:
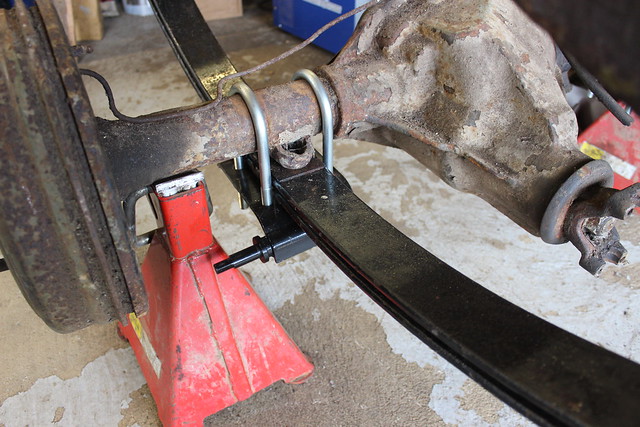
Next problem is mounting the springs to the axles. The rear was straight forward using of the shelf parts: Due to the wider springs, you cannot use the original spring plates any more, so I got Jeep CJ7 spring plates, which have 2.5” springs as well. The U bolts also won’t fit, as the spring packs are half the thickness compared to the original springs. So I found some aftermarket jeep U-bolts, that have more thread on them.
The front
was more complicated. I bought CJ7 front spring plates too, but they did not
fit, as they have narrower springs at the front (I had assumed the fronts on a CJ7 were 2.5" as well). There is also a clashing problem
with the shock absorber. I improvised for now with some wooden battings, but
are going to have to make new spring plates for this to work. Heavy duty
shackles are also in the works.
The springs
are compressing quite a bit when I put my weight on them, which is better than
the original ones, being rusted together solid.
I keep an
open eye out on how the ride will be, the Mahindra is obviously lighter than
the land rover they are meant for (about 150kg lighter), so we will see.
Thanks for
reading,
Daan |
||
|
1990 Mahindra
|
||
 |
||
|
TateC
Member

Joined: 23 Feb. 2018 Location: SLC, Utah Status: Offline Points: 510 |
Post Options
Thanks(0)
Quote Reply
Posted: 22 Mar. 2021 at 11:28pm |
|
|
Thanks for giving us an update. Very interesting read.
|
||
|
Tate Christensen
1941 Ford GP #9687 1943 Willys MB #263100 1944 Ford GPW #234613 1945 Willys CJ2A #10226 |
||
|
||
|
DAAN
Member
Joined: 02 Jan. 2019 Location: UK Status: Offline Points: 43 |
Post Options
Thanks(0)
Quote Reply
Posted: 01 May 2021 at 4:05pm |
|
|
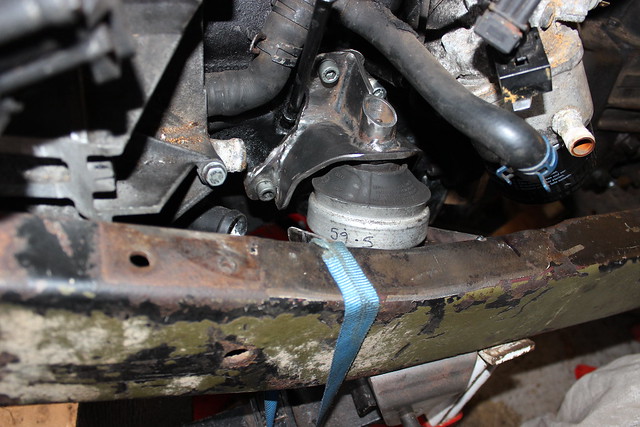
Some progress has been made on my Mahindra; I fabricated the steering box mount. The box I use is LHD P38 steering box. The shape of this box fitted inside the engine bay, so not visible from the outside. I started by welding the crush tubes directly to the chassis:
Which was then boxed in with 5mm plate:
I put a fold on the inside for extra strength:
Box mounted, it is slightly angled backwards, this was done to avoid a clash with the track rod at full compression: : There is enough clearance for the diff going upwards: I have left the mount tack welded for now, as there is also a shock absorber mount to consider as well as a radiator and battery mount. This way i can still make modifications easily. Thanks for reading! Daan |
||
|
1990 Mahindra
|
||
|
||
|
DAAN
Member
Joined: 02 Jan. 2019 Location: UK Status: Offline Points: 43 |
Post Options
Thanks(0)
Quote Reply
Posted: 12 Dec. 2021 at 4:00pm |
|
|
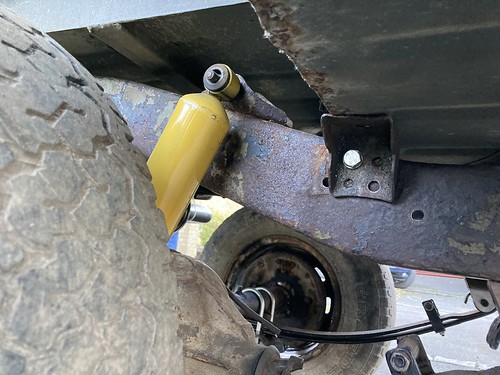
Hallo, here we are again, only 8 months since the last update! Live got in the way from spending time in the garage, but finally I am back on it. After fitting the springs, shock absorbers was the next logical thing to nail down. With the reduced friction in the spring packs, the job of the shock absorber has become a lot more important. In this application, gas pressure shocks are usually advised. I used Monroe gas magnum in Jeep cj5 fitment. They are available in many lengths, so I choose the ones which worked with the increased height of the parabolic springs. They get a good write up usually, and they still have the old fashioned metal dust covers, which mean they will look stock once painted army green. (This idea I got off JPET in his universal modified story, as well as the original idea for my Project). The rears were easy to fit, using the original top mount and the CJ7 spring plate with mounts at the bottom:
The fronts were more involved, on the right hand side there now a is a PAS box in the way. Conveniently, the front top crush tube is virtually in the correct position for the shock absorber mount, as well as the right diameter. So I removed the previously made crush tube and replaced it with a longer version, and a turned spacer was added to space the shock away from the chassis (glad I only tack welded the pas box mount!):
The other side has a clash issue with the wing, so I fabricated a new mount, identical to the original willys jeep:
Mounted, the shocks look like this:
The forward top PAS box bolt, now has 2 jobs: holding on the PAS box, and mounting the shock.
Lh side, the spring plate problem for the front axle was also solved with rear Jeep CJ7 spring plates. You may have noticed my shiny new front axle: I managed to buy a narrow Dana 30 front axle from a Jeep CJ5. It came about cheap locally with a 4.27 ratio, which is what I am planning to use, replacing old the 4.88 ratio. It also had freewheel hubs fitted. So buying this means I only need to change the rear axle ratio, and therefore saved me money (Man maths at its best!):
I am glad I found this axle, Jeep parts like this are not a common thing to find in the UK. Thanks for reading! Daan |
||
|
1990 Mahindra
|
||
|
||
|
DAAN
Member
Joined: 02 Jan. 2019 Location: UK Status: Offline Points: 43 |
Post Options
Thanks(0)
Quote Reply
Posted: 28 Nov. 2022 at 5:10pm |
|
|
Hi, here we
are again with a (long overdue) update. So here we are, nearly a year later, I have something new to show; I decided to have a clear out of
my garage by mounting parts to the chassis, starting with the largest lump,
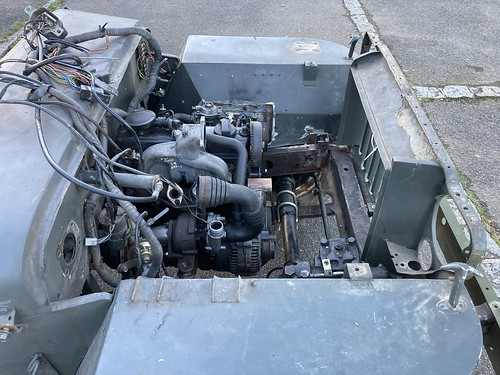
engine and gearbox. Now I have the body, I could take measurements to check for
any potential clashes with the VW TDI. It shows that the Mahindra is different
in a few areas to the Willys body I have. The gearbox is mounted further backwards
compared to the Willys, and is also longer, it being a 4 speed. As a result,
the engine rocker cover flange of the VW has no clearance to the bulkhead, and
the gear stick does not line up with the hole in the tunnel. More interesting
things are happening once I tried to fit the prop shafts; They are too short.
The rear by about 5mm, which is the result of the parabolic springs drooping
much further due to them being quite soft. (This is all done with the axles
hanging of the springs). The front prop was more worrying, as it somehow was
too short by about 1 inch. After some measuring, it appears the Dana 30 diff I use
is 1” shorter than the Dana 27 it replaced. So, a few problems
to think about (plus many more, but for another time). After some head
scratching, I decided best solution is to move the engine and box forward by
about 30mm solving all these problems. It will need a longer rear prop, which
is a good thing, as the Mahindra one is very short, resulting in unhealthy
U/J angles at full droop. The U/J’s are Identical to Defender ones, so it should
be easy adapt a defender prop (easy to get in the UK). With the location decided on, I could start fabricating engine mounts. I am using the original Hydraulic mounts that came with the engine (It is a 1.9 TDI 110 out of a Passat B5, engine code AFN). I am mimicking the original setup of the Passat, apart from the Engine lying on its side in the Passat by about 30 degrees, where I fit it in the upright position in the Jeep. The included angle of the AV mounts is about 45 degrees in the Passat, which I maintained in my mount arrangement. The chassis brackets are made out of 100 x 100 x 5 mm box section, like this:
The engine brackets were made out of 5mm plate, like this:
All
mounted, it looks like this, RH side: LH side:
Engine looks
at home in the chassis: Thanks for reading! Daan Edited by DAAN - 28 Nov. 2022 at 5:14pm |
||
|
1990 Mahindra
|
||
|
||
|
LuzonRed47
Member

Joined: 11 Apr. 2007 Location: Plymouth, MI Status: Offline Points: 842 |
Post Options
Thanks(0)
Quote Reply
Posted: 29 Nov. 2022 at 8:35pm |
|
|
Yours is a logical approach to an interesting build, Daan. Thanks for sharing and keep the progress reports coming!
|
||
|
CJ2A #140275 "Ziggie" (purchased new by my dad in 1947)
ACM #124334 CJ3A windshield, Warn Overdrive 1953 Strick M100 trailer Serial #18253 |
||
|
||
|
DAAN
Member
Joined: 02 Jan. 2019 Location: UK Status: Offline Points: 43 |
Post Options
Thanks(0)
Quote Reply
Posted: 20 Apr. 2023 at 11:39am |
|
|
Here we are
again, with an update; it took a while, but I spent a lot of time to get to
this point: With the
engine mounted, there are still a few things to sort out to make this engine
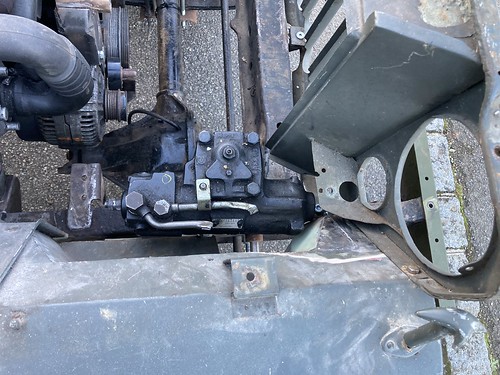
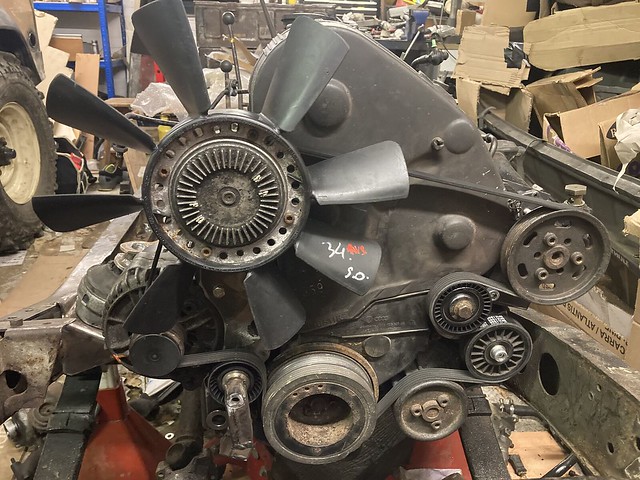
work in the jeep. There are some serious clashing problems with the LH chassis
rail to the oil filter, the alternator, the PAS pump and the viscous fan.
Neither are of these are easily solvable, they are proper train crash stuff. The Oil
filter problem was solved by changing the filter for a shorter one, of a Opel Omega V6; it is about half the length of the VW one, at the expense of
a non-return valve and an overflow valve. It now clears the chassis rail with
some distance:
And this is
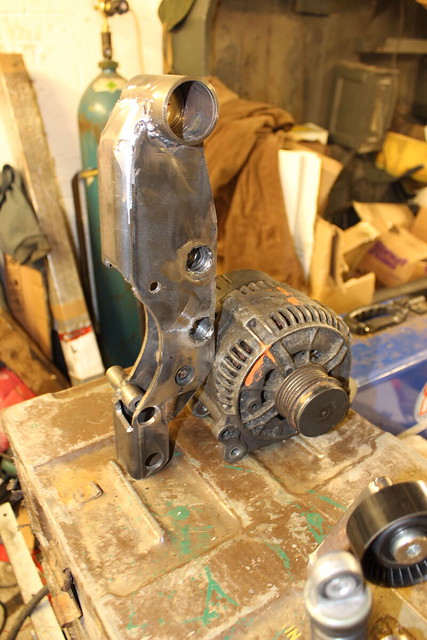
where the simple solutions ended: the other problems had to be solved by moving
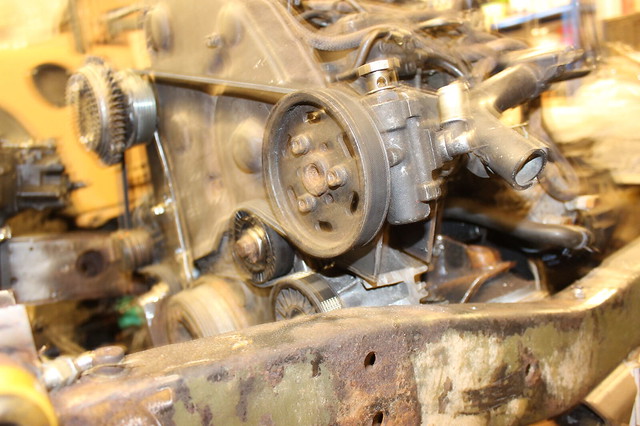
parts to other places. The alternator had to move to the RH side of the engine,
in the space for the AC pump, and the PAS pump moved upwards to clear the
chassis rail, and essentially in the position where it sits in the Golf. A
bracket was made up soon enough for the PAS pump:
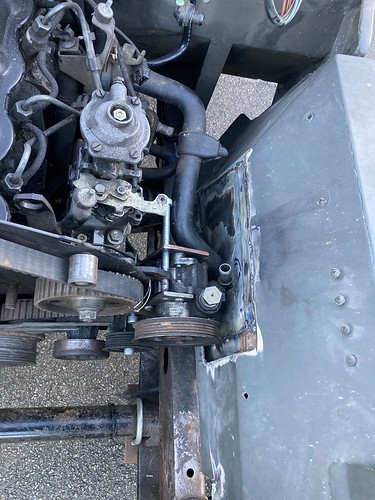
On the RH
side a bracket was made up to hold the alternator, and I searched for ways to
move the viscous fan as well. I much prefer the viscous over an electric fan
for an off road vehicle. All this then need some form of tensioner as well,
since the original one now does not work in its position where it is. I
Essentially had to re-designing the accessory drive, and this is where it went
very quickly from ‘how hard can it be’ to the one problem that kept me awake at
night. There is only one place where the tensioner can be, which is next to the
crank pulley at the unloaded part of the belt. In this position, it also
increases the belt wrap around the crank pulley and the alternator pulley.
Several automotive tensioners were tried, but none of them looked like I could
get to work. The clock spring is usually massive, and there just isn’t the
space required. Then I looked at linear spring versions. The Mondeo MK3 diesel
tensioner is the one I went with. The dimensions of the arm aren’t quite right,
but I used the spring, the pulley and the bearings of this and fabricated my
own version of tensioner arm:
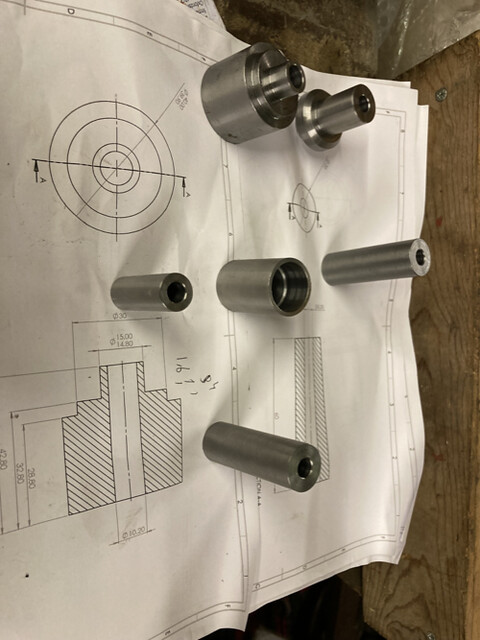
There were quite a few turned parts needed,
this I got done to my drawings by Darren at Bushes2U.com. His work was spot on,
well recommended: The
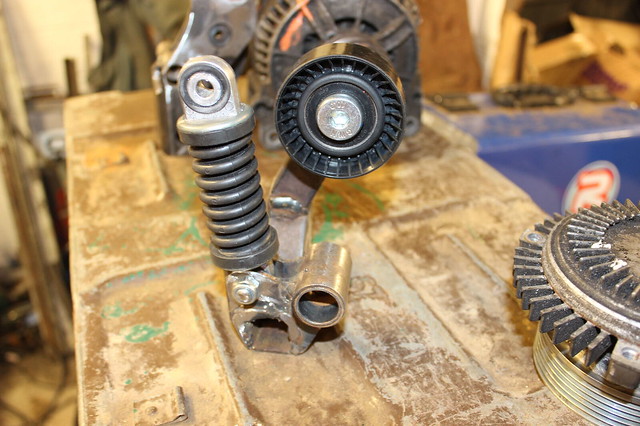
alternator, tensioner and viscous fan bearing are all incorporated in this
fabricated bracket: All
assembled it looks like this: Mounted to
the engine:
On the
engine, anti clock wise from the crank pulley, there is the water pump pulley,
an idler pulley (was the location of the viscous fan), another idler pulley
(old tensioner, changed to a ribbed pulley), pas pump, and viscous fan shaft.
The viscous fan used to be driven by the smooth side of the belt, but in this
position, it gets driven by the ribbed side of the belt. This means 2 things;
the pulley needs changing for a ribbed pulley, and the rotation is now the
opposite way. I solved the ribbed pulley problem by using a Ford Fiesta ribbed
pulley, welded to the old pulley and I swapped the fan for a version of the VW
Passat with a petrol engine which is designed to turn the opposite way. This fan bolts on the diesel viscous coupling. Last but not least, a longer belt finished the job. Regards, Daan |
||
|
1990 Mahindra
|
||
|
||
|
DAAN
Member
Joined: 02 Jan. 2019 Location: UK Status: Offline Points: 43 |
Post Options
Thanks(0)
Quote Reply
Posted: 08 Sep. 2023 at 5:15pm |
|
|
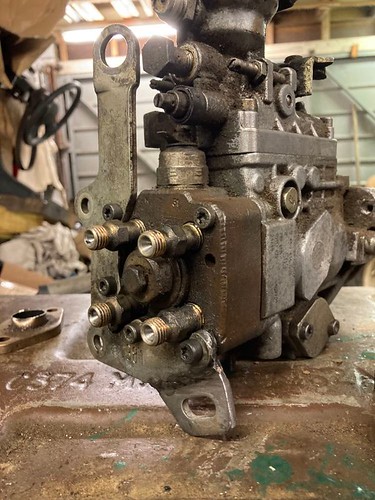
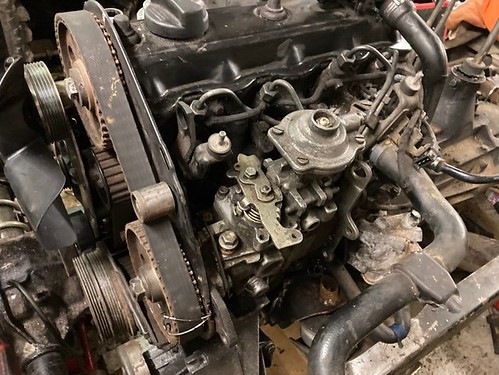
Time for an update: I did a bit more engine related stuff on the Jeep; The VW TDI engine came into my possession without an ECU. This, and the fact that I am useless with electronics made me decide to run the engine without any electronics. You can replace the pump on this engine for a mechanical injection pump. This is called an M-TDI in VW circles. The pump I use comes from a Land rover 300 TDI which has similar power output to the VW. To fit it to the VW engine, a few mods are needed: the VW pump bracket needs slots so you can rotate the pump to set the timing, and the centre bore diameter needs taking out from 50mm to 68mm. So I took the bracket to the machine shop: I fitted an 8mm cutter tool to my router and create the slots. The 50mm hole saw is a tight fit in the 50mm bore, so I clamped it to the router to use this as the fulcrum.
Once the slots are done, I opened the centre bore. You can fit 2 hole saws to one arbore and so the 50mm hole saw was the guide for the 68mm hole saw to cut a hole in the centre of the bracket.
Bracket
modified:
Also the bracket on the back of the pump for the 4th bolt need
modifying to fit to the land rover pump. I ended up sandwiching the VW bracket
with the land rover throttle cable bracket. Also, the delivery valves on the
back of the pump need to be swapped for the VW ones, as the land rover valves
are much longer:
With the ECU not present, I also needed to make a mod to the turbo. It is a VNT turbo, or Variable Nozzle Turbine. This is normally operated by vacuum through a box of tricks by the ECU. I converted
it to pressure activation using a wastegate actuator. The one I got is a Forge
motorsport piston actuator. This can be taken apart and you can change the
spring for a different stiffness to set the characteristics of the Turbo. The
usual purpose for this is to increase the turbo pressure, here it is to set up
the VNT. I got the actuator with a box of springs, so plenty of scope to setup
the turbo correctly. The most
bling part on my jeep so far: I also
rotated the turbine housing to point upwards, to help the routing of the intake
pipe. While at
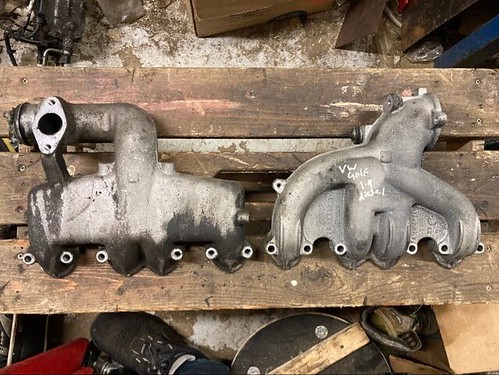
this side of the engine, I replaced the inlet manifold for a Golf version. The Passat
intake manifold points to the rear of the car, the Golf version points to the
front. The manifold came from the BRM code golf engine, this has the best flow
rate of all the TDI manifolds made by VW (an American tuning specialist flow bench
tested all the manifold options, and the BRM version came out as best.) Lh Passat AFN, Rh Golf BRM
All done, it looks like this:
Thanks for reading! Daan |
||
|
1990 Mahindra
|
||
|
||
|
DAAN
Member
Joined: 02 Jan. 2019 Location: UK Status: Offline Points: 43 |
Post Options
Thanks(0)
Quote Reply
Posted: 08 Oct. 2023 at 5:24pm |
|
|
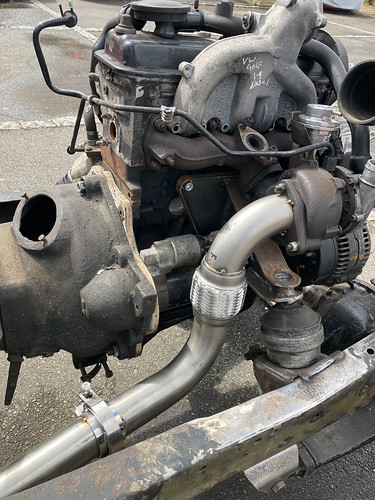
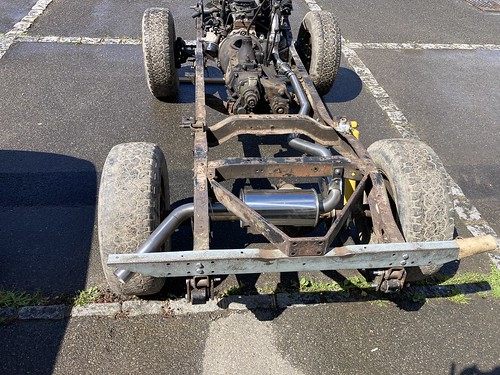
Time for an
update: with the body still off and the turbo mounted, the exhaust was the next
logical thing to do. A stainless
exhaust is the done thing here appropriately sized to the engine. I went with
2.1/4” size tube, one size up from the 2” that the VW Passat has. I have previously
done a stainless exhaust on my Landy, using individual bends and straight
sections welded together to form a fabricated exhaust. It works ok till this
day, but I always thought there must be a better way to do this, as you do end
up with a lot of welded joints. So I was looking to get an exhaust bent up. To
do this I needed to get coordinate points measured in 3D space. I started a
mock up exhaust with some leftover tube:
Ghetto fab
at its best basically, but this was perfect to decide where the tubes need to go. From here I
could measure the intersection points of the centre lines in 3D: I used the
gearbox mounting face as my X=0 datum, the outer edge of the RH chassis rail as
my Y=0 datum, and the garage floor as my Z=0 datum. From this I could measure
with a tape measure the X,Y,Z coordinates of the centre line intersections. Once
I had these points I had to do a shift of the coordinates so the first
coordinate point is 0,0,0. Next I drew
this on CAD to visualize how it would look. This is not strictly necessary, but
is good to make sure you do not design something that can not be made. There is
a certain amount of minimum straight length required between bends, I had to do
a few adjustments in my design to achieve this. CAD:
Drawing:
I got a
company appropriately called tube bender to do the work: This turned
up in the post a while later: They did a great job to turn my drawing into reality; the bent tube came out spot on and fitted like a glove. A 12 x 6”
silencer, flexible join and V-band clamps were bought of Exhaust parts UK: Mounting
was a doddle, and very little workshop time was needed to get it fitted:
Pleased
with the result, bending up a tube like this was cheaper than buying the
individual bends and straights, and looks a bit more factory.
Thanks for
reading! Edited by DAAN - 08 Oct. 2023 at 6:00pm |
||
|
1990 Mahindra
|
||
|
||
|
dasvis
Member

Sponsor Member Joined: 07 Sep. 2019 Location: Salem, Oregon Status: Offline Points: 1550 |
Post Options
Thanks(0)
Quote Reply
Posted: 08 Oct. 2023 at 6:50pm |
|
|
What is a "doddle"?
|
||
|
1947 CJ2A #88659 "Rat Patrol"
1953 CJ3A #453-GB1 11266 "Black Beauty" 1964 Thunderbird convertible ..... & one of them moves under it's own power!! |
||
|
||
|
rocnroll
Member
Sponsor Member Joined: 20 July 2005 Location: Tuscumbia, AL Status: Offline Points: 13612 |
Post Options
Thanks(0)
Quote Reply
Posted: 08 Oct. 2023 at 10:00pm |
|
|
Doddle noun......"a very easy task"
|
||
|
'47 CJ2A PU
'48 CJ2A Lefty "Common sense is not that common" |
||
|
||
|
DAAN
Member
Joined: 02 Jan. 2019 Location: UK Status: Offline Points: 43 |
Post Options
Thanks(0)
Quote Reply
Posted: 09 Oct. 2023 at 5:17am |
|
A very British way of saying it was easy. Not sure what the American equivalent would be! Daan
|
||
|
1990 Mahindra
|
||
|
||
|
Bruce W
Member 

Joined: 29 July 2005 Location: Northeast Colorado Status: Offline Points: 9653 |
Post Options
Thanks(1)
Quote Reply
Posted: 09 Oct. 2023 at 10:22am |
|
A piece of cake? BW
|
||
|
It is NOT a Jeep Willys! It is a Willys jeep.
Happy Trails! Good-bye, Good Luck, and May the Good Lord Take a Likin' to You! We Have Miles to Jeep, Before We Sleep. |
||
|
||
|
willyt
Member

Sponsor Member Joined: 31 July 2018 Location: Seneca,SC Status: Offline Points: 517 |
Post Options
Thanks(1)
Quote Reply
Posted: 09 Oct. 2023 at 10:56am |
|
|
“Nuthing to it”
|
||
|
1952 CJ3A (Lil'Green)
early M38A1(Ole Green) 1970 Jeepster Commando |
||
|
||
|
rocnroll
Member
Sponsor Member Joined: 20 July 2005 Location: Tuscumbia, AL Status: Offline Points: 13612 |
Post Options
Thanks(1)
Quote Reply
Posted: 09 Oct. 2023 at 12:12pm |
|
|
"Easy peasy"
|
||
|
'47 CJ2A PU
'48 CJ2A Lefty "Common sense is not that common" |
||
|
||
|
Mark W.
Member

Sponsor Member Joined: 09 Nov. 2014 Location: Silverton, OR Status: Offline Points: 7986 |
Post Options
Thanks(0)
Quote Reply
Posted: 10 Oct. 2023 at 4:04pm |
|
|
At the speeds your talking about driving your steering will become very very sensitive. With the jeeps high CG and a wheelbase 14.5" shorter then a classic VW bug. A quick movement of the wheel can put you on your side. To this end I strongly suggest a very slow ratio steering box like a Saginaw 525 manual box. And no way would I run a power steering box unless it had a 24-1 ratio. If you have never driven a rig with a high center of gravity and a super short wheelbase go at it slowly its not the same as a modern vehicle. Combine this with ND tires and at the speeds your talking about you will be running right on the very edge. The other thing to worry about is the windshield if you are going to run a MB or 2A type windshield a blast down the hwy at 80mph is likely to fold it up on you. I have run my much stronger 3A windshield at 70mph and it caused damage to the joint between the front sheet metal and the frame. And this was only for a few miles. If you want sustained 70mph and bursts to 80mph your going to need to seriously brace your windshield. Having it break and fold back on you at speed would not be a fun thing. Even sustained 60mph is hard on the windshields. One of the reasons I have been building a hard top is to support the windshield. Hope this helps avoid problems
Edited by Mark W. - 10 Oct. 2023 at 4:05pm |
||
|
Chug A Lug
1948 2A Body Customized 1949 3A W/S 1957 CJ5 Frame Modified Late 50's 134L 9.25"clutch T90A D18 (1.25") D44/30 flanged E-Locker D25 5.38 Since 1962 |
||
|
||
|
DAAN
Member
Joined: 02 Jan. 2019 Location: UK Status: Offline Points: 43 |
Post Options
Thanks(0)
Quote Reply
Posted: 11 Oct. 2023 at 5:02am |
|
Mark, many thanks for your reply. Yes, I am aware of the windscreen problem, was hoping to fit a roll cage for the MB windscreen to lean against. (apart from its obvious function). Main problem still is how the soft top would behave, as the wind forces on this at higher speeds will be very great. I have many years of experience of driving my 88" landy at motor way speeds on 35" tyres, so I am aware of the problems. Steering box is Range rover P38, I don't see a problem with using this, although a steering damper and good castor angle are crucial in my experience. Tyres, I am planning to get Goodrich MT's in 7.50x16 size, and I have a set of tubeless rims for them. Motorway speed is 70MPH in the UK, and going slower is a problem; 60 would still be ok, but any slower, is dangerous in this rushed country where I live. But of course the car has to be safe to do it. I am fully aware this is no race car, but as I don't trailer, a reasonable speed is what I need to get anywhere on time!
|
||
|
1990 Mahindra
|
||
|
||
|
DAAN
Member
Joined: 02 Jan. 2019 Location: UK Status: Offline Points: 43 |
Post Options
Thanks(0)
Quote Reply
Posted: 28 Nov. 2023 at 2:29pm |
|
|
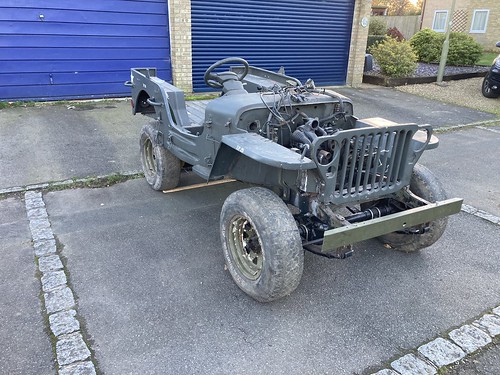
With the exhaust done, it is time to get the body fitted. My brother-in-law came over from Prague with his 2 lads to come and visit Goodwood FOS, so I had 3 bodies at my disposal to lift the tub on:
I knew it essentially fits, but a
few details need modding: one body mount on the chassis needs to move 30mm
forward:
The gear tower on the gearbox sits higher and therefore needed a larger hole
cutting in the tunnel.
This is essentially all it needs to fit the M38 body on to the Mahindra
chassis. Further mods were needed as a result of fitting the PAS box and the VW
engine. The body mount clashes with the oil filter, solved using a grinder:
The PAS box is clashing with the RH front wing. There is a large speed bulge
for the battery, and this almost clears the PAS box. I just needed to move the front
joggle forwards by 50mm:
On the LH side, the PAS pump pully interferes with the wing. I did a big cut out where the reinforcement rib is and made this the location of a step in the vertical portion of the wing. An intended dent is there to avoid the PAS pump feed pipe, and I extended the cut out for the shock absorber:
The Willys grille just bolts onto the Mahindra grille mounts, but there is a
3rd mount in the middle on the Willys grille, which the Mahindra
chassis does not have, so I made a bracket (no picture)
It now looks like a proper car, which is a great motivator. I think the
front height looks about right, but the rear sits far too high. Not sure yet
what to with that yet:
Thanks for reading! |
||
|
1990 Mahindra
|
||
|
||
|
Post Reply
|
Page <12 |
| Tweet |
| Forum Jump | Forum Permissions You cannot post new topics in this forum You cannot reply to topics in this forum You cannot delete your posts in this forum You cannot edit your posts in this forum You cannot create polls in this forum You cannot vote in polls in this forum |


 Topic Options
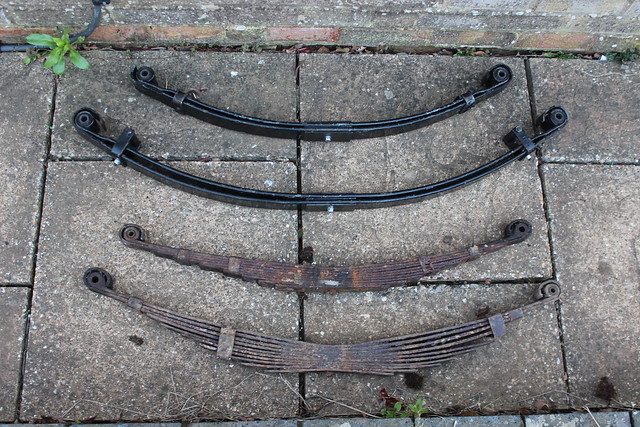


 dasvis wrote: