


|
|
|
Mazda Rotary Wankel Swap Willys |
Post Reply 
|
Page <1234 10> |
| Author | |
Millennium falcon 
Member 

Joined: 20 Sep. 2016 Location: Central PA Status: Offline Points: 1521 |
 Post Options Post Options
") Thanks(0) Thanks(0)
 Quote Reply Quote Reply
 Posted: 10 Jan. 2023 at 8:20pm Posted: 10 Jan. 2023 at 8:20pm |
|
Thanks for the info 👍 The research, and development, trial and error and making little tweaks as I go are more fun to me than any part of it. I’ve been doing tons of research on rotary’s it’s nice they’ve been around so long there is a lot of good info and videos out there too! It all goes along with what you said. I have been developing this plan for well over a year now and have it pretty well laid out… I think…
Someone asked about the l-134. There was nothing wrong with it. I just like to do engine swaps 😆 the original is not for sale. I will be keeping it for another project. This is out of order but here’s another video. I started this project and video series long before the thread so I’m finding stuff as I go. Edited by Millennium falcon - 10 Jan. 2023 at 10:01pm |
|
 |
|
|
Nick_
Member
Sponsor Member Joined: 05 May 2014 Location: Indiana Status: Offline Points: 1138 |
Post Options
Thanks(0)
Quote Reply
Posted: 10 Jan. 2023 at 10:36pm |
|
Great info by Dutch. Mentioning some parts businesses, I'd like to add the the RX-7 world is full of scammers and shops who never fulfill promises. It's becoming unbearable and a giant inside joke within the community. If you spend some time in the forums and Facebook group you'll find many people (such as myself) who have been scammed of thousands of dollars from "reputable" shops whether it be engine builds, parts, etc.
Never, ever buy from Elite Rotary in Chicagoland or RPM in Maryland who filed bankruptcy and changed their name from Rotor Piston Motorsports with an "s" to Motorsportz with the "z" to sneakily avoid lawsuits from customers who they screwed over. For every reputable place, there's about 3 bad ones. With your engine staying almost stock I'm sure you'll never run into these issues, but I feel obligated to throw my experiences out there.
Edited by Nick_ - 10 Jan. 2023 at 10:37pm |
|
|
|
|
Flatfender Ben
Member

Joined: 13 July 2014 Location: Nyssa OR Status: Offline Points: 2657 |
Post Options
Thanks(0)
Quote Reply
Posted: 14 Jan. 2023 at 9:31pm |
|
This is awesome!!
Thanks for taking us along with your build!
|
|
|
1946 cj2a desert dog
1946 cj2a bulldog 1948 cj2a blue jeep 1953 cj3b yard dog 1955 willys wagon 1955 willys pickup 1956 willys pickup boomer 1960 fc 170 1968 jeepster commando 1990 Grand wagoneer |
|
|
|
|
Chicodave
Member
Joined: 13 May 2019 Location: Chico, Tx Status: Offline Points: 96 |
Post Options
Thanks(0)
Quote Reply
Posted: 16 Jan. 2023 at 4:20pm |
|
It a Mazillys LOL :)
|
|
|
1949 CJ3a "Crap Game"
1951 Willys Truck 1950 Studebaker 2R5 1952 Chevy 3100 5 window |
|
|
|
|
Tom in RI
Member
Joined: 07 May 2009 Location: RI Status: Offline Points: 1126 |
Post Options
Thanks(0)
Quote Reply
Posted: 17 Jan. 2023 at 2:18pm |
|
Really like the top on that jeep!
|
|
|
|
|
chasendeer
Member
Joined: 24 Feb. 2012 Location: Napa,CA Status: Offline Points: 1088 |
Post Options
Thanks(0)
Quote Reply
Posted: 22 Jan. 2023 at 4:17pm |
|
Seth
Any progress reports? Jay
|
|
|
|
|
Millennium falcon
Member
Joined: 20 Sep. 2016 Location: Central PA Status: Offline Points: 1521 |
Post Options
Thanks(0)
Quote Reply
Posted: 22 Jan. 2023 at 4:34pm |
Yes tons of progress…. Not sure the neysayers will be able to handle it though! 😆 jk, I’ve been working a lot and haven’t had time to make a post. I’ll try to make an update soon.
|
|
|
|
|
Bruce W
Member 

Joined: 29 July 2005 Location: Northeast Colorado Status: Offline Points: 9652 |
Post Options
Thanks(0)
Quote Reply
Posted: 22 Jan. 2023 at 4:55pm |
|
Ya count me among the naysayers? I’m actually very interested in this. Not that it is anything I would do, but I want to see how it’s done and how it works out.
BW
|
|
|
It is NOT a Jeep Willys! It is a Willys jeep.
Happy Trails! Good-bye, Good Luck, and May the Good Lord Take a Likin' to You! We Have Miles to Jeep, Before We Sleep. |
|
|
|
|
Millennium falcon
Member
Joined: 20 Sep. 2016 Location: Central PA Status: Offline Points: 1521 |
Post Options
Thanks(0)
Quote Reply
Posted: 22 Jan. 2023 at 6:42pm |
I totally understand that this swap isn't for everyone but i'm happy to have people follow along even if its just for entertainment value lol... I completely expected some flak for this swap.... after all it its weird and far from practical but Its something Ive always wanted to try. I also figured this page doesn't need another 4.3 or dauntless swap. (not that there's anything wrong with them...but they are well documented) So...enough with the blabbing.. on to the controversial pictures that will cause peoples eyes to twitch and light keyboards on fire across the nation haha!
|
|
|
|
|
Millennium falcon
Member
Joined: 20 Sep. 2016 Location: Central PA Status: Offline Points: 1521 |
Post Options
Thanks(0)
Quote Reply
Posted: 22 Jan. 2023 at 7:21pm |
|
Assuming most of you watched the video and are aware i'm using the rx7 5-speed with a divorced samurai transfer case. I'm using an s5 rx7 trans which was a an upgraded version of the 1st gen and early 2nd gen 5-speeds. It is more than up to the task of sending this jeep down the trail with 160hp in front of it. It has a 3.6:1 first gear and is fully synchronized and has a nice overdrive gear as well. The reason I went with the samurai transfer case is because its tiny, divorced, proven, parts are readily available, and most importantly it has the gearing that is going to make this thing perform. I went with trail gear 6.5:1 gear and hardened upgraded input/output shafts with the updated 4wd dogs. This will give me a groovy 126:1 crawl ratio. But the real treat is that the 6.5 gears offer a 1.7:1 reduction in high range as well which would be horrible for an L-head but its perfect for the rotary. It will put the engine around 4200 rpm at 60 mph.
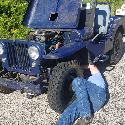
Because of the divorced cased I dont need to make a transmission adapter like I did with my TDI swap. I simply have to connect the t-case to the 5-speed and keep it as short as possible. Keeping the word "short" in mind is key... This drivetrain is around 63" long. So in an 80" wheelbase you have to get creative. A normal divorced transfer case with have the transmission and transfer case each utilizing their own individual mounts that allow them to move independently of each other. There would be a small driveshaft with 2 u-joints connecting the two. I don't have the space for that so..... I will be connecting the two units directly together via a precision machined baby little itty bitty solid mount shaft. I know what you're going to say... "that'll rip itself apart" But hear me out... If the output and the input are joined with zero runout and the they are connected in a way that allows the entire drivetrain to move as one underload then all is well.... And also keep in mind as everyone has also told me many times "rotaries make zero torque" haha! 0 ft.lbs. of torque never broke a drivetrain. haha! And most importantly remember, i'm doing this experiment with my money and time so you don't have to. lol enjoy. Take a deep breath because this is the part you aren't going to like. Haha!!! Lets get started. 1st I need a samurai drive flange.  I cut the u- joint ears off of it.  Then take the rx-7 driveshaft as a donor for the male part. This transmission uses a slip yoke which will aid in assembly and provide movement in and out that will prevent thrust damage concerns.  We have the two parts to get started.   I turned the flange and yoke down to create an extremally tight pressed fit.  I heated the flange and froze the shaft then pressed them together.   I then chucked it in the lathe and checked for runout. I tig welded it in the lathe and can confidently report runout is less than .001 on the face and the hub pilot. Here is the finished product.     Next up will be the transmission/transfer case cradle, special companion mounting and driveshafts. I have progressed far beyond these pictures and will upload more soon! Thanks for watching! |
|
|
|
|
oldtime
Member

Joined: 12 Sep. 2009 Location: Missouri Status: Offline Points: 4186 |
Post Options
Thanks(0)
Quote Reply
Posted: 22 Jan. 2023 at 7:34pm |
|
Following along so far.
This fiasco makes me think of.
Willy Wankel & the chocolate factory ! The Oompa Loompas are taking notes ! Edited by oldtime - 22 Jan. 2023 at 7:37pm |
|
|
Currently building my final F-134 powered 3B .
T98-A Rock Crawler using exclusive factory parts and Approved Special Equipment from the Willys Motors era (1953-1963) Zero aftermarket parts |
|
|
|
|
Bruce W
Member
Joined: 29 July 2005 Location: Northeast Colorado Status: Offline Points: 9652 |
Post Options
Thanks(0)
Quote Reply
Posted: 22 Jan. 2023 at 7:55pm |
|
I fully understand the desire to do something different. I’ve been that way since I was a kid. The Chevies, Buicks and Pintos are yawn-inducing. I wanted to do a Vega 4 swap just to thunb my nose at the Pinto crowd, but can’t find an engine (wonder why 🤪?). I guess my desire to be different explains why my jeeps are 100% original, yet still used. Who else does that? Anyway, keep up the good work.
BW
|
|
|
It is NOT a Jeep Willys! It is a Willys jeep.
Happy Trails! Good-bye, Good Luck, and May the Good Lord Take a Likin' to You! We Have Miles to Jeep, Before We Sleep. |
|
|
|
|
Scratch
Member

Joined: 30 July 2019 Location: Hudson, WI Status: Offline Points: 1457 |
Post Options
Thanks(0)
Quote Reply
Posted: 23 Jan. 2023 at 1:51pm |
|
Thanks for the update. I’m excited to see how you like it. Something different than the usual swap and if it works out well, could open minds up to other options not considered. Very interesting!
|
|
|
43 GPW 93487 Blk
44 GPW 230283 OD 46 CJ2A 50100 Tan 46 CJ2A 77632 Wht 47 CJ2A 141681 Grn 48 CJ2A 156240 Red/Yel 48 CJ2A "Lefty" 181341 Red 61 CJ5 123120 Tan 03 TJ Inca Gld |
|
|
|
|
Millennium falcon
Member
Joined: 20 Sep. 2016 Location: Central PA Status: Offline Points: 1521 |
Post Options
Thanks(0)
Quote Reply
Posted: 25 Jan. 2023 at 11:07am |
|
Update:
The motor mounts are done. I had to remove the stock willys mounts and weld in some new ones.  Then I got to work prepping, and cleaning the engine. I'm not doing any major engine work at this time, but I am re-sealing to oil pan, Deleting the Oil metering system to run premix fuel. I'm also Making injector delete plugs and a few other miscellaneous things. The tiny details definitely take up a lot of time.    I snapped a photo when the oil pan was off....Thought you guys would get a kick out of this... Its a little different than a conventional engine. The inside of the engine looked very clean.  I've been busy doing lots of fabrication for all the mounts and cradles.  As I said earlier I'm using 6 of the same mounts.. 2 on the engine, 2 on the trans and 2 on the transfer case. This will allow everything to mover together and minimize stress on any one component.  Trying to keep everything high and tight.  The exhaust will be passing through above the t- case mount on this side. so the bracing had to be kept back towards the frame.  This is where the shifter lands. It fairly ergonomic...its about 5" farther back than the old transmission. I will extend it and try to make it look like an old jeep shifter. The transfer case will have twin sticks poking up just to the right and slightly aft the main transmission.  I found a manufacturer that sells something that has made my life a lot easier. It is a conversion flange to allow samurais to run a 1310 u-joint. This allows me to re-use my jeep driveshafts. I completely lucked out.... it was not planned at all but the drivetrain worked out perfectly and the 4-speed driveshafts I removed fit perfectly after installing the 1310 conversion flanges.... Guess I better buy a lottery ticket. This is the one part of this swap that wont require fabbing! haha! I better enjoy it! :)    Driveshaft length and angle remains the same as it was with my sm420 setup. :) The next step is to rebuild the transfer case and install the 6.5 gears, HD shaft, twin stick and install it on the trans cradle. Ill post more detains on that soon!  |
|
|
|
|
Millennium falcon
Member
Joined: 20 Sep. 2016 Location: Central PA Status: Offline Points: 1521 |
Post Options
Thanks(0)
Quote Reply
Posted: 25 Jan. 2023 at 11:11am |
|
Here's Part 3 of the video series as well.
|
|
|
|
|
Lee MN
Member

Joined: 13 Aug. 2008 Location: Harris, MN Status: Offline Points: 4953 |
Post Options
Thanks(0)
Quote Reply
Posted: 25 Jan. 2023 at 2:13pm |
|
Very nice work & Creativity 👍🏽👍🏽👍🏽👍🏽👍🏽
Lee 
|
|
|
LEE
44 GPW-The Perfected Willys 49 2A “If you wait, you only get older” 67 M715 American Made Rolling History |
|
|
|
|
rocnroll
Member
Sponsor Member Joined: 20 July 2005 Location: Tuscumbia, AL Status: Online Points: 13610 |
Post Options
Thanks(0)
Quote Reply
Posted: 25 Jan. 2023 at 7:03pm |
|
After seeing that engine shot you just know I would have had to put it in a 3B body and machined the l off....just because.
 Interesting project. |
|
|
'47 CJ2A PU
'48 CJ2A Lefty "Common sense is not that common" |
|
|
|
|
Millennium falcon
Member
Joined: 20 Sep. 2016 Location: Central PA Status: Offline Points: 1521 |
Post Options
Thanks(0)
Quote Reply
Posted: 26 Jan. 2023 at 8:48am |
|
More little details... Since Im running aftermarket fuel injection and manifold I needed to delete the stock injectors.
 But I refuse to pay what the online manufacturers are charging.... $50-$90 for $5 worth of aluminum. Pass!   My "kit" looks better anyways! haha!    On the flip side Banzai Motorsports has their Oil metering pump delete kit at a very reasonable price so I saved some time and let them do the hard part on that one. Comes with laser cut plat, bolts anodized aluminum plugs with banjo washers.   |
|
|
|
|
Post Reply
|
Page <1234 10> |
| Tweet |
| Forum Jump | Forum Permissions You cannot post new topics in this forum You cannot reply to topics in this forum You cannot delete your posts in this forum You cannot edit your posts in this forum You cannot create polls in this forum You cannot vote in polls in this forum |


 Topic Options
 chasendeer wrote: