


|
|
|
MB/GPW Windshield Cover Project |
Post Reply 
|
Page 12> |
| Author | |
hopps1945 
Member 
Joined: 18 Jan. 2009 Location: Nine Mile Falls Status: Offline Points: 67 |
 Post Options Post Options
") Thanks(0) Thanks(0)
 Quote Reply Quote Reply
 Topic: MB/GPW Windshield Cover Project Topic: MB/GPW Windshield Cover ProjectPosted: 17 Feb. 2014 at 2:56am |
|
Well, today I started to work on a 'draft' of a windshield cover for the MB/GPW jeeps. Since my MB is getting closer to being finished, I figured it would be a good time to start playing with the design. Years ago I picked up a copy of a Ford drawing of the windshield cover. It gives me most of the dimensions I need, leaving a few to figure out with trial and error. On the advice of Jeff I will post my project here for all to see and maybe throw in a few tips and advice as I go
 . . On a side note, did Willys make a windshield cover for the CJs? I'll post some pictures later tonight. |
|
 |
|
|
zooke581
Member
Joined: 18 Feb. 2013 Location: Pilot, VA Status: Offline Points: 871 |
Post Options
Thanks(0)
Quote Reply
Posted: 17 Feb. 2014 at 3:01am |
|
I can't imagine Willys making a windshield cover for the CJ as the cover was used to stop reflection of light to enemy aircraft in WWII.
|
|
|
General William C. Lee Chapter of the 101st Airborne Division Association. B Btry 1/321 FA 76-78
http://va101stairborne.com http://sundialmotosports.com http://kalamals.com |
|
|
|
|
hopps1945
Member
Joined: 18 Jan. 2009 Location: Nine Mile Falls Status: Offline Points: 67 |
Post Options
Thanks(0)
Quote Reply
Posted: 17 Feb. 2014 at 3:58am |
|
Yeah, thought about that after I posted the question....
 |
|
|
|
|
zooke581
Member
Joined: 18 Feb. 2013 Location: Pilot, VA Status: Offline Points: 871 |
Post Options
Thanks(0)
Quote Reply
Posted: 17 Feb. 2014 at 4:04am |
|
Post up a pick of your cover as I may be interested in one.
|
|
|
General William C. Lee Chapter of the 101st Airborne Division Association. B Btry 1/321 FA 76-78
http://va101stairborne.com http://sundialmotosports.com http://kalamals.com |
|
|
|
|
Mike S
Member
Joined: 20 May 2006 Location: West Coast Status: Offline Points: 2318 |
Post Options
Thanks(0)
Quote Reply
Posted: 17 Feb. 2014 at 4:46am |
|
A nice accessory for towing your Jeep, I think.
|
|
|
'47 CJ2A -- #114542
Warn FF D41 rear Lock-Right locker 11" drum brakes Dual master cylinder T90C Transmission 16 X 6 Jeep truck wheels Cooper STT Pro tires |
|
|
|
|
Bruce W
Member 

Joined: 29 July 2005 Location: Northeast Colorado Status: Offline Points: 9652 |
Post Options
Thanks(0)
Quote Reply
Posted: 17 Feb. 2014 at 5:12am |
|
I can see where something like this might come in handy at the Fall Colors Tour!
|
|
|
It is NOT a Jeep Willys! It is a Willys jeep.
Happy Trails! Good-bye, Good Luck, and May the Good Lord Take a Likin' to You! We Have Miles to Jeep, Before We Sleep. |
|
|
|
|
hopps1945
Member
Joined: 18 Jan. 2009 Location: Nine Mile Falls Status: Offline Points: 67 |
Post Options
Thanks(0)
Quote Reply
Posted: 17 Feb. 2014 at 7:35am |
|
So went out and tinkered on this a bit tonight. Remember the saying 'Measure twice cut once' well I didn't follow that too well and ended up with one of my main pieces not square...
 That's what I get for having an adult beverage before starting the project.... I was able to at least salvage most of it and get a chance to work on the technique. Luckily I have about 60 yards of crap material I use for testing new stuff. So no loss on my part. I'll try and do my best to document the process here. That's what I get for having an adult beverage before starting the project.... I was able to at least salvage most of it and get a chance to work on the technique. Luckily I have about 60 yards of crap material I use for testing new stuff. So no loss on my part. I'll try and do my best to document the process here.First off, here is what I am using for a sewing machine:  It is a Consew 206RB-5 Triple Feed industrial machine. The triple feed means that the lower feet move, the foot moves and the needle moves. All three move in unison to move the material. Just picked this beast up a couple of days ago. Still trying to get used to it! A far cry from my other machine that you can see in the background. It is a 1950s Necchi industrial, non-walking foot. I started with cutting the top and bottom panels and then sewn them together.  There will be a reinforced area for the windshield adjustment arms and holes for the windshield hold down latches.  There is another reinforcement piece that runs the length of the top of the windshield. It starts at the seam made earlier and goes about 5 inches out then folds over itself and comes back, covering the first seam made when the two pieces were sewn together.  After sewing this in, I came to the conclusion that I can incorporate this into the bottom panel.  The raw edge of the bottom panel and the raw edge of the reinforcement piece butt together and are hidden under everything when the reinforcement piece is folded back over. This would element the hassle of trying to sew it in and nobody would know unless they took it part. So after that is all sewn in, the top is triple the thickness, nice and sturdy!  Next I measured out where the hole for the latch goes.  I cut it, folded it in on itself to hide the raw edge and sewn it in place.  Test fit it to the windshield frame and perfect size hole!  Before I called it a night, I cut out what the bottom corner will look like when finished.  So this was good practice. I'll work on this during the week making another one (making sure I measure twice before I cut!) Once I feel things will work out, I'll move on to the correct material. |
|
|
|
|
misterberry
Member

Joined: 27 Jan. 2006 Location: Edmonton Canada Status: Offline Points: 683 |
Post Options
Thanks(0)
Quote Reply
Posted: 17 Feb. 2014 at 4:41pm |
|
I admire your initiative ....and your results!
I am trying to figure out all of the niggly little points of getting together for making a top using the precise dimensional work that jpet has done. Reading this thread just stirred me up again.....I sure hope I can source good canvas now that I'm back in Canada - coming back after 10 years I feel a bit "lost" and confused..... Edited by misterberry - 18 Feb. 2014 at 2:49am |
|
|
James Berry
'48 2A ser.187593 "Jeep Jeep" It's a "Lefty".... Moved north from California- Now waving the Canadian flag - A Canuck back home in Edmonton |
|
|
|
|
hopps1945
Member
Joined: 18 Jan. 2009 Location: Nine Mile Falls Status: Offline Points: 67 |
Post Options
Thanks(0)
Quote Reply
Posted: 17 Feb. 2014 at 10:51pm |
|
Glad I could be of service misterberry to get you wanting to work on yours. For what seemed like a daunting task, is turning out to be not so bad.
|
|
|
|
|
hopps1945
Member
Joined: 18 Jan. 2009 Location: Nine Mile Falls Status: Offline Points: 67 |
Post Options
Thanks(0)
Quote Reply
Posted: 18 Feb. 2014 at 3:57am |
|
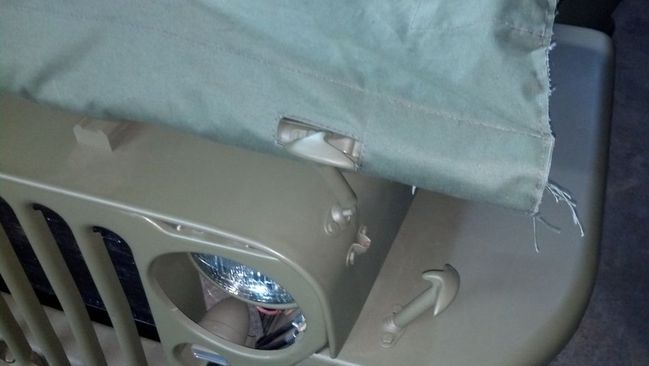
Didn't get to do much today. I did sew in the side panel and test fitted it on the windshield frame.
 Everything seems to fit in place. The reinforcement piece ended up over the windshield arm. That's a good thing! Need to tweak a few measurements as I had to make an educated guess on a few. Overall happy with the process. I did start cutting new pieces today and incorporated the reinforcement piece along the top as part of the rear panel. The way everything is put together, you would not know the different. Saves me a step in the process. Hopefully tomorrow, if I get the chance, I should be able to get the rest of the pieces cut and maybe start the assembly process. I also learned that I need to make some changes in my work area to accommodate a larger project. I'm not setup for something this big. No problem, I can adapt and overcome!  |
|
|
|
|
zooke581
Member
Joined: 18 Feb. 2013 Location: Pilot, VA Status: Offline Points: 871 |
Post Options
Thanks(0)
Quote Reply
Posted: 18 Feb. 2014 at 4:06am |
|
Nice work. Had an old Necchi myself. It was basically for sewing hats and such. No walking foot. When I used my first walking foot, it was so fast I thought I was going to sew through my fingers. Once I got the hang of it they are great. Need to find one.
|
|
|
General William C. Lee Chapter of the 101st Airborne Division Association. B Btry 1/321 FA 76-78
http://va101stairborne.com http://sundialmotosports.com http://kalamals.com |
|
|
|
|
F Bill
Member
Sponsor Member x 2 Joined: 05 Dec. 2005 Location: central Texas Status: Offline Points: 7752 |
Post Options
Thanks(0)
Quote Reply
Posted: 18 Feb. 2014 at 4:16am |
|
That is a sweet Consew...And nice work on the cover.. Never thought of it as a necessity for trail riding but it looks like Bruce needs one badly!
|
|
|
If you haven't checked out the tech FAQ section, go to:
http://www.thecj2apage.com/forums/tech-faq_forum57.html for a lot of great stuff you need to know!! |
|
|
|
|
hopps1945
Member
Joined: 18 Jan. 2009 Location: Nine Mile Falls Status: Offline Points: 67 |
Post Options
Thanks(0)
Quote Reply
Posted: 18 Feb. 2014 at 4:23am |
Ha! I totally agree!! After using my Necchi for the last few years (no walking foot also) and going to the Consew, holy crap!  I feared for my fingers!! Starting to get the hang of it though. I feared for my fingers!! Starting to get the hang of it though. |
|
|
Nick
1943 GPW 1945 MB |
|
|
|
|
hopps1945
Member
Joined: 18 Jan. 2009 Location: Nine Mile Falls Status: Offline Points: 67 |
Post Options
Thanks(0)
Quote Reply
Posted: 18 Feb. 2014 at 5:31am |
Thanks! I am really diggin' the Consew. I have to thank Jpet as watching his posts and getting recommendations from him on machines is what got me to this one. Plus tons of research on this machines. Consew seems to be a great machine to have with tons of attachments too! |
|
|
Nick
1943 GPW 1945 MB |
|
|
|
|
hopps1945
Member
Joined: 18 Jan. 2009 Location: Nine Mile Falls Status: Offline Points: 67 |
Post Options
Thanks(0)
Quote Reply
Posted: 19 Feb. 2014 at 4:10am |
|
So tonight I started from scratch and things chugged along fairly well. Incorporating the reinforcement piece across the top into the rear panel really made things go smooth. I was worried when it came time to cut in the holes for the hold downs to go through..... To my surprise, they were spot on!!!
  So far all my measurements that I had to figure out seem to be working. Got one of the side panels in tonight and will need to make some adjustments to the other side before I sew it in. Once the finally tweaks are done, I think I will be ready to go. So exciting! The snap closures that are shown in the drawing, I have not seen before. Tomorrow I'll snap a picture of it to see what you guys think. Looking at the other people making these, they are either using common sense fasteners or lift-the-dots. Since I am already using Lift-the-dots on another item I make, I'll use them on here too. I will have to see if my buddy has a CJ2 windshield frame lying around so I can see what modifications I need to make to this design so it will work on that frame. |
|
|
Nick
1943 GPW 1945 MB |
|
|
|
|
hopps1945
Member
Joined: 18 Jan. 2009 Location: Nine Mile Falls Status: Offline Points: 67 |
Post Options
Thanks(0)
Quote Reply
Posted: 22 Feb. 2014 at 2:05pm |
|
Finished up the prototype (minus fittings) last night. I tried it out on a buddy's jeep. When I actually make it, it will be trimmed with bias tape and finished with Lift-The-Dot fasteners. Sadly, the original style of fasteners are not available. I'm happy with the outcome and cannot wait to make one.
   So the next step is to modify it to fit a CJ windshield frame. |
|
|
Nick
1943 GPW 1945 MB |
|
|
|
|
F Bill
Member
Sponsor Member x 2 Joined: 05 Dec. 2005 Location: central Texas Status: Offline Points: 7752 |
Post Options
Thanks(0)
Quote Reply
Posted: 22 Feb. 2014 at 3:49pm |
|
What is involved in the modification? Just allow for the extra height? Looking good! |
|
|
If you haven't checked out the tech FAQ section, go to:
http://www.thecj2apage.com/forums/tech-faq_forum57.html for a lot of great stuff you need to know!! |
|
|
|
|
hopps1945
Member
Joined: 18 Jan. 2009 Location: Nine Mile Falls Status: Offline Points: 67 |
Post Options
Thanks(0)
Quote Reply
Posted: 22 Feb. 2014 at 3:58pm |
Well height I believe and don't they secure down in the center of the windshield, not at each end like the MBs? I'm not sure since I don't have a CJ windshield to compare to. I am in search of a local frame to look at. |
|
|
Nick
1943 GPW 1945 MB |
|
|
|
|
Post Reply
|
Page 12> |
| Tweet |
| Forum Jump | Forum Permissions You cannot post new topics in this forum You cannot reply to topics in this forum You cannot delete your posts in this forum You cannot edit your posts in this forum You cannot create polls in this forum You cannot vote in polls in this forum |


 Topic Options
 zooke581 wrote: