


|
|
|
My winter project - Built my own tub |
Post Reply 
|
Page <1234 8> |
| Author | |
philshevlin 
Member 

Joined: 01 Sep. 2011 Location: Greenback, TN Status: Offline Points: 211 |
 Post Options Post Options
") Thanks(0) Thanks(0)
 Quote Reply Quote Reply
 Posted: 23 Dec. 2011 at 6:16pm Posted: 23 Dec. 2011 at 6:16pm |
|
This helps!
 |
|
 |
|
|
bkreutz
Member
Sponsor Member Joined: 17 Oct. 2006 Location: Fruitland Idaho Status: Offline Points: 7037 |
Post Options
Thanks(0)
Quote Reply
Posted: 23 Dec. 2011 at 6:31pm |
|
The hole and bracket behind it are not original. Looks to me like someone added a firewall mounted brake master cylinder and the bracket is for the brake pedal to pivot on.
|
|
|
|
|
philshevlin
Member
Joined: 01 Sep. 2011 Location: Greenback, TN Status: Offline Points: 211 |
Post Options
Thanks(0)
Quote Reply
Posted: 23 Dec. 2011 at 6:35pm |
|
Ah! Thanks.
|
|
|
|
|
sean
Moderator Group 
Sponsor Member Joined: 20 July 2005 Location: North Idaho Status: Offline Points: 7388 |
Post Options
Thanks(0)
Quote Reply
Posted: 23 Dec. 2011 at 7:13pm |
|
Not stock. Looks like master cylinder mounted to the firewall, with a hanging brake pedal inside.
|
|
|
|
|
philshevlin
Member
Joined: 01 Sep. 2011 Location: Greenback, TN Status: Offline Points: 211 |
Post Options
Thanks(0)
Quote Reply
Posted: 23 Dec. 2011 at 11:31pm |
|
Well, its gone now. Getting some patching/welding experience.
  Edited by philshevlin - 23 Dec. 2011 at 11:32pm |
|
|
|
|
philshevlin
Member
Joined: 01 Sep. 2011 Location: Greenback, TN Status: Offline Points: 211 |
Post Options
Thanks(0)
Quote Reply
Posted: 04 Jan. 2012 at 11:14pm |
|
I picked up Mike in Oregon's tailgate repair section and got to work today.
 |
|
|
|
|
philshevlin
Member
Joined: 01 Sep. 2011 Location: Greenback, TN Status: Offline Points: 211 |
Post Options
Thanks(0)
Quote Reply
Posted: 04 Jan. 2012 at 11:17pm |
|
I picked up Mike in Oregon's tailgate repair section and got to work today.
    |
|
|
|
|
F Bill
Member
Sponsor Member x 2 Joined: 05 Dec. 2005 Location: central Texas Status: Offline Points: 7752 |
Post Options
Thanks(0)
Quote Reply
Posted: 05 Jan. 2012 at 2:26am |
|
Nice work..lets see the show side too!
|
|
|
If you haven't checked out the tech FAQ section, go to:
http://www.thecj2apage.com/forums/tech-faq_forum57.html for a lot of great stuff you need to know!! |
|
|
|
|
philshevlin
Member
Joined: 01 Sep. 2011 Location: Greenback, TN Status: Offline Points: 211 |
Post Options
Thanks(0)
Quote Reply
Posted: 11 Jan. 2012 at 11:22pm |
|
The more I look, the more holes I find...
  |
|
|
|
|
Roberto Flores
Member

Sponsor Member Joined: 01 Nov. 2005 Location: Pamplona-Iruña Status: Offline Points: 881 |
Post Options
Thanks(0)
Quote Reply
Posted: 12 Jan. 2012 at 10:31am |
|
Well, but at least you´re still working on it. Keep up the good work!
|
|
|
Roberto Flores
Made to order cartoons, comics...! http://www.robertoflores.com http://www.cafepress.com/robertoflorescartoonist http://www.cafepress.com/theoutliner http://www.zazzle.com/flores67 |
|
|
|
|
Jeeper71
Member
Joined: 14 June 2010 Location: Ohio Status: Offline Points: 384 |
Post Options
Thanks(0)
Quote Reply
Posted: 13 Jan. 2012 at 4:51am |
|
I think your doing good. I too will be doing a tub that is badly beaten and rotted, rather than buy a new one.
|
|
|
Restores Coleman Gas Lanterns and Stoves. Windmill/well pump hobbiest. (Heller Aller, Aermotor). 1946 CJ2A, basket case status. |
|
|
|
|
philshevlin
Member
Joined: 01 Sep. 2011 Location: Greenback, TN Status: Offline Points: 211 |
Post Options
Thanks(0)
Quote Reply
Posted: 13 Jan. 2012 at 11:28pm |
|
Started on the tailgate surround and the rear valance...
     |
|
|
|
|
philshevlin
Member
Joined: 01 Sep. 2011 Location: Greenback, TN Status: Offline Points: 211 |
Post Options
Thanks(0)
Quote Reply
Posted: 14 Jan. 2012 at 11:25pm |
|
Since I have more time than money, I am recycling some of the plate the PO covered the floors with. In this case I used some to fabricate a replacement for the lower tailgate surround and the rear valance brackets.
    |
|
|
|
|
philshevlin
Member
Joined: 01 Sep. 2011 Location: Greenback, TN Status: Offline Points: 211 |
Post Options
Thanks(0)
Quote Reply
Posted: 16 Jan. 2012 at 9:24pm |
|
Well, I decided to attempt to form side panels. I'm hoping my metal forming skills are better than my patching skills. I'm gonna try doing it like Brian did, but with MDF forms as FBill suggested.
 |
|
|
|
|
F Bill
Member
Sponsor Member x 2 Joined: 05 Dec. 2005 Location: central Texas Status: Offline Points: 7752 |
Post Options
Thanks(0)
Quote Reply
Posted: 16 Jan. 2012 at 10:04pm |
|
Don't forget LOTS OF CLAMPS!!! Even use a piece of angle iron to spread the clamping load and clamp that sucker TIGHT before you start. And if you are tracing the old panel, remember to leave an allowance for the bent up lips and bent over inner piece.
|
|
|
If you haven't checked out the tech FAQ section, go to:
http://www.thecj2apage.com/forums/tech-faq_forum57.html for a lot of great stuff you need to know!! |
|
|
|
|
philshevlin
Member
Joined: 01 Sep. 2011 Location: Greenback, TN Status: Offline Points: 211 |
Post Options
Thanks(0)
Quote Reply
Posted: 17 Jan. 2012 at 11:05pm |
|
Almost done with the first side panel. I just have to do the top channel. Something I noticed about using MDF, if you have to shrink a decent amount, like the small radius corners, the tucks/folds tend to press into the soft wood. Once that happens, there's no turning back -- and its impossible to shrink it further to remove the folds. I'll have to try to remove them after I take the panel out of the forms.
It definitely would be better if the forms were steel. But so far, this is working pretty good. I also tacked a couple pieces of scrap angle to the top side of the panel. This is to prevent the sheet from getting pulled into the form while I work the bottom side of the panel. It worked perfect. Between the clamps and the tacked angle. The sheet didn't move a millimeter! I mainly used the 3 hammers shown. I have a few more from a project I did a few years ago, but these 3, so far, have been all I needed. 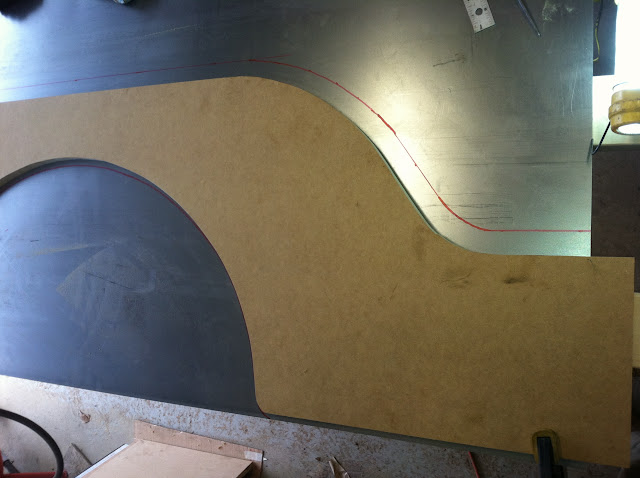    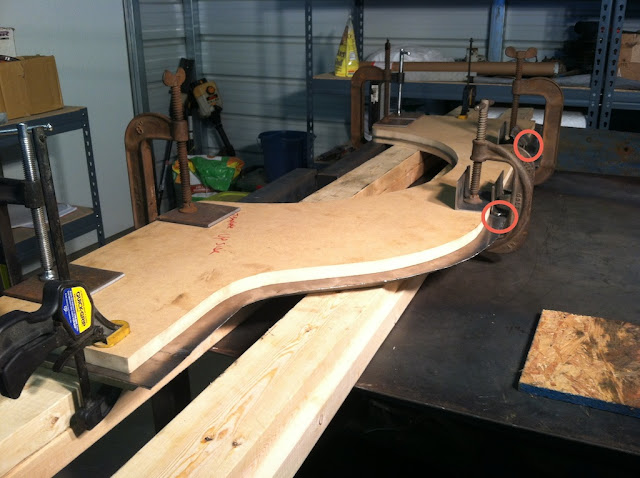     |
|
|
|
|
F Bill
Member
Sponsor Member x 2 Joined: 05 Dec. 2005 Location: central Texas Status: Offline Points: 7752 |
Post Options
Thanks(0)
Quote Reply
Posted: 17 Jan. 2012 at 11:24pm |
|
Looking good so far.. a couple of suggestions, well worth what ya paid....
 MORE CLAMPS....and drop those cheapy bar clamps in favor of some more Heavy duty c clamps. At least where you are hammering you need to clamp the flat surface very well... Go slower and try and bend a little less with each hammer hit...that will help out on those tucks that were forming.... You may find releiving the top hammerform piuece to provide more access may help. I have heard fiberglass resin applied to the raw sawn edges will help stiffen it up some...I have not tried it. You may need a little heat on the reverse curves you will have on the top section.. Gonna be the tough part of the job. Eagerly awaiting the next picture session!
 |
|
|
If you haven't checked out the tech FAQ section, go to:
http://www.thecj2apage.com/forums/tech-faq_forum57.html for a lot of great stuff you need to know!! |
|
|
|
|
philshevlin
Member
Joined: 01 Sep. 2011 Location: Greenback, TN Status: Offline Points: 211 |
Post Options
Thanks(0)
Quote Reply
Posted: 18 Jan. 2012 at 12:09am |
|
Thanks. I am enjoying it. A side benefit is developing Popeye forearms!
I had more clamps, just not in the photos. Two more in the wheel well. Probably no more than 16" apart. I'll add more. I'm not sure, I could go slower on those corners. I put the tucks there with the small end of the teardrop hammer. Then tried to flatten them out. I was using just the weight of the metal hammer -- no real muscle. The problem was -- the tucks pushed into the soft wood immediately. I don't see how you can shrink without a solid backing (dolly) behind the hammer. On the next one, I will try and hold some sheet metal along the edge of the MDF. This should keep the sharp/edges of the tucks from piercing into the MDF
Edited by philshevlin - 18 Jan. 2012 at 12:11am |
|
|
|
|
Post Reply
|
Page <1234 8> |
| Tweet |
| Forum Jump | Forum Permissions You cannot post new topics in this forum You cannot reply to topics in this forum You cannot delete your posts in this forum You cannot edit your posts in this forum You cannot create polls in this forum You cannot vote in polls in this forum |


 Topic Options