


|
|
|
Orange 1946 with f-head |
Post Reply 
|
Page 123> |
| Author | |
jeepingben 
Member 
Joined: 01 Dec. 2013 Location: Central Maine Status: Offline Points: 124 |
 Post Options Post Options
") Thanks(0) Thanks(0)
 Quote Reply Quote Reply
 Topic: Orange 1946 with f-head Topic: Orange 1946 with f-headPosted: 13 Jan. 2014 at 12:06pm |
|
Thank you to everyone on the forum who answered my questions when was deciding whether to buy this jeep late last year. The jeep is #37626, the frame seems to be from a CJ5 and the engine seems to be from a pickup as it has the draft-tube instead of a PCV. Although it is winter here and my garage is unheated I've made a little progress. One of the first things I had to do was drain and replace the coolant as it dropped to -10 up here and the PO had watered down what was in there:   The incredibly loud glasspack exhaust was replaced with a kit from Walcks. Half of the lights were burned out due to a loose battery cable and the headlights were wired completely wrong. Two of four wheels have been cleaned and painted (on the inside only) before swapping on the ndts. Once the tires and springs are changed over I will be able to take it out of the garage to work on it. Then I will start changing fluids. One of these days I will need to put up a wanted ad for a carb that will let me close the hole in the hood. |
|
 |
|
|
tooge
Member

Joined: 07 Feb. 2011 Location: Liberty, Mo Status: Offline Points: 321 |
Post Options
Thanks(0)
Quote Reply
Posted: 13 Jan. 2014 at 6:25pm |
|
or pull that f head. I bought mine with an f head as well. I found a Holley 1904 carb that allowed me to close the hood with a bit of grinding here and there. After driving it around for a year, I pulled the f head, sold it, and found a nice running L head and a new hood.
|
|
|
|
|
willys522000
Member

Joined: 19 June 2012 Location: Huntingdon Pa. Status: Offline Points: 204 |
Post Options
Thanks(0)
Quote Reply
Posted: 13 Jan. 2014 at 8:22pm |
|
X2, my 48 came with the f-head and I went to the L, kept the f though as I have 3 other f-head powered willys in the fleet, spare parts are a good thing. I have nothing against the f, but the sound of the flat does it for me. Mine also came with the short holley which I think is salvageable. Keep us informed. Damn this Winter!!!!!!!!!!!!!!!
|
|
|
|
|
BillF
Member
Joined: 02 Oct. 2005 Location: Hillsborough NH Status: Offline Points: 1133 |
Post Options
Thanks(0)
Quote Reply
Posted: 13 Jan. 2014 at 9:35pm |
|
Nice buy, like I said if you want a set of stock cj5 springs I have them.
|
|
|
1952 m38
|
|
|
|
|
jsteed
Member

Joined: 14 Mar. 2013 Location: Seattle Status: Offline Points: 185 |
Post Options
Thanks(0)
Quote Reply
Posted: 13 Jan. 2014 at 10:16pm |
|
ORANGE JEEP ALERT!!!!! Sorry, that's all I have to add. That and get an L head.
|
|
|
Jordan
------------------------------ No you can't play with my toys! |
|
|
|
|
jeepingben
Member
Joined: 01 Dec. 2013 Location: Central Maine Status: Offline Points: 124 |
Post Options
Thanks(0)
Quote Reply
Posted: 14 Jan. 2014 at 1:08am |
|
My plan for this jeep involves keeping it usable most of the time and moving in the general direction of authentic as things need to be replaced. If the f-head dies or if everything else is finished I will seek an l-head, but for now there is enough work to be done without removing an engine that is working fine.
|
|
|
|
|
jsteed
Member
Joined: 14 Mar. 2013 Location: Seattle Status: Offline Points: 185 |
Post Options
Thanks(0)
Quote Reply
Posted: 14 Jan. 2014 at 1:12am |
|
I hear ya, I'm in the same boat. And actually, after the mechanicals are all sorted out on mine, it may return to its original color!
|
|
|
Jordan
------------------------------ No you can't play with my toys! |
|
|
|
|
jeepingben
Member
Joined: 01 Dec. 2013 Location: Central Maine Status: Offline Points: 124 |
Post Options
Thanks(0)
Quote Reply
Posted: 18 Jan. 2014 at 11:17pm |
|
Thanks Bubba!
 He welded the side gears to the carrier, the side gears to the spider gears, all the gears to the cross shaft. It looks like I will be looking for a front end soon. |
|
|
|
|
smfulle
Member

Sponsor Member Joined: 16 Sep. 2010 Location: Ogden, Utah Status: Offline Points: 6144 |
Post Options
Thanks(0)
Quote Reply
Posted: 19 Jan. 2014 at 12:47am |
|
Truth is, as ugly as it looks, those welded gears will get you out of a mud hole a. lot better that if they weren't welded. And if you only lock your hubs in when you are off road you might not even notice that they are welded.I wouldn't do it. to my rig, but if mine came that way I might just use it as an excuse to try and take on some ridiculously steep or muddy wheeling.
|
|
|
|
|
jeepingben
Member
Joined: 01 Dec. 2013 Location: Central Maine Status: Offline Points: 124 |
Post Options
Thanks(0)
Quote Reply
Posted: 25 Jan. 2014 at 4:13pm |
|
Fabbed a new battery tray this morning.
  I'll be the first to admit it is only 5% less bubba than the old one, but it will let me use real battery hold-downs instead of the bungee cord it came with. I didn't want to spend $$ on an original repro that would weld to my incorrect frame. I think he put in an oversized battery. I may revisit this if the battery dies. I also installed a fuel filter so I can either clean the carter YF that I have and not have it clog again, or not have my new carb clog - I put up a wanted ad for a holley carb to let me close the hole in the hood. Ben |
|
|
|
|
R Qualls
Member

Joined: 27 Feb. 2011 Location: Western NC Status: Offline Points: 447 |
Post Options
Thanks(0)
Quote Reply
Posted: 02 Feb. 2014 at 10:18pm |
|
I run a couple f heads with the short holley carbs, and love them, I live in the mountains and 10 extra horses make a big differance. Also have one with welded axles, and tractor tires, it will climb trees. Good luck with your project.
|
|
|
1946 cj-2A x2, 1951 M38
1954 cj-3B converted to a MB 1955 m38a1 * NRA LIFE MEMBER * |
|
|
|
|
jeepingben
Member
Joined: 01 Dec. 2013 Location: Central Maine Status: Offline Points: 124 |
Post Options
Thanks(0)
Quote Reply
Posted: 14 May 2014 at 1:28am |
|
It was a productive winter and early spring for this jeep. As of today, it is legal and on the road.
Winter projects included the expected: New exhaust New tires New springs and shocks Rewiring the lights Patching some holes cut into the floor Swapping in oil for the icy/watery goo that filled the entire drivetrain Disassembling the carb and re-assembling it correctly to enable the idle circuit + accelerator pump Connecting the air-filter again Adding a fuel filter Adding a tow-bar The not-unexpected: replacing various oil seals draining the diluted coolant in the dark ahead of a cold snap and refilling with 50/50 and some unexpected work: Replacing a bent pushrod Replacing a piston that looks like it lost a fight with a lock-washer Replacing cylinder rings Replacing rod-bearings Rebuilding the parking brake The carburetor replacement and hood-hole closure have been postponed due to the unexpected internal engine work. I drove about 12 miles today in several short trips. There was some good news : No death wobble even after removing the steering stabilizer installed by the PO The jeep is as fun to drive as the MB that got me hooked originally I didn't need the tow-bar to get home And some pretty minor, not-so-good news: I have the typical rear main seal leak and the jeep pours oil on the ground after shutting it off when warm I will be crawling under it and inspecting things before I order the rear main seal to see what rattled loose, broke, or fell off. No pictures today, but I'm sure I will get some soon. Various build pictures are scattered here: http://www.jeepingben.net/zen/zenphoto/index.php?album=2014 |
|
|
|
|
jeepingben
Member
Joined: 01 Dec. 2013 Location: Central Maine Status: Offline Points: 124 |
Post Options
Thanks(0)
Quote Reply
Posted: 29 Dec. 2014 at 8:10pm |
|
The winter 2014 jeep-fixing season has started.
I knew the passenger side rear corner needed replacing so I started forming a patch.  I also started stripping the bondo away so I can get a better idea of what is needed.  There was a piece of angle iron covering the rear lower tailgate surround. It looks like I will be replacing part of the surround and getting rid of the angle. My Jeep has a CJ5 frame with the A in the back cut off, so for now it will look a little goofy with the cutout for a non-existent frame part.  The good news was that the PO didn't seem to own a saw so the front of the toolbox was patched without cutting off the 'Jeep' script. I will be buying a blank toolbox front and saving what I can from the old one.  I removed the top layer of floor patches today. It looks like it was done a long time ago since it has rotted away and was brazed. The newest floor patch is 1/8th inch sheet bolted from the bottom. That will be coming out as well and will be replaced with some new hat channels, a new floor pan, a new cowl brace, and a new gusset for the inside corner. I found half of the floor drain for that side (visible just behind the cowl brace)  . . |
|
|
|
|
Mark W.
Member

Sponsor Member Joined: 09 Nov. 2014 Location: Silverton, OR Status: Offline Points: 7986 |
Post Options
Thanks(0)
Quote Reply
Posted: 29 Dec. 2014 at 9:53pm |
|
DUDE....I to have a CJ2A tub and drive train on a CJ5 frame. I went a little nuts when it came time to cut the frame to fit(it had been this way since before 1962 when my dad bought the jeep) Here is a photo of what I ended up doing (your looking at the frame upside down.) 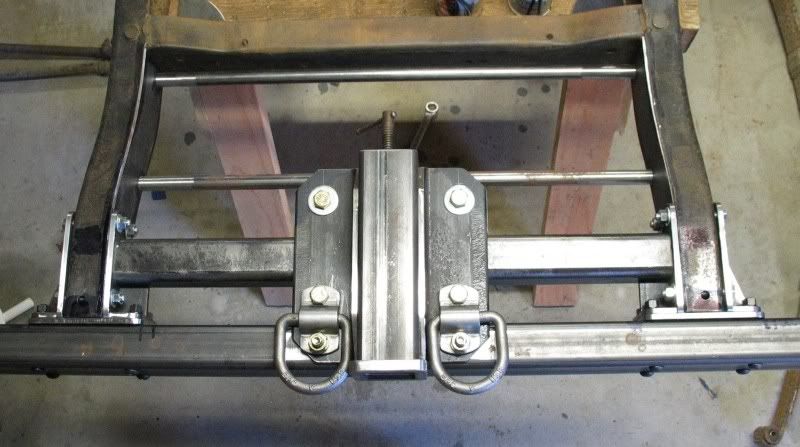 Now one thing I will warn you that if you shorten a CJ5 frame to match a 2A tub you will not be able to use the CJ5 springs. The shackle mount will be out past the rear cross member. I solved that by making my own extended shackle mounts from some 1020 cold finish I had. You can see them here in this view (disregard the air tank). 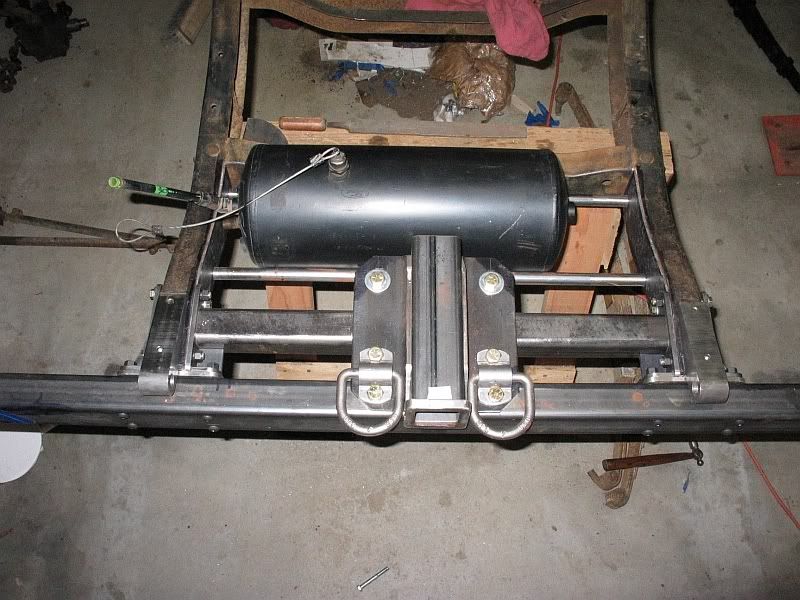 Nothings been welded yet in these photo's since I don't weld all the joints are pinned together to keep them aligned. And I will have a pro that does the fancy welding for us at work come out and in a couple hours he will do everything on the frame at one time. From the rear cross member mounts and boxing to the Saginaw steering mount and Front bumper mounts I have designed. Edited by Mark W. - 29 Dec. 2014 at 9:55pm |
|
|
Chug A Lug
1948 2A Body Customized 1949 3A W/S 1957 CJ5 Frame Modified Late 50's 134L 9.25"clutch T90A D18 (1.25") D44/30 flanged E-Locker D25 5.38 Since 1962 |
|
|
|
|
jeepingben
Member
Joined: 01 Dec. 2013 Location: Central Maine Status: Offline Points: 124 |
Post Options
Thanks(0)
Quote Reply
Posted: 04 Jan. 2015 at 5:02pm |
|
Thanks Mark,
It looks like I will have to do something with the rear of the frame. It looks like I should be able to shorten the frame an inch or two without having to do anything too crazy with the spring mounts.   I have ordered new body mounts so I can take out the '2 peewee hockey pucks' high body lift. If I can move the rear bumper forward just a little, it will look a lot better. I will probably end up notching the bottom of the bumper and overlapping the shackle mounts slightly. I will also be able to put back the 4 rear mounting points to replace the 2 that supported a piece of angle iron at the frame-rails. |
|
|
|
|
jeepingben
Member
Joined: 01 Dec. 2013 Location: Central Maine Status: Offline Points: 124 |
Post Options
Thanks(0)
Quote Reply
Posted: 06 Jan. 2015 at 12:45am |
|
Since the tailgate was removed, this was a good time to clean it up. There was a box brazed to the bottom with a funny looking aluminum trim piece.  Under the trim piece was a healthy layer of bondo which went on before the orange paint. Under the bondo was an old piece of sqare steel that seems to date back to the last major rebuild of this jeep (dark blue).  The square tube was a pretty clever and well executed repair considering that it happened before a nice replacement was available on ebay, but it rusted through and was bubba'ed up with bondo and aluminum.  I cleaned the inside of the top roll of steel with a 20ga shotgun brush, washed it out, and will spray some cold galvanize in there before painting. |
|
|
|
|
jeepingben
Member
Joined: 01 Dec. 2013 Location: Central Maine Status: Offline Points: 124 |
Post Options
Thanks(0)
Quote Reply
Posted: 21 Jan. 2015 at 10:59pm |
|
I took a half-day off today and attacked the tailgate. The piece from mike in oregon was perfect - there was exactly enough to reach sound metal. I put a coat of primer on it so I could see how it looks. There are a couple spots where I need to grind a little, but it is way better than it was.    Since I was at the gas store getting more argon anyway, I picked up some LN2 to make ice-cream.  (Beer and ice-cream to celebrate the rescue of my tailgate. (Beer and ice-cream to celebrate the rescue of my tailgate. |
|
|
|
|
berettajeep
Member

Sponsor Member Joined: 03 Feb. 2009 Location: Astoria OR Status: Offline Points: 4304 |
Post Options
Thanks(0)
Quote Reply
Posted: 22 Jan. 2015 at 2:34am |
|
Well done!
 Yay for beer and ice cream! Yay for beer and ice cream!
|
|
|
|
|
Post Reply
|
Page 123> |
| Tweet |
| Forum Jump | Forum Permissions You cannot post new topics in this forum You cannot reply to topics in this forum You cannot delete your posts in this forum You cannot edit your posts in this forum You cannot create polls in this forum You cannot vote in polls in this forum |


 Topic Options